Application
Configuration and Setup
MC2 will run on almost any modern PC or Citrix/Terminal Server. Our minimum recommended PC is a
Pentium class processor with a clock speed of 300 MHz and 256 MB of RAM. MC2 will run on Windows 98, Windows NT,
Windows 2000, Windows XP, Windows Vista, Windows 7, Windows Server 2000 or
higher and Citrix Server. MC2 is not
supported on Windows 95. We strongly
recommend that operating system patches are applied to ensure optimal
performance. Application response time
and performance are directly tied to PC size, server size, and network
bandwidth.
MC2 requires the following applications to be resident on each client
PC.
·
Microsoft
Office 97 or above (preferably Office 2000 or higher)
·
Internet
Explorer 5.5 or above
Each user’s PC must be properly configured to run MC2. It is important to reconfigure the monitor’s
resolution (1024x768 or higher) and their default email client.
MC2 is designed to run with a minimum screen resolution of 1024 x
768. To minimize the effects of the
change, it is suggested to adjust the default font size to large.
1.
Open
Windows Control Panel
2.
Double
click on Display
3.
Select
settings tab
4.
Change
Setting Tab to 1024 x 768
5.
Select
the Effects Tab
6.
Select
the Large Icons check box
7.
Select
Okay
8.
Exit
The deployment
module must be loaded on the user’s desktops.
Additionally, the database name that links the PC to the AS/400 is tied
to each user who logs in. As a result, a
database name must be created for each user profile that accesses this PC. There is no global setting for all user
sessions. This will need to be setup on
each user’s PC.
The normal PC
installation process should be followed
When downloading the latest build, we do recommend saving the latest
build file before running the setup process.
To install a new build of MC2, it is very important that you have
adequate authority on your PC to properly remove and install files. If it appears that you have done the install
but you are not seeing the latest version, please go to Add/Remove Programs to
make sure you have only one instance of MC2 in your programs list. If
there are two instances, you will need to remove both to do the full
install of the latest version. When you
remove the second instance, you will be prompted to select OK for a missing
file. Select OK until the program has
finished uninstalling. If you have other
issues with the install or need further assistance, please contact
support.
We suggest
enabling network drives for MC2 users.
The MC2 – MD2 Attachments folder will be located on a network drive so
all users will need access to that drive to be able to view and save their
attachments within MC2.
MC2 uses the default e-mail client in Windows. On each client PC, perform the following:
1.
Open
Internet Explorer
2.
Select
tools / Internet Options
3.
Select
the programs tab
4.
In
the e-mail combo box, select your default application
5.
Select
OK and then you may exit
To email from
MC2, the email server must allow relay or you can configure the email server to
allow the MC2 users to relay from their PC’s by their IP address.
MC2 supports mass e-mailing through your existing e-mail server or
individual e-mailing through the user existing e-mail client.
We can use any
SMTP server on your system.
·
It
must be configured for relay. There are many ways this rule can be written to
ensure it complies with your internal standards.
·
If
you are on a Citrix or Terminal Server
you could use a fixed IP address, or we also support ESMTP
authentication
If you are not
going to use SMTP, all you need to do is put the email Server IP Address in the
MC2 Configuration Master.
MC2 can fax directly from the user’s PC via a modem or from the MC2
Fax Server. MC2 uses its own Fax Server
software that requires a dedicated PC with up to twelve modems installed. Other fax options are discussed which may not
require a dedicated PC where a modem is not required.
The configurations are discussed below.
User has fax modem and phone line on their computer.
1. The MC2 Fax should be
installed from the MC2 installation CD to user’s PC.
2. The user’s security profile
(see security section) must be tailored for individual faxing.
3. MC2 will use this fax
printer for all user generated faxes (This does not include Rules).
The user will be responsible for managing their own fax printing.
1. User does not have fax modem
card but will use the MC2 Fax Server.
2. A dedicated PC (with one or
more modems installed) must have the MC2 Fax Server software installed (see MC2
Installation Guide).
3. The Fax Server Installed
Flag must be set in the Company Master File (see Company Master Section). All faxing will be done through this server
once flagged in Company Master.
Company has other faxing system
1. Cforia currently supports Captaris’s RightFax and Quadrant
Software’s FastFax products.
2. Please contact technical
support if your faxing solution is not listed above.
Users can
automatically schedule faxes through the MC2 Fax Server through the
server. The MC2 Automation Engine can be
loaded on the any PC and run directly against the AS/400, but is not
recommended when faxing via modem. . If
you have a supported email integration for MC2, the MC2 Automation may be setup
on a user’s PC.
Microsoft Excel
must be loaded and accessible for each MC2 user. MC2 will instantiate an Excel session when
the user selects an Excel related activity.
MC2 provides its
own word processor. No additional tailoring
is required. MS Word is not required,
but can be called from within MC2 for user convenience.
It is recommended
a default printer driver is installed to allow printing from MC2.
MC2 requires the
following applications to be resident on the Citrix/Terminal Server with the
Cforia Software supports deploying MC2 via Citrix or Terminal Server. This is a standard deployment model for us. MC2 runs perfectly in this environment but
several areas must be considered.
Each user’s Citrix/Terminal Server profile must be properly configured
to run MC2. It is important to
reconfigure the monitor’s resolution (1024x768 or higher) and set the colors to
True Color (24 bit or higher). Highest
color resolution is always recommended.
The deployment
module must be loaded on the Citrix/Terminal Server. Additionally, the database name that links
the PC to the AS/400 is tied to each user who logs in. As a result, a database name must be created
for each user profile that accesses the Terminal Services/Citrix PC. There is no global setting for all user
sessions.
The MC2
installation process is the same for Citrix/Terminal Server as it is for an
individual PC. The normal
Citrix/Terminal Server installation process should be followed
When downloading the latest build, we do recommend saving the latest
build file before running the setup process.
To install a new build of MC2, it is very important to go to Add/Remove
Programs first and remove MC2 before applying the new build. There is no need to remove the ASNA
Deployment from Add/Remove Programs. Of
course, be sure that all users have signed out of MC2 and the Citrix/Terminal
Server before applying the latest build.
We suggest
enabling network drives for MC2 users to store their files generated through
Citrix/Terminal Server for easy access and manageability.
An email client can be installed and configured for each user
profile. Or, there is a ‘Citrix’ option
in the MC2 Configuration Master for Email Client that will use the MC2 email
editor. The MC2 email editor will send
the emails directly through your email server based on the settings in the MC2
Configuration Master.
Microsoft Excel
must be loaded and accessible for each user of MC2 on Terminal
Services/Citrix. MC2 will instantiate an
Excel session when the user selects an Excel related activity.
MC2 provides its
own word processor. No additional
tailoring is required. MS Word is not
required.
We recommend
creating one Citrix or Terminal Services supported printer for each user
location.
The MC2 Fax
Server is unaffected by the Citrix/Terminal Server. Users can automatically schedule faxes
through the MC2 Fax Server through the server.
We do not recommend installing the MC2 Automation to the Citrix/Terminal
Server as this can be difficult to maintain, especially when there are fax
modems involved. The MC2 Automation Engine can be loaded on the any PC and run
directly against the AS/400. If you have
a supported email integration for MC2, the MC2 Automation may be setup on a
Citrix/Terminal Server.
In the MC2
Configuration Master, under the Email/Fax Server tab, you will populate the
E-mail Server field with the SMTP or Email Server IP Address. If you are using Microsoft Exchange Server,
you can setup a universal MC2 email username/password (i.e. MC2USER) that
allows relay. Otherwise, please leave
the username and password fields blank.
Select Update to save.

Once you have
setup email in MC2, to test the email configuration please do the following:
To setup email in
MC2 could take a few interations as each email server settings are different.
Select a letter
in MC2 by double clicking on any customer and select Action à Generate Letter, double click a letter and select merge. (If you have not setup any letter templates,
simply create a test letter by clicking the ‘Create New’ button in the letter
engine and save).
Select the Email
button in the toolbar or File à Send to Email.
Be sure the To
address is outside of your network and the From address is populated.
Select Send.
If your received
a window ‘Email was sent successfully’, the configuration is good.
If you receive an
error, please email the error to [email protected] for further
instruction.
The MC2
Attachments folder is used to store documents and images saved within
MC2/MD2. This folder should be on a
network drive and each user’s PC or Citrix/Terminal Server profiles need to be
given the proper security settings that will allow access to that drive to
read/write.
The MD2
Attachments folder location is defined in the MC2 – Configuration Master.
The MC2 Fax Server is used to output the documents created by the
rules engine. Once the documents are
posted through the rules review process, the automated server executes the
desired action(s). Though we call this a
Fax Server, in actuality it faxes, e-mails and prints documents. The automated process applications must
reside on a dedicated server (see installation manual on proper setup).
1. MC2 Auto Engine.exe
a. This downloads each document from the AS/400,
renders the image and executes the action (print, e-mail or fax).
b. It is executed in one of two ways:
i. The Windows Task Scheduler
ii. Manually
2. MC2 Fax Check.exe
a. This interrogates the fax printer to:
i. Determine the status of each fax
ii. Write the status of the fax back to MC2
b. This moves the completed document from
pending to history on the AS/400
c. Any fax that is sent to the MC2 Fax Server has the document status
of "*SCHED." That status will
not be updated until the MC2 Fax Check.exe is executed.
3. MC2 Fax Server Interface.exe
a. This allows a technician to inquire as to the
status of the fax within the MC2 Fax printer
From the user’s PC:
1. Create a template that generates a customer
document
2. Attach
that template to a sub-rule
3. Execute
the rule
From the MC2 Fax Server:
1. Execute the MC2 Auto Engine.exe
2. When
the MC2 Auto Engine completes then execute the MC2 Fax Check.exe
3. The
status of the documents will be updated within MC2
The MC2 Fax
Server can run on any Pentium class PC (greater than 400 MHz or faster,
preferably 800 MHz) that has one or more standard fax/modems or multi-port
modems. Depending on the number of faxes
you intend on sending out, our fax server supports up to 20 concurrent ports
(modems).
Any
traditional Fax Modem you can pick up from your local Staples, Office Depot,
etc. will be sufficient. The cost should be around $20 to $50, depending on
your selection. Unfortunately, some of the older model modems cannot be
configured to support the MC2 Fax Server requirements. I hope you find this
information helpful. Please do not hesitate to contact me should you have any
further questions.
For detailed
instructions to install/setup the MC2 Fax Server based on your ERP, please
contact support.
Not all
integrations are available in all ERP’s.
Here's what you
will need to do to setup RightFax on the MC2 Fax Server:
1.
Install the RightFax Printer Driver (provided by
RightFax) on the Fax Server that runs the MC2 Auto Engine
a.
Name the RightFax Printer Driver MC2RFX
b.
Configure the RightFax Printer Driver to operate
in "No Popup" mode
2.
Select the "RightFax" option in the MC2
Configuration Master and select Update.
3.
Setup the RightFax User ID in each MC2 User’s
profile under Application Security.
4.
If you need further instructions in setting up
the RightFax Printer Driver in “No Popup” mode, please contact support for further
instructions.
Using the
Quadrant Fast Fax – LAN API
1. Step one
requires tailoring a setting in the Fast Fax software.
a. On the fast
fax workstation Launch the FFRegistry Icon from the desktop
b. Choose edit
and enter the UNC path to the lanapi directory. This is basically any folder
you choose on a windows server. (Ex. If the dir is on the same machine as fast
fax it might be "\\Fastfaxserver\progam
files\ Fast Fax\lanapi"
2. The next step
is to launch MC2
a. Go to
Maintenance à Configuration
Master à Faxing and
Imaging Tab. Here you must enter that same UNC path to the LANAPI directory in
"Path to Quadrant Outbox". (Ex. "\\Fastfaxserver\progam
files\Fast Fax\ lanapi")
b. For
"Path to Internal Quadrant Outbox" please specify the path to the LAN
API directory as it relates to the Fast Fax server. Using the example where the
LAN API is defined on the Fast Fax server this field would be "C:\Program
Files\Fast Fax\lanapi". If the LAN API is defined as a mapped network
share that's not on the Fast Fax server then the UNC path should be entered
here as well.
c. For each MC2
user, go to Maintenance à Application
Security à Maintain
Security Profile --> Image Fax Tab. Enter the Quadrant User Id into this
field. Each user MUST be setup in Quadrant as a valid FastFax server.
d. If an MC2
user is in another physical location using a Fast Fax use "Path to
Quadrant Outbox" in Maintain security profile to override what is set in
the Configuration Master. ** The default setting is blank for this field.
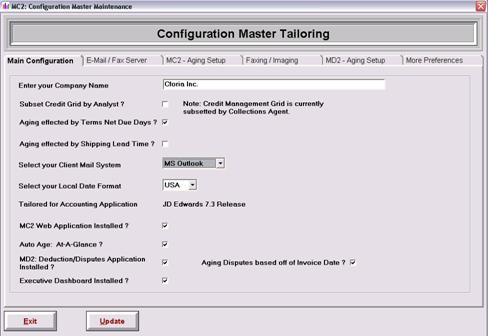
The MC2
Configuration Master sets all the global parameters for MC2. It must be tailored for all the environments
of MC2 you have installed. The options
are listed below.
MXA, SSA, Other
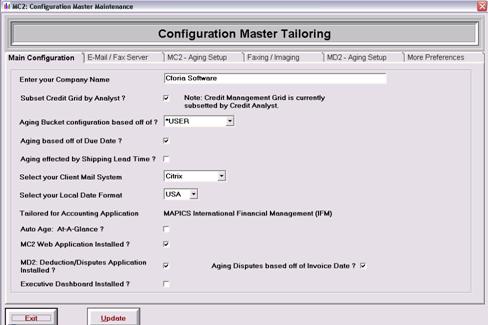
Enter your
Company Name Enter
Company Name
Subset Credit Grid by Analyst? If different people are
responsible for credit than collections.
This will display the Credit Grid by Analyst instead of Collections
Agent.
Aging Bucket configuration
based off of? *ERP will automatically
create your aging buckets based off your default ERP settings. *USER will allow you to setup your own aging
bucket configuration and allow you to select your aging bucket colors.
Aging
based off Due Date? Bases
aging by Invoice Due Date.
Aging
effected by Shipping Lead Time? Add shipping lead time to due date for
aging.
Select
your Client Mail System: Select
the e-mail system your company uses.
Select
your Local Date Format: Select
either European or USA.
Tailored
for Accounting Application: Displays
which ERP accounting application is used.
MC2 Web Application Installed? This is displayed if MC2 Web
is installed and interfacing.
MD2
Deductions/Disputes Application Installed?
Select if MD2 is installed. (Contact Cforia Software for questions or to
purchase).
Aging
Disputes based off of Invoice Date? Select
to base aging disputes off of invoice date.
Executive Dashboard Installed? Select if Dashboard is
installed. (Contact
Cforia Software for questions or to purchase).
JDE
Enter your
Company Name Enter
Company Name
Subset Credit Grid by Analyst? If different people are
responsible for credit than collections.
This will display the Credit Grid by Analyst instead of Collections
Agent.
Aging effected by Terms Net Due Days? Bases aging by Invoice Due Date
Aging effected by Shipping Lead Time? Add
shipping lead time to due date for aging.
Select Client
Mail System: Select
the e-mail system your company uses.
Select Local
Date Format: Select
either European or USA.
Tailored for
Accounting Application: Displays
which ERP accounting application is used.
MC2 Web
Application Installed? This
is displayed if MC2 Web is installed and interfacing.
MD2
Deductions/Disputes Application Installed?
Select if MD2 is
installed. (Contact Cforia Software for
questions or to purchase).
Aging Disputes
based off of Invoice Date? Select to
base aging disputes off of invoice date.
Executive Dashboard Installed? Select if Dashboard is
installed. (Contact
Cforia Software for questions or to purchase).
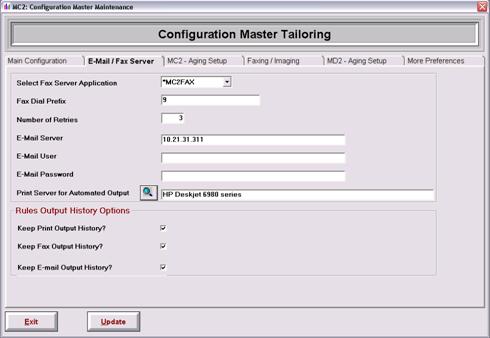
Select Fax Server Application: Select *MC2FAX, FAX400,
FAXCORE, NOFAX, OPTIOFAX, QUADRANT or RightFax
MC2
Fax Server Installed? Select
if MC2 Fax is to be used.
Fax
Dial Prefix: Input
your default “dial out” prefix number.
E-Mail
Server: Input
address for SMTP mail server.
E-Mail User and E-Mail
Password: Input valid User
ID and Password that MC2 will use to log into your SMTP server to send e-mail.
Printer Server for Automated
Output: If the MC2 Automated
process engine is to print output, what printer is to be used.
Keep
Print Output History: Select
if history is to be kept.
Keep
Fax Output History: Select
if history is to be kept.
Keep
E-mail Output History: Select
if history is to be kept.
MXA, SSA, Other
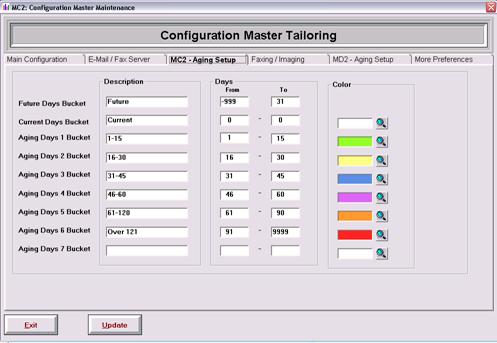
The MC2 Aging
Setup tab will be enabled when you have selected *USER for the Aging Bucket
configuration on the Main Configuration Tab.
Define your MC2
Aging Bucket Descriptions and Days Ranges, as well as Colors.
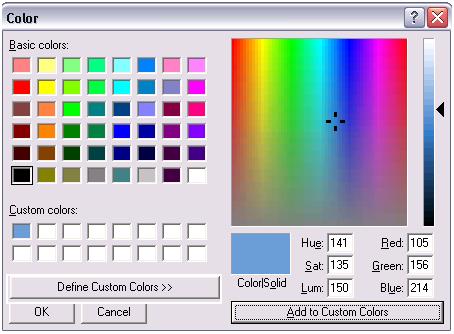
To select Color,
click the magnifying glass  and chose from the Basic Colors or click
Define Custom Colors to open the palette and create your own. Be sure to select Add to Custom Colors before
you say OK to save the color you created.
and chose from the Basic Colors or click
Define Custom Colors to open the palette and create your own. Be sure to select Add to Custom Colors before
you say OK to save the color you created.
JDE
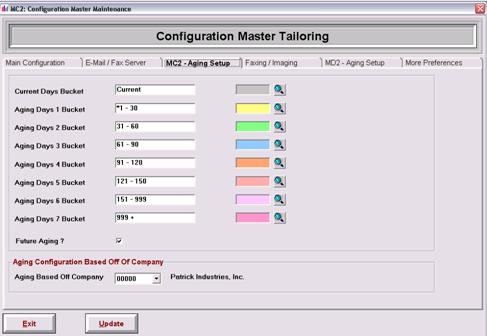
The MC2 Aging
Setup for JDE is based off the Company Number you base your Aging Configuration
in JDE. Select the drop down for Aging
Based Off Company to select the appropriate company. Recreate your Aging Bucket Descriptions and
define your Aging Bucket colors by clicking the magnifying glass  and chose from the Basic Colors or click
Define Custom Colors to open the palette.
Be sure to select Add to Custom Colors before you say OK to save the
color you defined.
and chose from the Basic Colors or click
Define Custom Colors to open the palette.
Be sure to select Add to Custom Colors before you say OK to save the
color you defined.

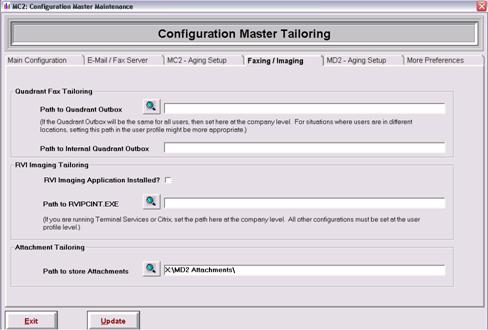
Path to Quadrant Outbox: This is the
location of the network folder where the faxes are sent to Quadrant.
Path to
RVIPCNT.exe: Location
of the RVI viewer.
Path to store Attachments: Location on the
network for the attachments directory.
We suggest enabling network drives for MC2 users. The MC2 – MD2 Attachments folder will be
located on a network drive so all users will need access to that drive to be
able to view and save their attachments within MC2.
MD2
ages deductions differently than collectables.
For all invoices whose type is not a blank will be aged with these
buckets and colors in the Deductions Manager Module.
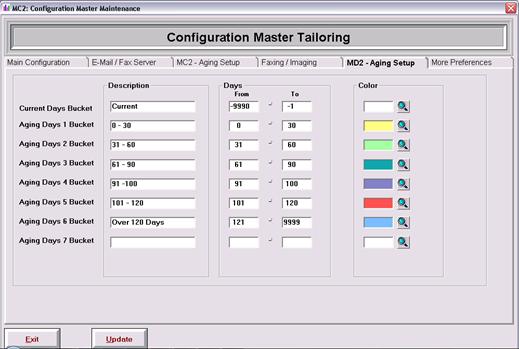
Define your MD2
Aging Bucket Descriptions and Days Ranges, as well as Colors.
To select Color,
click the magnifying glass and chose from the Basic Colors or click
Define Custom Colors to open the palette.
Be sure to select Add to Custom Colors before you say OK to save the
color you defined.
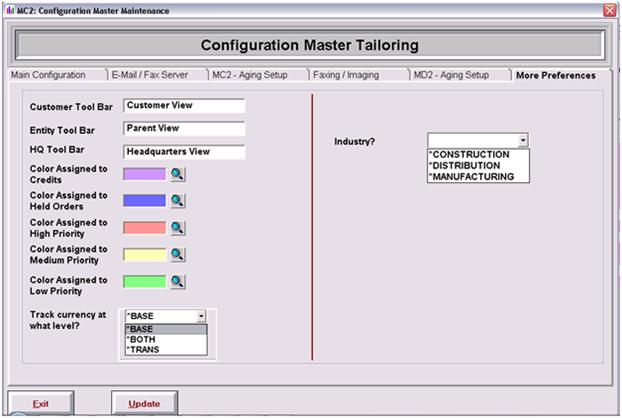
For example you
can change the Entity Tool bar to read “Parent” or other naming convention
based on your ERP or internal practices.
Customize Colors
Assigned to Credits, Held Orders, and High, Medium or Low Priority
Activities
To select Color,
click the magnifying glass and chose from the Basic Colors or click
Define Custom Colors to open the palette.
Be sure to select Add to Custom Colors before you say OK to save the
color you defined.
Track Currency at what level? Track
currency at *BASE or *TRANS or *BOTH (multi-currency) level and is supported in
the Letter Engine when set to *BOTH.
Industry? Define
what Industry category your company falls under: Distribution, Manufacturing or
Construction.
This panel
displays the list of user profiles that exist in MC2. Here you can create, maintain and delete user
profiles.
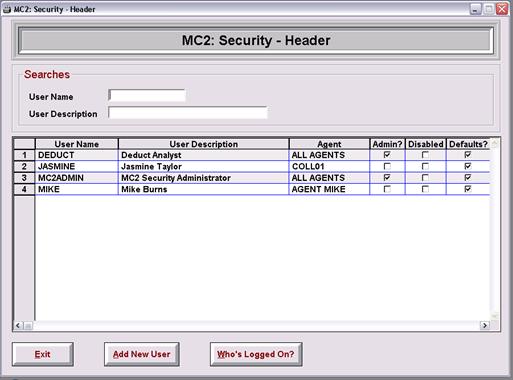
Search Options Search
by user name or description
Exit Exits
the Security Header Panel
Add New User Create
new user profile
Who’s Logged On? Displays
list of MC2 users logon date/time
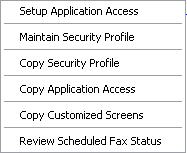
User Maintenance Options Double click on the user you wish to update. You will be presented with six options.
Users with
Security Admin authority can manually force a user out of MC2.
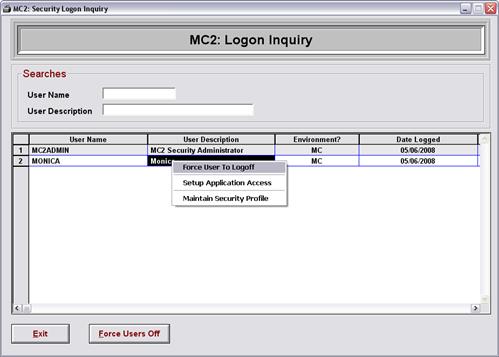
To Force one user
off, double click that user in the list and select Force User To Logoff.
To Force all
users off, simply select the Force Users Off at the bottom of the window.
Select Copy
Application Access or Copy Customized Screens to copy those settings from one
user profile to another. To copy an
existing profile, simply select Copy Security Profile.
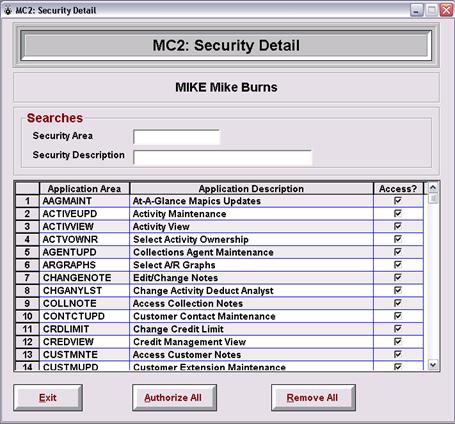
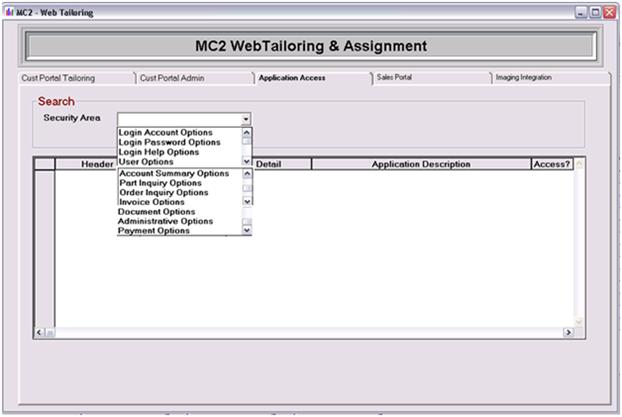
Select areas to be accessed by each user by selecting
check box(s) in the MC2 Security Detail Panel.
You can authorize all or remove all.
Please note these options differ based on ERP.
Establishes
defaults and tailoring for each user.
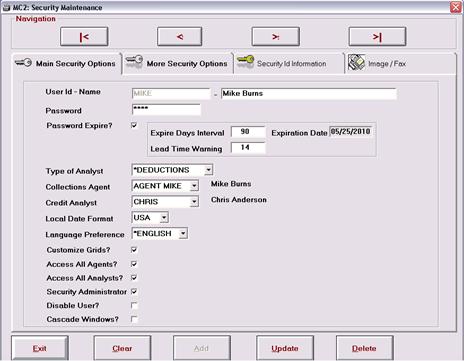
User Name Unique
identifier for each user – user name.
Password Password
for user (this is an MC2 password and is NOT the user’s PC or AS/400 password).
Password Expire? MC2 User Id Password Expire feature. Check the Password Expire box to require
users to reset their password in the amount of days you set.
Expire Days
Interval Set your
password to expire by set number of days.
Expiration
Date Automatically tells you what date the password is set to
expire.
Lead Time Warning Will
notify that the user’s profile will expire in the amount of days you set.
Type of Analyst Select *Collections or *Deductions. *Deductions is only selected when the
deductions module is installed and different people manage deductions than
collections.
Collections Agent: The default Collections Agent for the user. It will default each panel to that value.
Credit Analyst: The default Credit Analyst for user (if
tailored in Company Master File).
Customize Grids? Allows user to customize to rearrange and save
their column setting defaults.
Access All
Agents? Select if this
User can access all other collectors information.
Access All
Analysts? Select if the
User can access all other Credit Analysts information.
Security
Administrator? Select if User can
access security menus.
Disable User? This will be selected if User ID is
disabled. Select this to disable user.
Cascade Windows: Establishes default display format. If not selected, each new panel in MC2 will
be in a tiled format (upper left hand corner).
If selected, each new panel will display in a cascaded format.
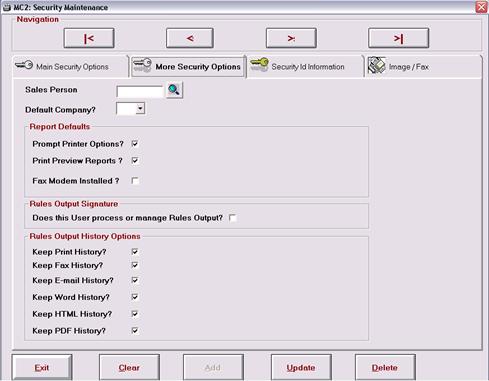
Sales Person If MC2 Web is installed and
interfacing, this establishes this user as an MC2 web user.
Default Company Each Management view will default to
the company number selected.
Report
Defaults
Prompt Printer
Options Select if you
want user to override the default printer.
Print Preview
Reports Select to
enable report print previewing.
Fax Modem Installed Select ONLY if user has a fax modem
installed with an attached outside phone line.
MC2 will always fax through this users PC modem for all user-generated
documentation.
Rules Output Signature
Process Rules? Check this box to allow this user
authority to process Rules.
Rules Output History Options Section
Select which user
or auto-generated customer documentation you wish to save to history.
This panel
contains all of the user contact data.
The MC2 Letter Engine uses this for all the user defined fields.
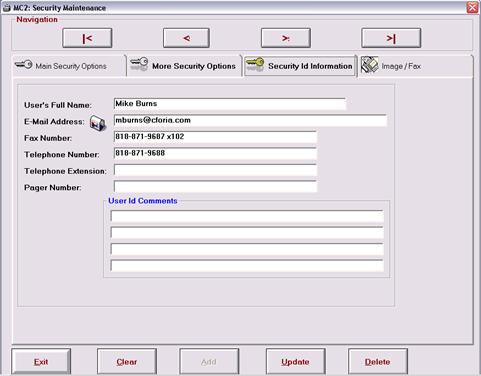
User’s Full Name: Input users name the way you wish it to appear on
customer correspondence
User’s E-mail
Address: Input the users
corporate e-mail address
Fax Number: Input the users
return fax number
Telephone Number: Input the users phone number
Telephone
Extension: Input the users
extension
Pager Number: Input pager or cellular information here (not
used anywhere within MC2)
User ID Comments: Input any comments associated
with the user
This panel is
used to override the global settings for faxing and imaging.
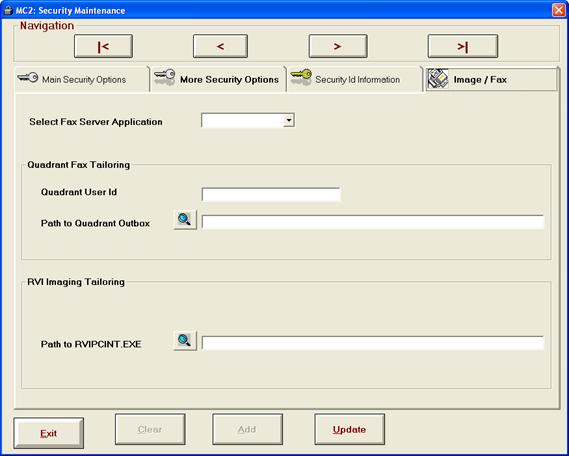
Select Fax Server
Application: Select
*MC2FAX, *QUADRANT, *RightFax, *OPTIOFAX
Quadrant Fax Tailoring Enter Quadrant User ID
and Path to Quadrant Outbox. (if applicable)
RVI Imaging
Tailoring Enter
Path the RVIPCINT.EXE (if applicable)
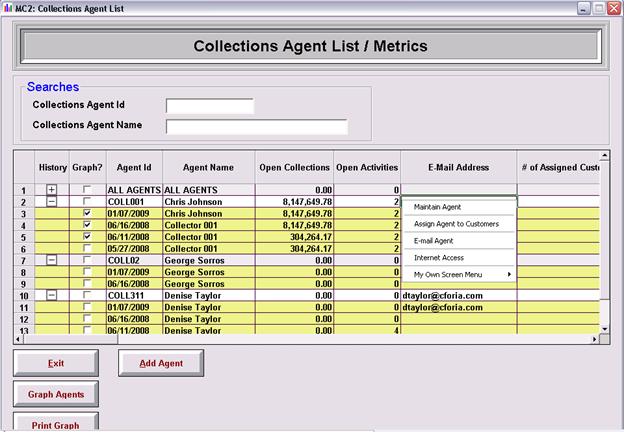
Searches Search by
Collections Agent ID or Name
Maintain Agent Edits existing
Collections Agent information
Assign Agent to
Customers Brings up Agent Assignment
Panels
E-Mail Agent Initiates an e-mail
to the Collections Agent
Internet Access Opens user’s default
Internet Browser
Add Agent Button Select to create a new agent
Graph Agents Button Compare Collector current and historical metrics. This information is captured when the weekly
or monthly ADP program is scheduled to run.
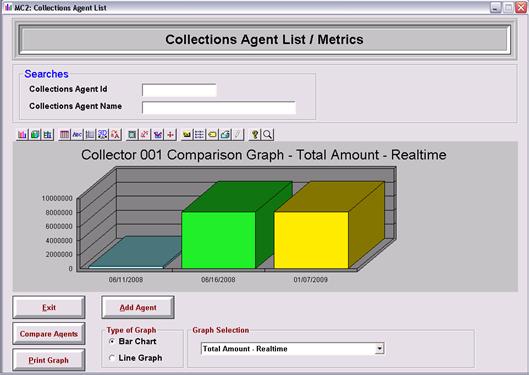
Type of Graph Select Bar Chart or
Line Graph
Graph Selection Use the drop down to select which metric you
would like to compare
To exit the
graph, click the Compare Agents button to return to the Collections Agents List
/ Metrics or click Exit to completely exit the Collection Agents window.
Enter all
contact data related to Collections Agent.
This data is reference only and does not appear anywhere in MC2 or in
the letter engine.
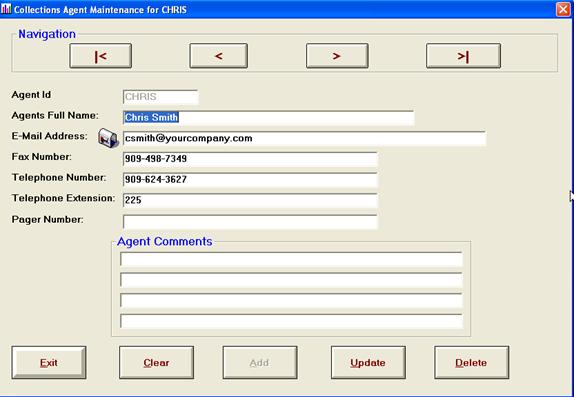
Agent ID: Input unique
Collection Agent ID (up to 10 Characters)
Agents Full
Name: Enter full name
of Collections Agent
E-Mail
Address: Enter
Collections Agent E-Mail Address
Fax Number: Enter Fax Number
of Agent
Telephone
Number: Enter Telephone
Number of Agent
Telephone
Extension Enter Telephone
Extension of Agent
Pager Number: Enter Pager Number of
Agent
Agent
Comments: Enter
comments relating to this Collections Agent
To delete an
agent, simply click the Delete Button in the Maintain Agent Maintenance. Please note:
It is highly recommended to Unassign this Agent ID from accounts before
the agent is deleted.
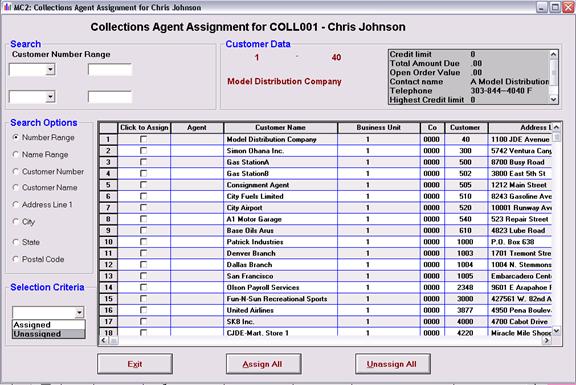
Selection
Criteria Select
Unassigned or Assigned accounts to display
Search Options Select the search to best assist in the
assigning or unassigning of accounts
Selecting Number Range or Name Range will give you the Assign All or
Unassign All buttons to allow you to mass assign or unassign accounts.
Collection Agent Assignment is currently only at the customer (child)
account level.
Quick Tip! In addition to using
the mouse to check or uncheck the Click to Assign box, you can use the arrow
keys to move up and down and space bar on the keyboard to select or unselect
the Click to Assign boxes.
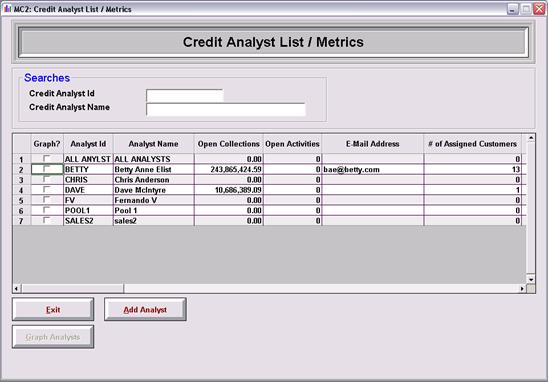
The fields
associated with the Collection Agent List / Metrics are as follows:
Agent Id Agent
ID as defined in Collection Agent Maintenance
Agent Name Agent
Name as defined in Collection Agent Maintenance
E-Mail Address Email address as defined in the
Collection Agent Maintenance
Supervisor
Agent Check
box for Y or N identification (Coming Soon)
Supervisor? Memo
only notation to provide quick identification during comparisons - Pulled from
open field entry on the Collection Agent Maintenance screen
# of Assigned Customers Count of the customers
assigned to that Agent ID – based on customers with non-zero balances
Open Collections Total due balance for assigned
customers including both clean and dirty receivables.
Past
Due
Sum total
of past due balance on account. Includes full balance of clean
receivables past due.
Deduction Amount Sum total of the items coded with a
deduction (INVTYP) code within this collection agent. Excludes collectable deduction types.
Disputed Amount Sum total of the items coded with a
Dispute (INVRSN) code within this collection agent
Credit Amount Sum total of all transactions
with a remaining credit balance.
Unapplied Cash Sum total of the unapplied cash
(RU transaction type) within this collection agent. {May vary in availability based on ERP}
Collectable Amount Collectable Amount is accumulated Net
Receivables MINUS the future bucket
Collected Amount
Accumulation of the customer
extension level received amount. (CUSRCVAMT) This is a total of amounts
received against open transactions in the database – essentially the amount
received against partially paid invoices.
Collected - MTD
Total amount received for the month for open
transactions on accounts assigned to the collector ID.
Note: The month to date field used
is invoice date by default unless G/L date if specified in implementation.
Open Activities this Month Count of the # of open
activities for that collector during the month.
This will be a cumulative count of all activities with an activity
creation for the calendar month.
This is a cumulative count which is updated as part of the nightly
program, and the value is resets each calendar month end.
Open Activities Summary count of all activities
(A, N, D, E, R, L, P, M, H, W) for agent as of the nightly update.
Activity Count Summary count of all activities
open for assigned agent. This count
includes the following activity types: A=Activities, N=Notes, D=Deductions.
E-Mail Count Summary count of all Email
activities (E) open for assigned agent.
Rules Count Summary count of all Rules
activities (R) open for assigned agent.
Letter Count Summary count of all Letter
activities (L) open for assigned agent.
Promise Count Summary count of all Promise
activities (P) open for assigned agent.
Multiple Count Summary count of all Multiple
Follow up activities (M) open for assigned agent.
Held Order Count Summary count of all Order Hold
activities (H) open for assigned agent.
Web Portal Count Summary count of all Web Portal
activities (W) open for the assigned agent.
(Requires MC2 Web Portal)
Promises Amount Sum total of open promise values for
customers assigned to this agent as of the nightly update program - only takes
into consideration (P) type promises.
Broken Promises Count of "P" type
activities in which the follow up date has past.
Collector Efficiency Calculated field
for collection efficiency bases on industry standard metric as shown below:
Beginning Receivables +
(Credit Sales/N*) - Ending Total Receivables
Beginning Receivables + (Credit Sales/N*) - Ending Current Receivables X 100
The denominator is = (AgtBegAmt + AgtNetAmt – Accumulated Current
Balance (ie CUSRAAGEC) per Agent)
The numerator is = (AgtBegAmt + AgtNetAmt – AgtEndAmt)
AgtBegAmt is the total balance at the beginning of the month where Day
= 01 (this is measured using nightly update program due to the fact that the
ADP program may not be scheduled on first day of month)
AgtNetAmt is the accumulation of customer’s net receivables in total
per agent/multiple customers
AgtEndAmt is the total balance at the end of the month when ADP
program is run – total of net receivables per agent/multiple customers.
A
credit/deduction analyst is an individual responsible for additional action for
a given group of customers. This can be
a completely separate person than collection of full open invoices, or it can
be a one-to-one ratio if deductions and collections are managed by the same
person.
For
implementations in which the Collection Agent is not the same person as the
Credit Analyst assigned to the account, the Credit Analyst Metrics provide an
additional lens for managing the portfolio. The calculations in
this for are identical to those outlined in the Collection Agent metrics in the
section above. The only difference is that they are driven by the credit
analyst attached to in the customer extension records rather than the
collection agent.
If in your
implementation the same person manages your collections and deductions the
analyst metrics are a duplication of those seen in collection agent
maintenance.
Please reference
Collect Agent Metrics for the Credit Analyst functionality.
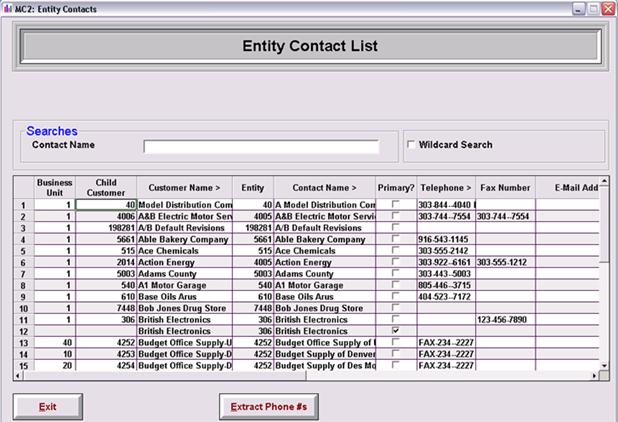
Search for
customer contacts by Customer Name, Contact Name, and Telephone Number.
Simply right
click the column with the ‘>’ to sort by that column. Columns are customizable.
Click the
Wildcard radio dial and enter the information that you are looking for – the
system will return a list of all items that meet that criteria.
The Extract Phone
#’s button will synchronize the contacts in MC2 and make them available to be
searched through the Contact Maintenance utility. This button should be clicked once to update
the search.
The Activity
Assignment Personnel is used in the activities list to identify people who are
involved with the collections process who are not collectors.
Collectors can
assign activities to individuals who are not in the department. This can be used to organize a collector’s
interaction within the company or through the use of MC2 Web, actually
collaborate with those individuals. For
example, Customer Service, Sales Personnel and other Internal departments. This feature can also be used in conjunction
with the deduction reminder feature which allows you to deny or approve
deductions discussed in the Activities section of this manual.
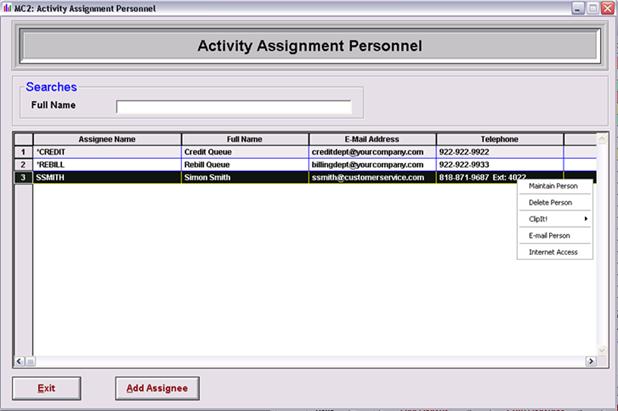
Searches Assignee Name
Maintain Person Edit existing Assignment
Personnel information
Delete Person Delete an Assignment Personnel. Please note this will note remove this person
from any activities they are assigned to and will no longer be a
search/sortable Assignment Personnel person.
Clip It Clip by
Single Row or Subsetted Rows. Collections Agent
Internet Access Opens the internet
browser
Add Assignee
Button Select to create a
new Assignment Personnel person
Each language
(French, Spanish, German) is initially translated by Cforia. Applies ONLY to
custom grids in MC2 today. Future
vision of product is to apply to all static inquiries. International User may
‘adopt’ language of choice.
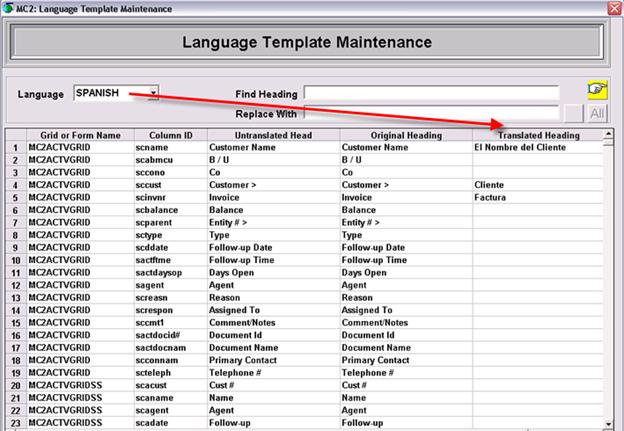
Override column
headings by populating the Translated Heading field. This will affect all clients that have this
language selected as their default
language.
Find Heading Find a specific
heading you would like to tailor
Replace With Use this feature to
replace one or more headings
Use the  button to go to next or to replace searched
field. Select
button to go to next or to replace searched
field. Select  to replace all fields based on the search.
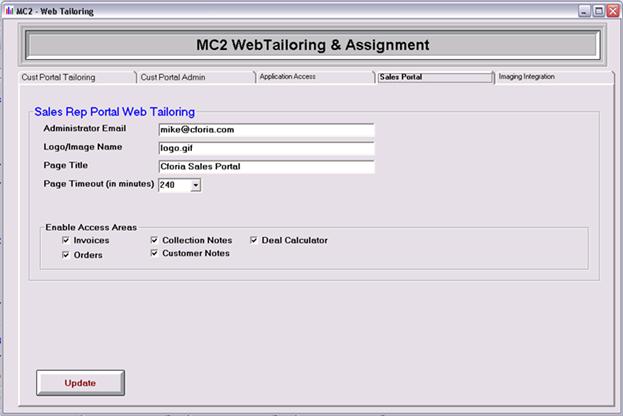
The Sales Rep
list allows full maintenance to add, change, and delete the sales reps.
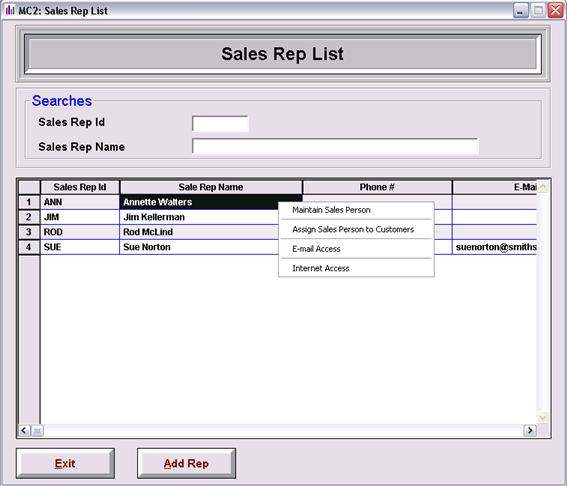
Search Search
by Sales Rep ID or Sales Rep Name
Maintain Sales
Person Maintain
or Delete Sales Person
Email Access Opens
blank email to Sales Rep
Internet Access Opens
internet browser
Add Rep Button Select
to create a new Sales Rep
Assign Sales Person to Customers Assigns Sales Reps to
customers to view by Sales Rep in the MR2 Sales Portal (if applicable)
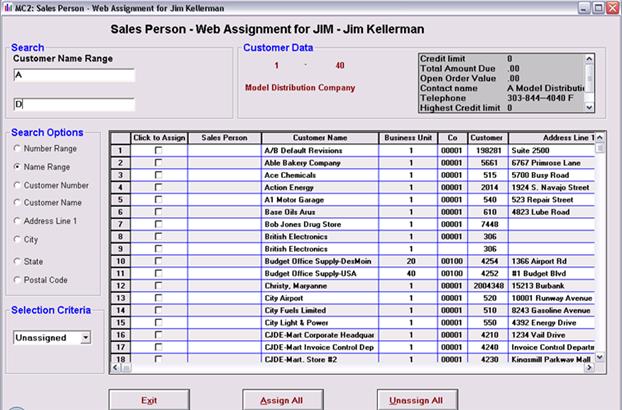
Selection
Criteria Select
Unassigned or Assigned accounts to display
Search Options Select the search to best assist in the
assigning or unassigning of accounts
Selecting Number Range or Name Range will give you the Assign All or
Unassign All buttons to allow you to mass assign or unassign accounts.
Sales Rep Assignment is currently only at the customer (child) account
level.
Quick Tip! In addition to using
the mouse to check or uncheck the Click to Assign box, you can use the arrow
keys to move up and down and space bar on the keyboard to select or unselect
the Click to Assign boxes.

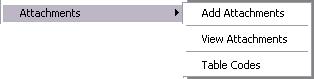
Attach files to
MC2 at the company level with no association to any specific account. Here you can attach documents and images for
reference, forms, templates, etc. for easy access to call upon within MC2.
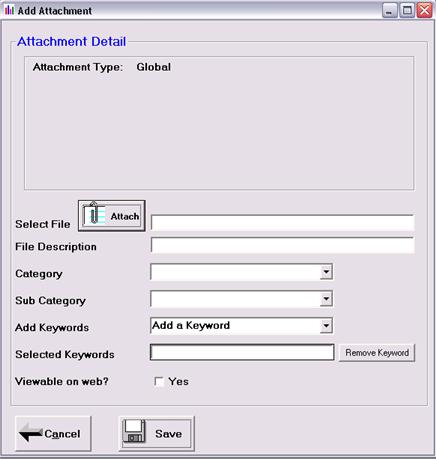
Select File Click the Attach
button to open the location of the
attachment you want to add
File Description Define your file
description
Category Select a
category
Sub Category Select a sub category
Add Keywords Add a keyword
Selected Keywords Select the Remove Keyword button to add a different
keyword to this attachment.
Viewable on Web? Select Yes to make attachment available on the MC2
Web Application
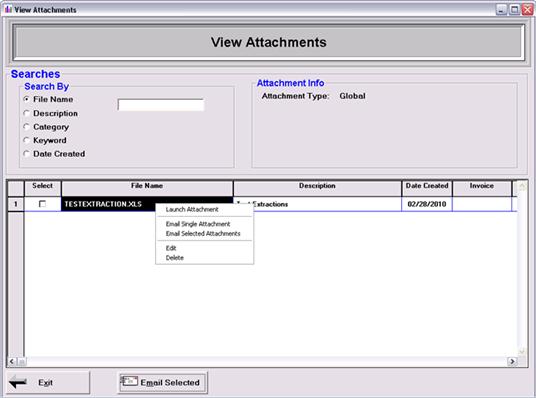
Searches Search by File Name,
Description, Category, Keyword or Date Created
Double left click
on an attachment to Launch Attachment, Email Single Attachment, Email Selected
Attachment, Edit Attachment Description or Delete.
Use the select
column to click and check attachments you want to send in one email. Simply click the Email Selected button or
double click an attachment and select Email Selected Attachments.
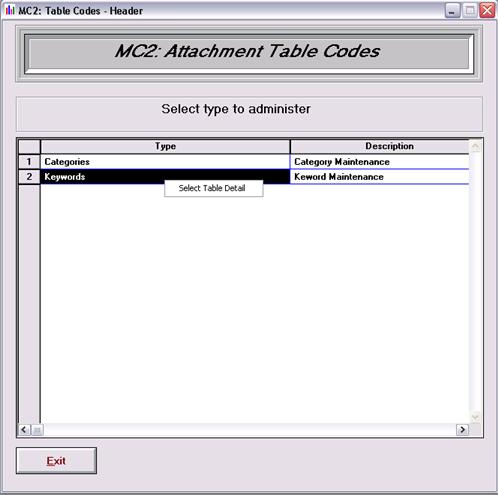
Define Categories
and Keywords by double clicking the type and Select Table Detail.
From any of the
main Management View, select Maintenanceà Documents and Faxes to access the
document status options.

This displays the
master document template list that is available for use in MC2. From this screen it is possible to add,
delete or edit existing documents.

This features
displays the status for all rules engine generated documents which have not
been completed successfully. Only
documents generated by the rules engine will be displayed and managed through
this feature.

Available status
codes on this screen include:
*FAILED Documents
that were unable to be sent.
*PENDING Documents
that have been created on AS/400 but not sent.
*SCHED Faxes
that have been sent to the MC2 Fax Server but not confirmed as sent.
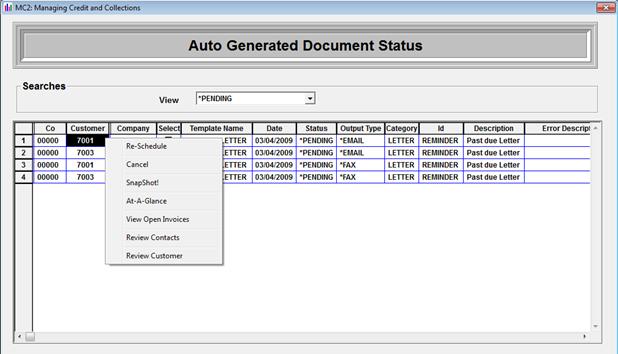
Actions that can
be performed from this screen by accessing the MC2 pop-up menu include:
Reschedule This
option will reschedule a previously failed document and change the status to
Pending until the automation server resends the information.
Cancel This
cancels the pending document.
Snap Shot Launches
the snap shot view for that customer
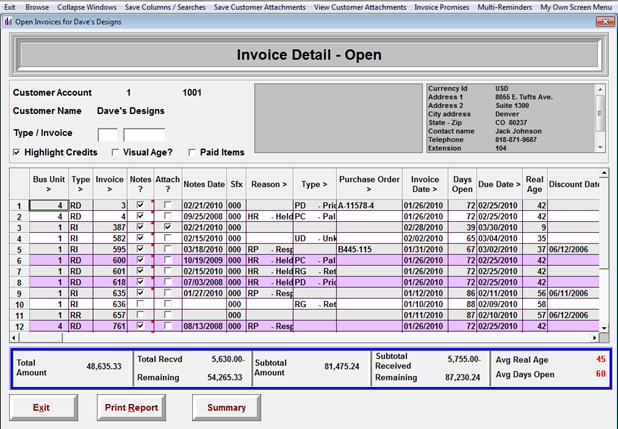
At-A-Glance Launches
the At-A-Glance view for that customer
View Open Invoices Launches
the View Open Invoices screen for that customer
Review Contact Opens the contact maintenance screen for that customer so
that the information can be viewed and/or updates as necessary.
Review Customer Opens the customer extension maintenance record for that
account to provide quick access to key information.
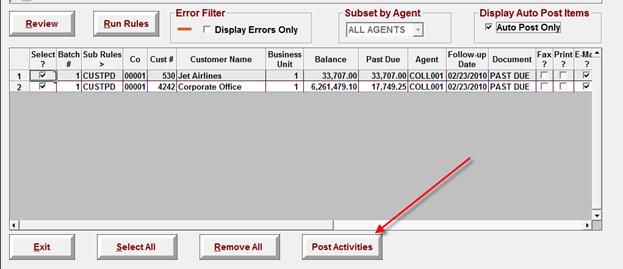
If the filter is
set to the Failed status – the action bar at the bottom of the screen will
activate with some additional options.

Using the Select
All or and De-Select All buttons in conjunction with the  check boxes next to each line with allow the
user to identify transactions that either need to be re-scheduled via the MC2
Auto Engine or Cancelled.
check boxes next to each line with allow the
user to identify transactions that either need to be re-scheduled via the MC2
Auto Engine or Cancelled.
Re-Scheduling a
transaction will move it from the *FAILED status to the *PENDING status for
reprocessing.
This feature
displays all faxes that were individually sent by MC2 users via the MC2 Fax
functionality. Only those faxes sent
through the MC2 FaxServer will be displayed on this list.
NOTE: If a user has a fax/modem card in their
computer and they are tailored to fax individually, their fax status will not
be displayed here. Only those faxes sent
through the MC2 FaxServer will be displayed on this list.
Available status
codes on this screen include:
*FAILED Faxes
that were unable to be sent.
*PENDING Faxes
that have been created on AS/400 but not sent.
*SCHED Faxes
that have been sent to the MC2 Fax Server but not confirmed as sent.

From the MC2
pop-up menu the user has several options that they can perform:
View/Edit Fax
Contact Information Opens the contact maintenance screen for
that customer so that the information can be viewed and/or updates as
necessary.
Re-Schedule Resets the document to Pending status and prompts the
system to re-schedule.
Cancel This
cancels the pending document.
Clip It Places
the data displayed onto a clipboard so that it is ready to paste into excel.
Transactions that
can be initiated from this screen:
Select This selects that document to be resent.

Select All This
selects all faxes to be resent.
De-Select All This
de-selects all faxes that are to be resent.
Re-Schedule This posts the transactions from the *FAILED status
to the *PENDING status.
Cancel Selected This cancels
the pending fax.
This
menu option allows you to create, edit or delete all of the table codes within
MC2. Review the previous discussion
section to determine which code files you will use and which values are
appropriate. The file maintenance
process is identical across all table codes.
Once you understand the maintenance process for one table, then you
understand the process for all tables.
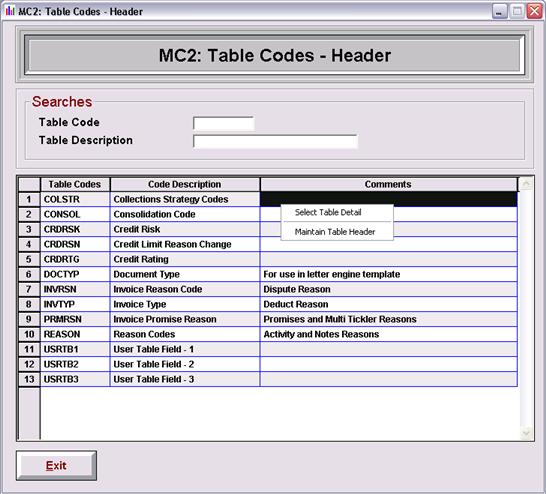
Maintains the
header description of the table.
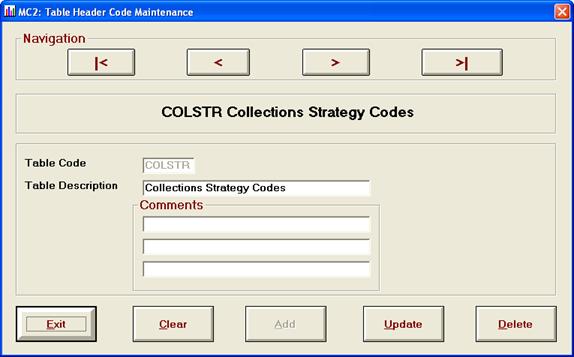
Table Description Change the description of the
table. Can be useful for formatting
reports.
Table Comments Additional description of the table
This will display
the list of codes for the table.
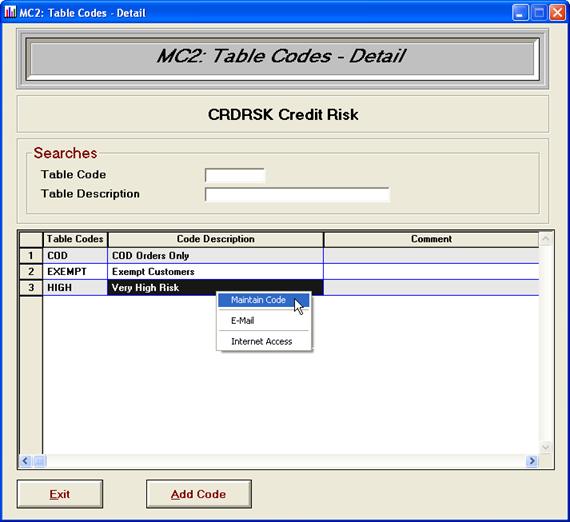
Maintain Code Edits the individual table entry
E-mail Activates users e-mail
Internet Activates a browser session
Purpose: Group customers by common collections
policies.
Discussion: Customers are grouped based upon various
parameters. Each group shares a common
collection policy(s). The Collections
Strategy code is used for those purposes.
One additional use of this field is to identify customers whose
receivables are potentially at risk. We
create a separate code to identify these customers and track the potential bad
debt exposure.
Here are some
examples for consideration:
·
VIP
Can
be used to identify accounts that fall outside of the normal collection call
process – these are generally manually assigned as they are identified
·
INTERCO – Intercompany Accounts (Have also seen this expanded to SALES
if you have internal Sales Accounts)
o
Have
seen this effectively used for monitoring intercompany accounts
o
Having
these as a strategy code allows you to exclude these from rules that are generated.
·
SP_HND - Special Handling
Usually
manually defined – but allows a grouping for customers that will receive
special letters or require a unique processes
·
Customer Groupings (TBD in specific implementations)
If
it is important to group your customers based on a collection practice this can
be key
o
Can
be driven by a Category Code in JDE – whether that be a territory, customer
type, etc in your JDE implementation.
o
Can
be used as a division of Small accounts vs. Majors
·
COD or CC (Terms based)
In
cases where there are issues with prepay, COD or credit card accounts require
close monitoring this is one way to be able to call these out quickly
·
NEW
New
customer accounts – can be defined systematically to a Strategy (or Risk) of
NEW.
o
Requires
manual update to appropriate Strategy Code when account moves out of the NEW
account handling process
Purpose: Segregation of accounts by brand
Discussion: The GL Class Code will be mapped into this
field, Category code 6.
Purpose: Classify customers by credit risk
Discussion: The credit risk code is used to identify
customers based on their potential exposure to the business. Once identified, they, then, can be closely
monitored and managed.
Days beyond terms
will be calculated as a weighted average that excludes deductions and credits
Proposed credit
risk codes and their policies (definitions):
·
AGENCY
o
Identification
of accounts that are placed in 3rd party collection
o
Manually
updated at time of placement
·
BNKRPT
o
Bankruptcy
accounts
·
HIRISK
or WATCH or ALERT
o
Accounts
that have been determined to be high risk for some reason and are being flagged
for more stringent review
o
Manually
updated to and from this code as business dictates
·
DBT
Calculation to identify a risk category
o
Leverage
the MC2 DBT calculation at one of our metric points ( 90 Days, 6 months, 1
Year) to classify the risk
o
Example
– DBT > 5 days = LOW / DBT 6 – 15 = MED / DBT > 16 = HIGH
o
Can
define a numeric or alpha category if preferred rather than Low/Med/High
·
Define
risk based on outside source
o
Accounts
can be manually updated to a Risk category that is defined from an outside
agency scoring or report.
o
Simply
select the appropriate risk category when updating the extension record.
Purpose: This field tracks the reasons for
customer credit limit changes
Discussion: MC2 tracks all credit limit changes. Additionally, MC2 allows you to track the
reasons surrounding credit limit changes.
Sample codes are:
·
CUSTRQ
o
Customer
Request
·
INTERN
o
Internal
Decision
·
VOLUME
o
Change
in purchase volume
Purpose: Not all documents serve the same
purpose. This code is to track the
different types of documents
Discussion: This type code is used for reporting
purposes. Sample codes are:
·
*CRDRF
o
Credit
Reference
·
*INVRP
o
Invoice
Reprint
·
*INVR1
o
Invoice
Reprint 2
·
LETTER
o
Standard
Letter Document
Purpose: Dispute analysis and reasons for late
payments
Discussion: The majority of unpaid invoices are not
due to a lack of funds. Instead, the
customer does not have the required information to complete the financial
transaction. This code can explain late
payment reasons and, consequently, will aid in timelier remittance.
Alternatively, this
code can be used to provide a status of an invoice or
open deduction
depending on your business rules.
Proposed Invoice
Reasons and their policies (definitions):
·
BILLTO
o
Billed
to incorrect address/party
·
CREDIT
o
Credit
pending
·
DISPUT
o
Disputed
by customer
·
POD
o
POD
requested
·
NOINV
o
No
invoice left
·
NSF
o
NSF
Check
·
POERR
o
Purchase
order number error
·
REJECT
o
Rejected
·
SLSTAX
o
Sales
tax issue
·
TERMS
o
Incorrect
terms
Purpose: Type of deduction
Discussion: MC2 can classify an invoice based upon the
type of deduction taken. This deduction
type is assigned outside of the accounting system. However, it can be auto assigned depending on
how cash is applied. Sample codes are:
·
BD
o
Bad
Debt
·
CD
o
Unearned
cash discount
·
CR
o
Customer
refund
·
DF
o
Defective
merchandise
·
FR
o
Freight
·
LB
o
Labor
·
NF
o
NSF
check
·
OS
o
Over
ship
·
PR
o
Pricing
problem
·
PT
o
Pallets
·
RG
o
Returned
goods
·
SS
o
Shortage
·
UD
o
Unknown/Unidentified
deduction
·
VR
o
Volume
rebate
·
WO
o
Write
off
New response
boxes have been added to the INVTYP code maintenance. As the INVTP code is what drives the
deduction module, the user now has the ability to determine if an invoice type
is considered a collectable (‘clean’) or not collectable (‘dirty’) receivable.

Select the Collectable
Invoice Type box to include the deductions with this type code in your
Collectable Amount.
·
These
are considered “clean” receivables and will total into the Collection totals
for the Dashboard Metrics (if applicable).
·
If
you choose to make a deduction type collectable these items will display in
your Net Collectable aging on Collection Management.
·
If
you choose to make a deduction type non-collectable, these items will be
considered dirty and will not reflect in the Collection Management aging
columns.
In some
implementations, it has been necessary to identify specific ERP document types
to be categorized either as collectable/non-collectable transactions or to
exclude these from the DBT calculation.
For this reason we have added the Invoice Document Type selection as an
option in the INVTYP table code maintenance which can be used in conjunction
with the “Collectable Invoice Type”? and “Exclude from DBT” check boxes.
NOTE: If
a transaction that would normally follow the “Invoice Document Type” rules
specified above has a deduction type code associated with it, the deduction
type code will take hierarchical precedence for Collectable/DBT calculations.
Select the
Exclude from DBT to exclude specific invoice types or deductions from being
calculated in the days beyond terms calculation.
·
This
new feature allows you to define exactly which transactions are included in the
DBT calculation that is part of the monthly ADP (Average Days to Pay) program
which updates the credit history and trends information.
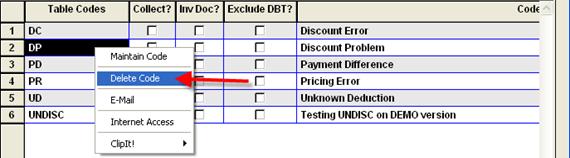
To delete an
invoice type code, double click on the code and select “Delete Code” from the
drop down menu.
System will
prompt you to ask if you are sure you wish to delete this code:
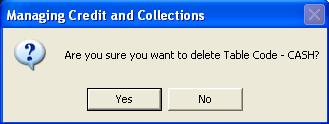
NOTE: It is important to remember not to delete any
type codes that are currently in use! If
you are unsure, select “No” and review prior to deleting this table code.
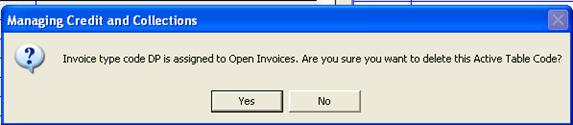
Extra security
message had been added to both Invoice Type Codes and Invoice Reason Codes to
make sure that if you try to delete a code that is in use you are warned!
Example: If the code you are trying to delete a type
code which is assigned to open items, a warning message will prompt you to
reconsider.
Purpose: Tracks invoice Promise and Multiple
reminder activity reason codes.
Discussion: Provides a reason code for special
reminder activities that are created through the use of Promise to Pay “P” and
Multiple “M” reminders. These activity
types may be created from either the Snap Shot view or from View Open
Invoices. Sample Codes are:
·
MULT
o
Multiple
reminder activity follow up
·
PTP
o
Promise
to Pay
·
PYPLAN
o
Payment
Plan follow up
Purpose: Tracks customer interactions
Discussion: MC2 tracks reasons for customer
interactions with codes such as customer notes, collection notes, and
activities (reminders). These codes are
used for reporting on customer relationships.
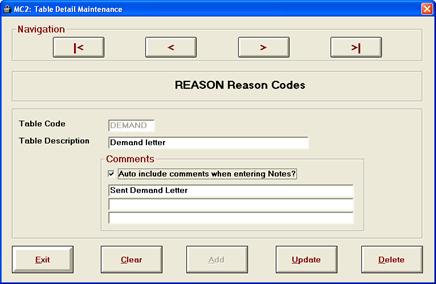
When setting up
Reason Codes in MC2, you can “Auto Include” the table code’s comments
field. This feature, when chosen in
Customer and Collection Notes, will automatically include the comments table
detail if the Auto include comments when entering Notes? Box is checked.
Proposed reason
codes and their policies (definitions):
·
*APPRV
o
Standard
system MC2 classification (comes with product)
o
Approved
for Credit – For use with deduction activity approval process
·
*AUDIT
o
Standard
system MC2 classification (comes with product)
o
Identifies
audit trail transactions such as Terms, Credit Message or Temp Credit Message
changes initiated from MC2.
·
BROKEN
o
A
broken promise
·
DEMAND
o
Demand
letter sent to customer
·
*DNYRB
o
Standard
system MC2 classification (comes with product)
o
Deny/Rebill
– For use with deduction activity approval process – indicates that the item
was denied for credit and must be rebilled to customer.
·
INV
o
Invoice
sent
·
L/M
o
Left
voice or e-mail with customer
·
LSTCHK
o
Lost
check
·
*NOTES
o
Default
MC2 classification (comes with product)
·
POD
o
POD
sent
·
PTP
o
Customer
promised to pay
·
PAYPLN
o
Customer
pay on schedule
·
RECVNG
o
Receiving
department/RMA issue
·
RESRCH
o
Customer
to research
·
RULES
o
Rules
generated activity
Purpose: User definable table codes.
Discussion: MC2 allows up to 3 user definable table
code fields which can be found in Customer/Entity Extension, At-A-Glance and
Invoice Detail.
The purpose of
the User Defined Fields is to capture additional invoice, customer, entity,
headquarters, contacts or activity information
MC2 can capture
additional information related to your key AR information. This can be manually assigned or can be
pulled from another field from your source ERP.
MC2 provides 15 user fields at the invoice, customer, entity (parent),
headquarters, contact and activity levels.
·
Customer
extension file - MC2CUEPF
·
Entity
extension file - MC2ENEPF
·
Headquarters
extension file – MC2HQEPF
o
(Only
available in certain ERP’s)
·
Invoice
file – MC2INEPF
·
Activity
file – MC2ACTPF
·
Contact
file – MC2CONPF
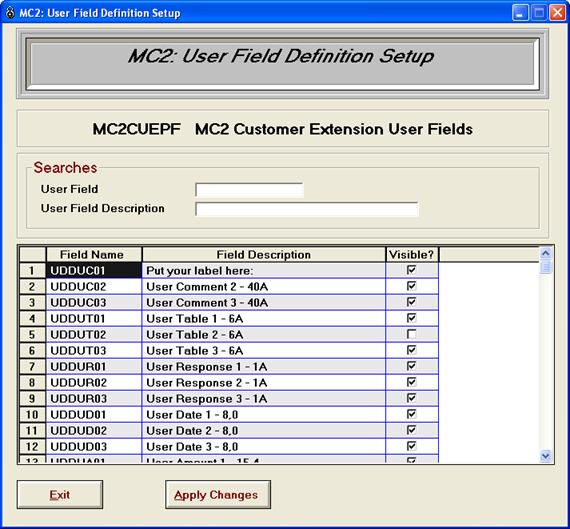
To activate a field, you select the Visible check
box. You can define the title of the
field by typing in the Field Description.
All six user tables have the same 15 field types. They are:
3 - 80 character long Comment fields
3 – Table Code fields
3 - Response Check Box fields
3 – Amount fields
3 - Date fields
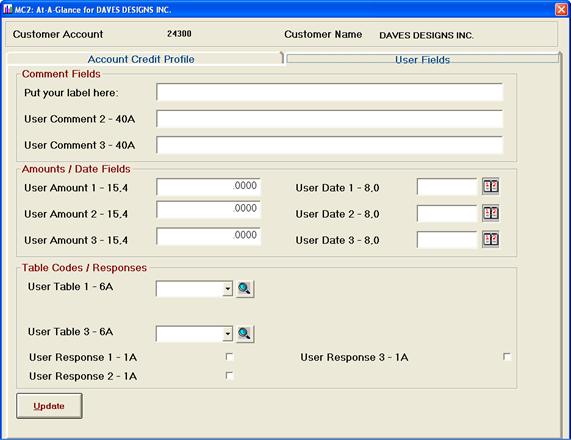
Accessing User Fields Within MC2: Each data element that supports user fields displays their value
when viewing that data element within MC2.
For example, the customer extension file user fields are viewable from
Customer Extension File maintenance and At-A-Glance.
The Customer Extension File for the previous example is
shown below. Please note that the User
Table 2 is not visible and that the first comment field’s label is
changed. All inputs and changes to the
data fields within this record will be saved when the record is updated.
This
menu option allows you to create, maintain or access Carrier Table Codes within
MC2. Each carrier that exists in your
Accounting system will have a carrier in this file. Each carrier will need to have its proof of
delivery (POD) URL entered. This will
enable MD2 to link to the POD site.
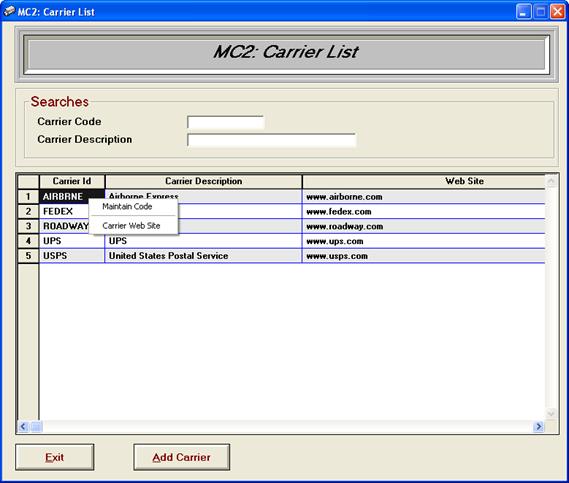
Carrier Detail
To
activate the proof of deliver feature in MD2, it is necessary to input the
proof of deliver web address for each of your carriers. This is input in the carrier detail
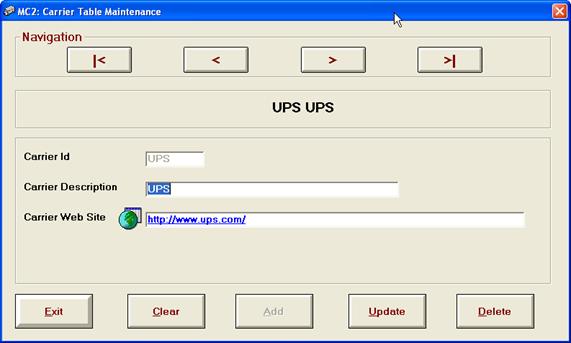
Input
the carrier POD URL address into the Carrier Web Site field.
This section will
discuss basic navigation in MC2.
Use these hot
tips for quick reference or to get started quickly in MC2. Detailed explanations of these tips are found
within this document for further detail.
1.
MC2 uses double left clicks to select and right
clicks to generate a search or sort feature.
2.
F2 will cascade the screens and F3 will center
the active screen. Or, click Windows in
the main tool bar to click these selections.
3.
Ctrl + E will open Microsoft Excel
4.
Ctrl + W will open Microsoft Word
5.
Hitting the “Ctrl” and “Tab” keys will flip
thorough the panels
6.
You can save the defaults on each panel by selecting
the “Save Defaults” option in the upper left hand corner of all panels
7.
If an item does not come up during a search,
please review your filter criteria. More
than likely you have inadvertently filtered the desired item out.
8.
Any column heading that has a “>” after it is
a sortable field.
9.
When you see a red dot next to the notes flag,
hover your mouse over the dot to see your invoice or deduction level notes!
10. Key
Definition: Invoice Type
a.
MC2 allows you to assign two codes to an invoice
record, the Invoice Type and Reason Code.
The Invoice type is a critical field.
It is the type of deduction. It
is typically automatically assigned to all deductions in your system based on
the MC2 nightly update program. The
default code is ‘UD’ or ‘SP’. When you
work the deduction and determine what it actually is, you need to change this
code by clicking into the cell and selecting the appropriate value.
11. Customizable
screens can be accessed either by the customize options at the top of your
screen, or double click within the MC2 grid and select My Own Screen Menu.
Selecting any
object within MC2 allows the user to navigate to any related information. The easiest way to access them is to double
left click on an object and view the available options in the MC2 pop-up
menu.
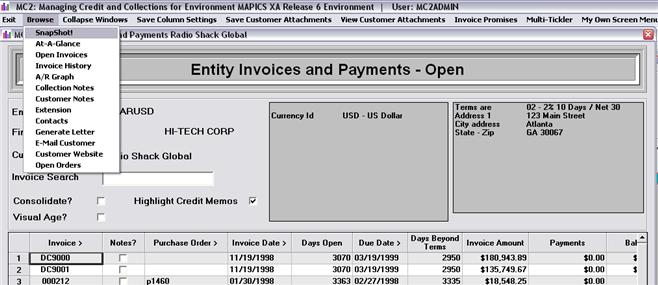
The Actions
option in the Main MC2 Tool Bar provides the following options of navigations:
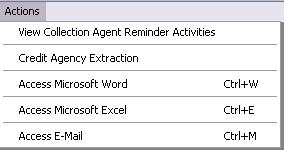
When you open
MC2, the first window is the Collection Agent Reminders. If you close the reminders window, you can
reopen this window by clicking on Actions à View Collection Agent Reminder
Activities.
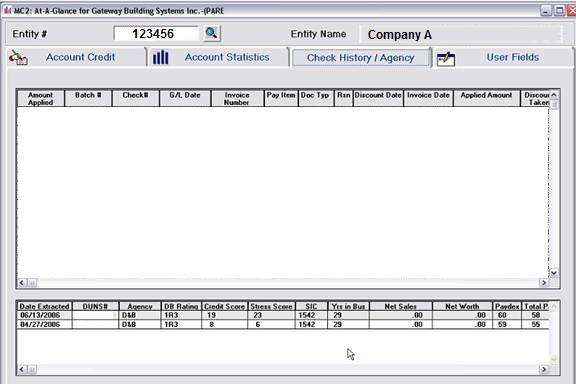
The Credit Agency
Extraction will allow you to pull your D&B Credit Report Excel Spreadsheet
(if applicable) into MC2 to view.

The
fields are as follows in this order:
1. Account #
2. Account Name
3. DUNS#
4. DB Rating
5. Credit Score
6. Financial Stress
Score
7. SIC
8. Years in Bus
9. Net Sales
10. Net Worth
11. Paydex
12. Total Payments
13. % Slow Pay
14. High Credit
15. Avg. High Credit
16. Total Employees
17. Suits
18. Liens
19. Judgments
20. RAM Score
21. Sug Credit Limit
22. Date Extracted
Simply select the magnifying glass to the right of the
Excel file to report field, point to the latest Credit Agency data, then select
the Extract button.
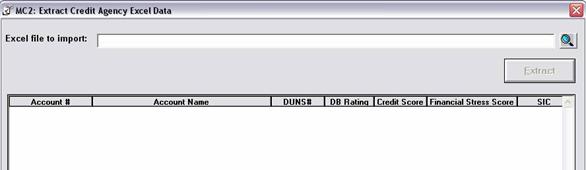
Now you can view
this report within MC2 through At-A-Glance under the Check History / Agency
tab. Please note, the Agency tab will
not be visible in the Credit History tab
if this report is not extracted to MC2.
This option opens
up a blank Word document. Pressing
“Cntrl” + “W” on keyboard will also perform this action.
This option opens
up a blank Excel worksheet. Pressing
“Cntrl” + “E” on keyboard will also perform this action.
This option opens
a blank email form in the user’s email application.
Throughout MC2, you have the ability to Customize your screen. These are saved by your user profile ID, so
each user’s profile can be unique to how that user works in MC2.
In the main
Management views, you have the ability to save defaults to tailor your
settings. Save Defaults will save the
following options:
- Customer or Entity View
- Customer/Entity Name or
Customer/Entity Number
- Visual Aging
- Column Headings
- Drag and Drop, Rename Headings, Hide
columns.
Please note
that while all grid screens will eventually be customizable, currently only the
following menu’s have this new flexibility:
- Collection Management
- Invoice Management
- Credit Management
- Activity Management
- Deduction Management
- Collection Agent Tickler screen
- Snapshot!
- View – Open Invoices
- Credit Statistics Screen
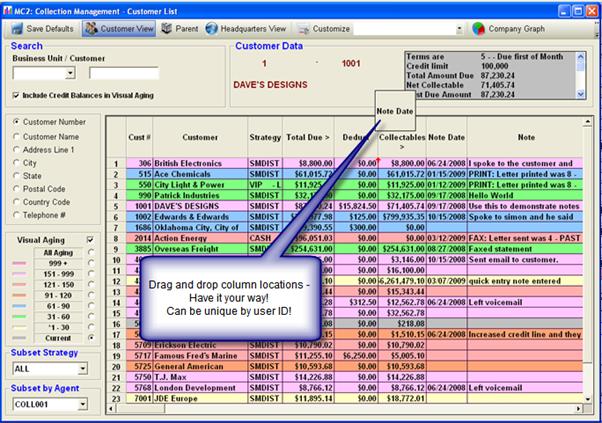
This feature
allows the collector to rearrange the columns on the customizable screens.
To activate this
feature, click on the column header, hold down your left mouse button to pick
up the column header, and drag the column header to the desired location.
NOTE: While it is possible to move all the columns,
for best results you should press the save defaults button on your menu bar
after each move is made!
Simply hold down
the left click of your mouse to drag and drop columns:
Be sure to select
the Save Defaults button to save your changes.
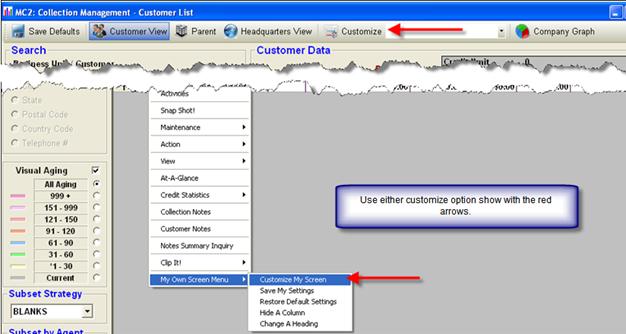
There are two
ways to reach the screen customization options.
These are indicated below by the red arrows.
- Use the Custom Screen button from
your MC2 tool bar
- Using the “My Own Screen Menu” Option
from the MC2 Main Menu.
Choose to
customize your screen using either of these options:
Once you have
chosen to customize your columns, you will see a pop up box on your screen that
identifies in the center which screen you are currently customizing. (All customizable screens will follow the
same process. Once you have learned to
customize one screen, you will be able to apply this knowledge to the other
customizable screens.) Be sure to select
the Save Defaults button to save your changes.
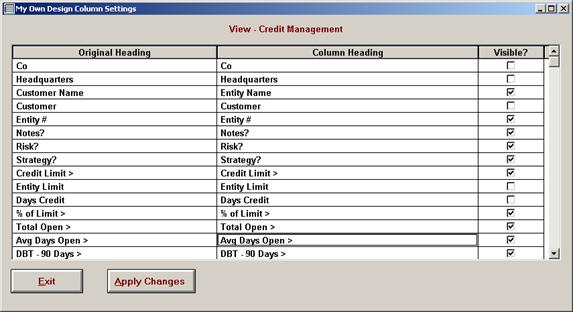
Original Heading - Standard
MC2 header information for the company.
This will remain unchanged regardless of the column headers that a
collector may customize.
Column Heading - Verbiage
that will be displayed in the grid once any changes have been made and applied.
Visible? - Check box
that indicates the collector preference.
If the radio button in this column is checked, the column will appear in
the collectors grid view. If the radio
dial is unchecked, the column will not display in the collector grid view.
In our example
following, we are working with the Credit Management View:

Be sure to select
the Apply Changes button to save your changes.
To remove columns
from view, simply uncheck the “Visible?” column. You can select or deselect as many columns as
you desire.
In the example
below you can see that there are quite a few fields that are unchecked and will
not be visible when we return to our main credit management grid.

Click the apply
changes button, and then the Exit button to return to your main grid
screen.
Once you have made your selections, select
the Save Defaults button in the upper left of your main management view.

Or, if you have
made changes in view open invoices or Snap Shot screens, select the Save My
Settings button in the toolbar at the top of your screen, then Save My
Settings.

MC2 gives you the
ability to sort from high to low, by simply doing one right click from you
mouse on the column header. These sorts
are available in the following:
-
Collection
Managements (Aging and Accum Buckets)
-
Credit
Management (Aging and Credit Statistic columns)
-
View
Open Invoices
-
Snap
Shot
Columns that have sort capability in view open invoices and Snap Shot will have
a > in the column header. When you click the column header, the column
will sort in descending order (HIGH to LOW).
If the column has
a ‘>>’ in the header, it is a
range search.
While working the
main management views, you can double click on any customer to receive the MC2
Pop-up Menu. This menu may vary. Here is an example and description of the
various available options.

Activities Access Activity Screen for selected customer
Snap Shot Takes you into the Snap Shot
for that customer, entity or headquarters.
Maintenance Allows you to access the customer extension file and
contact maintenance.
Action Allows
you to send an e-mail, generate a letter, export a customer statement into
Excel, add an activity, print a customer statement and go to their website.
View Allows
you to drill into open invoices, invoice history, open orders, document
history, activity history and an AR graph for the customer.
At-A-Glance Displays customers At-A-Glance
information.
Credit Statistics Displays the customer’s Credit History and Trends and
Credit Limit Change History.
Collection Notes Displays the collection notes.
Customer Notes Displays the customer notes.
Clip It! Copies
either a single row or the entire visible subset to the Windows Clipboard.
Toolbar Menu Displays
the options for the MC2 Toolbar Menu.
My Own Screen
Menu
Hide A Column, Change A Heading, Save My Settings and Restore Default
Settings.
When you are not
working in the main management views, to continue moving forward within a
particular account, you will have a Browse option available in the upper left
of your screen.
You will see this
Browse button in view open invoices, Snap Shot, At-A-Glance, order history,
invoice history, etc. This menu will
vary throughout MC2, but is designed to assist you in moving forward with an
account in the collection process.
The
Customer/Entity Extension Maintenance allows you to outline specific Collection
techniques to effectively monitor accounts. This establishes how MC2 classifies
the customer, entity and headquarters.
You can access the extension file maintenance from the standard MC2
pop-up menu.
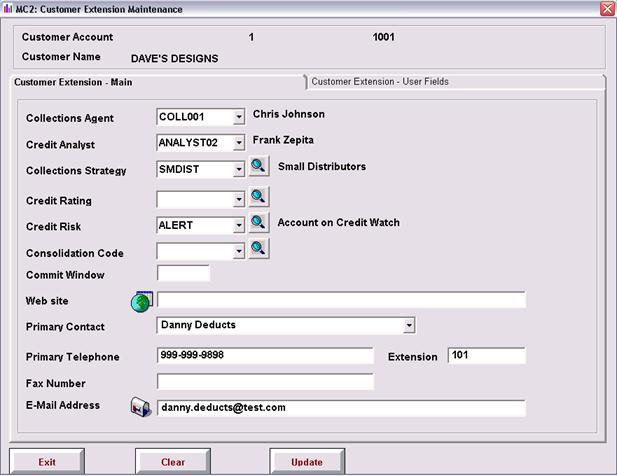
Collection Agent: Assign
Collection Agent to a customer.
Credit Analyst: Assign
Credit Analyst to a customer.
Collection
Strategy: Group
customers by common collections policies.
Credit Rating: Give
customers a crediting rating based off their credit
report.
Credit Risk: The
Credit Management panel has this additional
subsetting feature. You can select a specific credit risk to subset on.
Consolidation
Code: Group customers together based upon a common
marketing brand.
Commit Window: Forward days to consider for credit
calculations. All open orders past this
number of days will be ignored.
Web Site: Customer’s
web address.
Primary Contact: The primary contact for this
customer. All correspondence will
default to this customer.
Primary
Telephone: Default
contacts phone number.
Extension: Extension
of default contact.
Fax Number: Fax
number for default contact.
E-Mail Address: E-mail
address for contact.
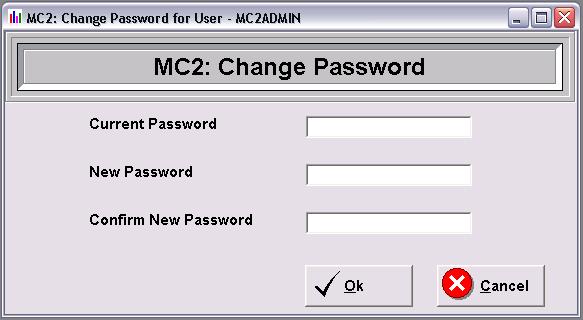
A user can change
their password by clicking User in the main tool bar.

Simply enter your
current password, your new password and confirm your new password then click
OK. Your new password must be used on
your next login to MC2.
MC2 System
Administrators can reset user passwords by going into Application Security à double click the user profile you want to reset and select Maintain
User Profile. Simply reenter a password
in the password field and select Update.
The
Agent Reminder screen is the first screen that is visible when signing into
MC2. This screen is mission control for
all activity reminders that require collector follow up, and replaces other tracking
systems such as note pad, sticky notes and email reminders. This screen displays all of the open
activities that are due or past due for action.
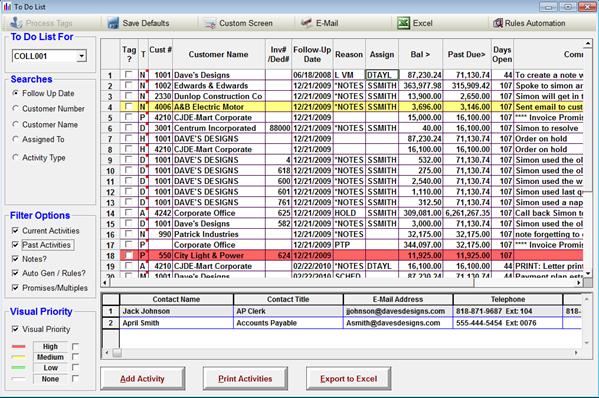
Unlike
the Activity Management view, this screen focuses solely on those activities
which require immediate attention. Using
the searches and filter options, the user can prioritize their daily tasks.
The
default agent/analyst that appears on this screen when they sign into MC2 will
be the one that is linked to the user’s application security. Depending on whether a user is set up a
*Collections or *Deductions in their user profile will drive whether this
screen defaults to Agent or Analyst.
Follow Up Date Date that the reminder is
due. Selecting this search will sort in
ascending date order (oldest to newest)
Customer
Number Sorts the reminder
activities by customer number
Customer
Name Sorts the
reminder activities by customer name
Assigned
To Sorts the
reminders by the
Activity
Type Provides a
list by the type of activity
Current
Activities Display
activities that are due today.
Past
Activities Display
all activities whose follow up date has past.
Notes? Includes
all Notes (N) type activities.
Auto
Gen/ Rules Includes
all posted rules generated activities.
Promises/ Multiples Includes all Promise (P) or
payment plan/multiple (M) activity follow ups.
Visual
priority on the activity management screen refers to the priority level of an
activity that has been entered into MC2.
The visual priority colors are customizable by install, and are defined
in the final tab of the configuration master.
MC2 Admin authority is needed to change the priority colors. One or more priority filters can be selected
at a time. Selecting all or none on the
screen will show all activities.
High Selecting
this filter only will pull in all activities that are marked as high priority.
Medium Selecting this
filter only will pull in all activities that are marked as medium priority.
Low Selecting
this filter only will pull in all activities that are marked as low priority.
None Selecting
his filter only will pull in all activities that have no priority assigned to
them.
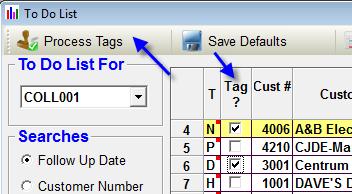
Key Columns in the
Reminder screen display:
Tag? Tag as complete. This column consists of check boxes that the
user can click into to mark transactions as complete. This will allow the user to tag multiple
transactions at one time. Once all the
desired boxes have been selected, simply click on the Process Tags option on
the top of the screen to close all of these activities as completed.
Activity
Type Type of
activity that was generated:
A =
Activity Follow Up (Actionà Add Activity or Invoice
Activity)
N = Notes
Activity Follow Up
D =
Deduction Note Follow Up
E = Email
Follow Up
R = Rules
Generated
L =
Letter Generated
P =
Promises Activity
Customer
Number Customer number
linked to the activity.
Customer
Name Customer for
which the activity was created
Invoice # The
transaction document number will appear on all invoice activities or deduction
note activities that were generated.
Activities generated at a customer level will not display invoice
numbers.
Activity
Reason The
notes/activity reason code that is assigned to that activity.
Follow
Up Date Scheduled
follow up date for that activity.
Assigned To The activity
assignment personnel attached to the activity.
This is the internal person or department that the collector is working
with to adjudicate the open issue or balance.
Comments/Notes The comment or notation that
is associated with the activity maintenance record.
Past Due This column
will always display the past due clean receivable balance for the
customer. The displayed value in the
Past Due column is as of the nightly update program run or the last time the
account was manually re-aged.
Balance The “Balance”
column on this screen is variable based on the type of activity that the
collector is reviewing. This is by
design, as the Activity Management and Reminder screens are created to provide
a unique lens to the follow up activities that the collectors have scheduled
for themselves. Please see table below:
|
|
|
|
Reminder Screen Display Columns
|
|
Type
|
Description
|
Level
|
Past Due
|
Balance
|
|
D
|
Deduction Note Activities
|
Invoice
|
Customer Clean Past Due Balance
|
Invoice Balance
|
|
E
|
Email Activities
|
Customer
|
Customer Clean Past Due Balance
|
Customer Total Due Balance
|
|
L
|
Letter Activities
|
Customer
|
Customer Clean Past Due Balance
|
Customer Total Due Balance
|
|
M
|
Multiple Reminder activities
|
Customer
|
Customer Clean Past Due Balance
|
Customer Total Due Balance
|
|
N
|
Collection note activities
|
Customer
|
Customer Clean Past Due Balance
|
Customer Total Due Balance
|
|
P
|
Promise to Pay activities
|
Invoice
|
Customer Clean Past Due Balance
|
Promise Balance
|
|
|
|
|
|
|
|
A
|
Activity Follow Up
|
Variable
|
|
|
|
|
Created via Action--> Add Activity
|
Customer
|
Customer Clean Past Due Balance
|
Customer Total Due Balance
|
|
|
Created via Add Invoice Activity
|
Invoice
|
Customer Clean Past Due Balance
|
Invoice Balance
|
|
|
|
|
|
|
|
R
|
Posted
Rules Activities
|
Variable
|
|
|
|
|
Customer Rules
|
Customer
|
Customer Clean Past Due Balance
|
Customer Total Due Balance
|
|
|
Invoice Deduction Rules
|
Invoice
|
Customer Clean Past Due Balance
|
Invoice Balance
|
|
|
|
|
|
|
The displayed value in the Balance column is as
of the nightly update program run or the last time the account was manually
re-aged.
Note: The full balance due and past due totals for
an account are always available via the collection management, snap shot,
At-A-Glance or other summary screens that are focused on the collection
process.
The standard MC2 Pop-Up menu options are present
to allow the user to quickly maneuver to different screens so that they can
make informed decisions regarding the activities. The one item of note is the available options
for viewing or maintaining activities will change on the MC2 Pop-Up Menu
depending on the type of activity that the user has positioned to.
For
example, in the screen shot below the cursor is positioned to an “N” type
(note) activity and the options available read “Maintain Note Activity” and
“Maintain Note”. If the cursor were
positioned on a “P” type (promise) activity, the available options would be
“Maintain Promise Activity” and the Maintain Notes options would be grayed out.
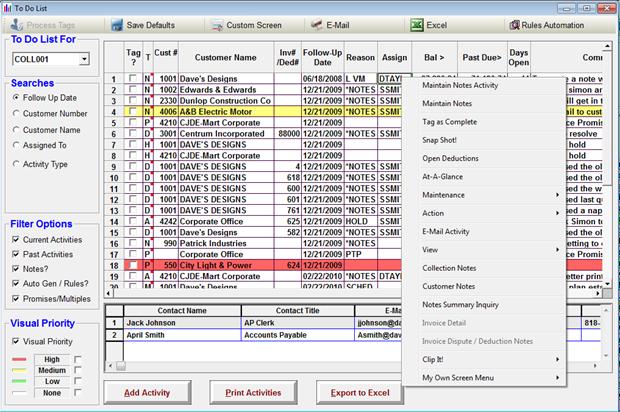
In
addition to the standard tool bar options (Save Defaults, Custom Screen, Email
and Excel), the Reminders screen tool bar has two unique action buttons:

As
noted in the column section above, the Process Tags button on the menu bar is
used in conjunction with the “Tag?” column in the form grid. Once one or more activities are checked in
the “Tag?” column, the Process Tags button becomes activated. Click the Process Tags button to tag the
activities as complete and send them to the history file.
The
Reminders view display all activities that have been manually created by the
collectors or posted in mass to this queue via the Rules Engine. On the upper right hand corner or the
Reminders menu bar, is the Rules Automation button which grants access to all
activities that have been generated via the rules engine, but not posted into
the collector queue.
The
Rules Automation provides efficiency and organization by allowing collectors to
keep rules generated follow ups in a separate queue from those that were
manually generated. Additionally,
workflow has been added into the rules automation screens which prompt the
collectors to work through a list of accounts with suggested actions in a much
more efficient manner.
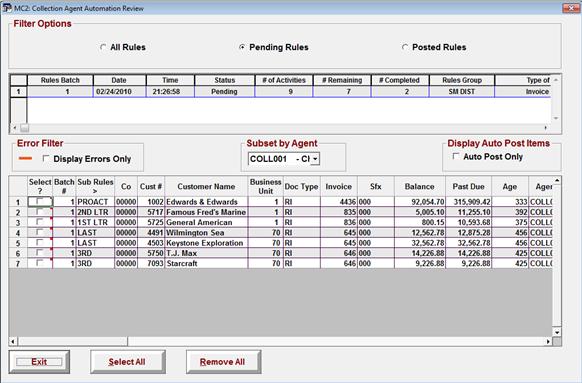
Please
see the Rules Automation Workflow portion of this manual for more information
about this feature.
Across
the bottom of the Agent Reminders screen there are functional buttons provided.
The
Add Activity button will open a blank Activity Maintenance screen. As this was not launched from a specific
customer account, the user will need to select the appropriate customer
account. The first drop down box that
appears on the form is for the business unit/company and the second field is
for the customer number. To activate a
customer selection list, click the magnifying glass to the right of the field,
and the “Customer Name Search” form will open.
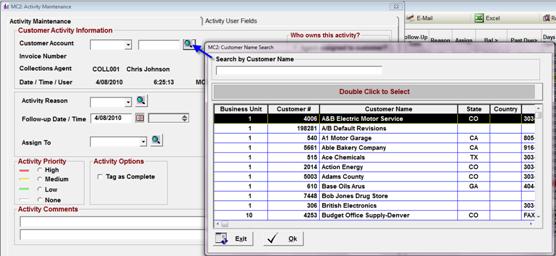
Complete
remaining activity fields as normal.
The
Print Activities button can be used to generate a quick report of the
activities displayed on this screen.
When pressed, the system will prompt the user to approve the default
printer, or select a new one. If the
user profile is set to print preview reports, they will have the opportunity to
review the report before printing.
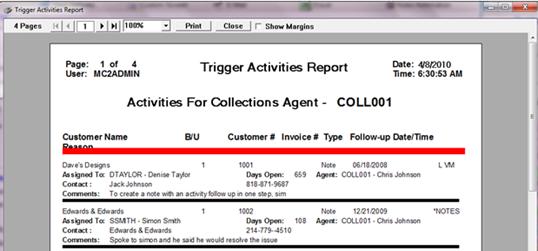
The
Export to Excel button can be used to provide the same information as generated
in the activity report in an easy to use excel format.
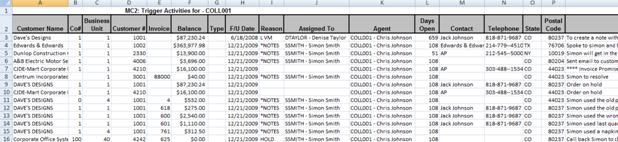
At the bottom of
the Reminders screen, there is a customer contact window. Depending on which activity that the cursor
is positioned to, this window will display the contacts which are associated
with that customer number

There are 6 main
Management views that collectors will use on a regular basis, and these are
accessible through the View menu option on the tool bar located at the top of
the screen. Each of the main management
views has been designed to address different challenges posed to the collection
staff.
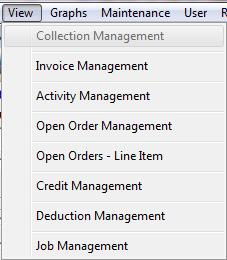
The main
management views are as follows:
- Collection Management - This module
is used to manage customer’s portfolios.
- Credit Management - This module
manages the credit status of your customers
- Invoice Management - This module is
used to manage all the invoices in the portfolio.
- Deduction Management - This module
manages your customer’s deductions portfolios.
- Activity Management – This module is
used to manage current/past, future and historical Activities.
- Open Order Management - This module
manages open and held orders
- Job Management –
This module is available in JDE implementations for the construction
industry only.
Note:
If a management view appears to be lightly greyed out as the Collection
Management option appears above, that means that the screen is already
open. Simply select to cascade tiles
(F2) and the hidden screen will appear.
You can have more
than one Management View open at one time.
To view all the open management views, simply select F2 to Cascade and
F3 to Center (make vertical) your active window. You can also select the Windows option in the
Main Toolbar to activate these options using your mouse.

The Collection
Management View in MC2 is designed to effectively manage
customer’s portfolios. In most
implementations this screen is the primary screen from which the collector will
launch account reviews. From this screen
the collectors can manage customer balances, track customer touches, last
collection notes, and review aging status at a quick glance. There are a variety of analysis tools
available to manage your customer aging portfolio.
For most ERP implementations this includes entity and in some cases headquarters (entity group)
support.
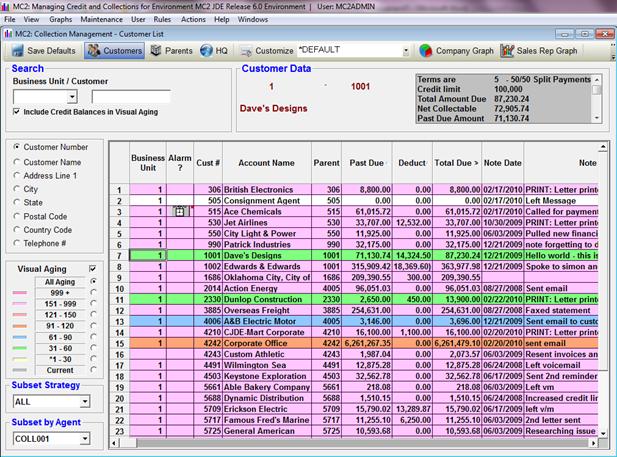
From the
collection management view you can drill to the details of any customer account
that it displayed. Position the mouse to
the desired account and double click on any column to display the MC2 Pop-up
menu for navigation options:
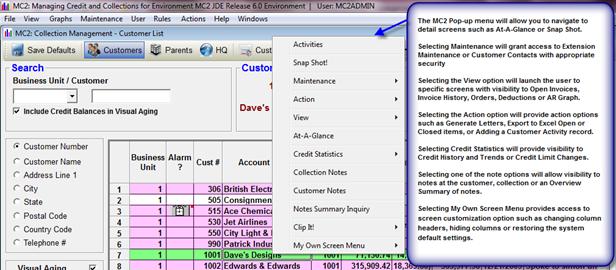
Note:
If the user double clicks on the entity (parent) column while in the
customer view of collection management to access the MC2 Pop-up menu it will
launch to the user to the entity level.
Clicking on any other column will launch the user to the customer level
only.
On the collection
management view each of the aging columns and accumulated aging columns are
sortable by right clicking on the column heading. In addition, any column with a “>” in the
column heading are also sortable in this manner.
When checked and visual aging is selected, this function will include
customers who have credit balances in the selected aging bucket. If unchecked, those customers will be
excluded from the selection.
Primary searches
include customer number and customer name.
When either of these options is selected the user can also select a
specific business unit for viewing.
Additionally the visual aging options are available for use, and the
user is able to subset by strategy code if necessary.
Customer Number Sorts the data by customer number and allows user to position
to specific customer numbers by entering the number in the selection box at the
top of the screen.
Customer Name Sorts the data by customer name and allows user to position
to specific customer numbers by entering the number in the selection box at the
top of the screen.
Secondary
searches include self explanatory searches such as Address Line 1 (often a DBA or practice name), City,
State, Postal Code and Country.
The Telephone #
search found on collection management is driven based on the telephone number
associated with the primary contact record in MC2.
MC2 classifies customers
and invoices by color based upon its aging criteria. The colors that are seen on the collection
management view are assigned based on the oldest debit balance aging bucket for
the customer account. The Aging Buckets
are defined in the Configuration Master and require System Administrator rights
to access and update.
The Visual Aging
filters are only supported for the customer/entity number and name
searches. Selecting the Visual Aging
option on any panel will subset the information based on the aging date. Each of the aging buckets displayed on the
screen is a cumulative aging filter.
For example,
selecting *1 – 30 on the
collection management view above would display those customers which
have a balance in the *1- 30 aging bucket or older.
Collection
Strategy codes are defined in the table code maintenance section of MC2. Generally strategy codes are used to group
customers together based upon various parameters which identify those customers
as sharing common collection policy(s).
Once strategy codes have been defined and attached to the customer
extension maintenance, it is possible to subset the collection management view
to see all customers related to that strategy.
For example if
all cash on delivery accounts were assigned strategy code of CASH, it would be
possible to view all CASH accounts easily via the collection management view by
selecting this option from the strategy code drop down menu.
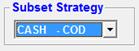
Collection
management view can be subset by a specific agent portfolio, or switched to ALL
AGENTS to view all open accounts regardless of agent assignment.
*NOTE:
Access to all agents must be granted by the MC2 Admin for each user.
The grey customer
data window in the upper right hand portion of the collection management view
will display key information regarding the account which the cursor is
positioned to.
Notes? A
check mark will appear in this column if collection notes are present on the
account.
Notes The last
collection note on the account will appear in this column.
Note Date Date of the last
collection note entered on the account.
Next Activity Date of next activity on the account. Open activities whose dates are in the past
will appear with a < in front of the date.
Alarm? An
alarm clock will appear present in this column if a collection note has been
marked as a *ALARM notation.
Credits Total
of all credit transactions as defined in database. This may vary by installation based on ERP
transaction type or transaction balance.
Deductions Total
of all transactions with a deduction (INVTYP) code assigned to them. Excludes any collectable deduction types
Disputes Total
of all transactions with a dispute code (INVRSN) assigned to them.
Net Collectables The net collectables total includes all
transactions with a blank invoice type (INVTYP), plus any items that are coded
with a collectable invoice deduction type
Total Unapplied Cash Total of the "RU"
transactions open on the account {Availability may vary by ERP}
Total Credits Total credit balance
transactions open in the system.
Today's Forecast* Cash flow forecast. Using historical payment trends (DBT 90) MC2
forecasts the expected cash receipts due from customers today.
Tomorrow's Forecast* Cash flow forecast. Using historical payment trends (DBT 90) MC2
forecasts the expected cash receipts due from customers tomorrow.
Forecast Next 7 Days* Cash flow forecast. Using historical payment trends (DBT 90) MC2
forecasts the expected cash receipts due from customers in the next 7
days.
Next 30 Days* Cash flow forecast. Using historical payment trends (DBT 90) MC2
forecasts the expected cash receipts due from customers in the next 30
days.
Forecast > 30 Days* Cash flow forecast. Using historical payment trends (DBT 90) MC2
forecasts the expected cash receipts due from customers in greater than 31
days.
# of Cust Touches – MTD Field on collection management screen
which counts the number or collection notes and activities that have been
posted this account during the course of the month.
When the entity button is selected, the collection manager module
displays the aging information for all the parent accounts in your accounting
system. All of the features available
for the customer are available for the entity when drilling into an
entity.
As the entity is a roll up of the child account data, selecting
options such as the SnapShot for an Entity will display the consolidated notes,
invoice transactions, open reminders, paid history,
etc… for all customers belonging to that entity.
In the collection management view at entity level it is possible to
see the summary of all related child accounts simply by clicking the (+) sign
next to the entity number. After a brief
delay MC2 will expand (-) the parent data and return a subset list which shows
the summary aging line for each of the related child accounts. Clicking on a child account line will launch
just that customer’s screen that will information while clicking on the entity
line will continue to show the roll up of all related accounts.
Note that there is an option at the top of the screen that allows the
user to filter out the zero balance child accounts. Checking this radio dial will leave only
accounts with balances in the display.
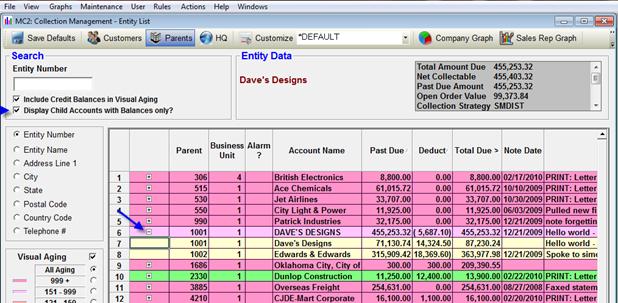
When the headquarters button is selected, the collection manager
module displays the aging information for all of the entities assigned to that
headquarters. Only certain features are
supported when drilling into a headquarters account.
Each accounting system handles this level of consolidation
separately. Some features will not be
available because they are not supported in the source accounting systems.
The credit
management view is designed to focus on the credit status the customer
portfolio. While collection management
focuses on the last touches and notes to the accounts and forecasting trends,
the credit management view shifts focus toward credit limits, DBT trends and
exposure.
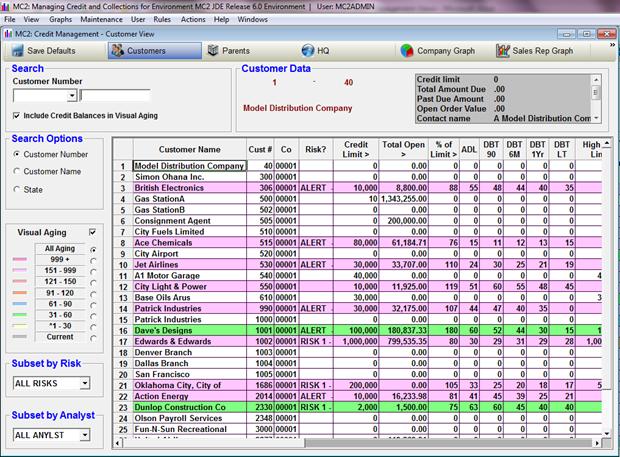
On the credit
management view each of the aging columns and accumulated aging columns are
sortable by right clicking on the column heading. In addition, any column with a “>” in the
column heading are also sortable in this manner.
Primary searches
include customer number and customer name.
When either of these options is selected the user can also select a
specific business unit for viewing.
Additionally the visual aging options are available for use, and the
user is able to subset by strategy code if necessary.
Customer Number Sorts the data by customer number and allows user to position
to specific customer numbers by entering the number in the selection box at the
top of the screen.
Customer Name Sorts the data by customer name and allows user to position
to specific customer numbers by entering the number in the selection box at the
top of the screen.
A secondary search by State is available
on this screen as well.
MC2 classifies
customers and invoices by color based upon its aging criteria. The colors that are seen on the collection
management view are assigned based on the oldest debit balance aging bucket for
the customer account. The Aging Buckets
are defined in the Configuration Master and require System Administrator rights
to access and update.
The Visual Aging
filters are only supported for the customer/entity number and name
searches. Selecting the Visual Aging
option on any panel will subset the information based on the aging date. Each of the aging buckets displayed on the
screen is a cumulative aging filter.
Credit Risk codes
are defined in the table code maintenance section of MC2. Generally credit risk codes are used to group
customers together based upon payment trends or other risk indicators. Once the credit risk codes have been defined
and attached to the customer extension maintenance, it is possible to subset
the credit management view to see all customers related to that credit risk.
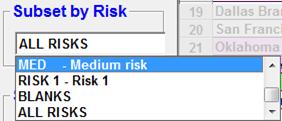
The credit
management view can be subset by a specific agent or analyst portfolio. The decision to subset this screen by Agent
or Analyst is controlled in the first page of the configuration master.

*NOTE:
Access to all agents/analyst must be granted by the MC2 Admin for each
user.
Risk ? Credit
Risk: The risk associated with
conducting business with a customer, entity or headquarters. This user
definable field differs from the Credit Rating in that it defines your trading
relationship and not what is reported to external agencies. It is assigned to
customers, entities and headquarters through extension file maintenance.
Credit Limit Credit limit for the account. By positioning within this cell, users with
appropriate security are able to update the credit limit in MC2.
Total
Open: The sum
total of both the AR balance (clean and dirty) plus the open orders on the
account.
% of
Credit Limit: This is a
calculated value displayed in the MC2 credit management grid. The formula is
total due (open AR plus open orders) divided by the credit limit.
Avg Open DBT Average days open for all transactions open
on the customer account.
DBT 90
Calculation Calculated
in the ADP program at month end. This is
the average DBT for all eligible receivables paid within the last 90 days
If
there are no payments in history for the last 90 days (or if the DBT 90 is exactly zero) the system will look at the
average real age of the open transactions.
If the average real age is >0, this will be entered into the DBT90
field.
DBT 6 Months Calculated in the ADP
program at month end. This is the
average DBT for all eligible receivables paid within the last 180 days
DBT 1 Year Calculated in the
ADP program at month end. This is the
average DBT for all eligible receivables paid within the last 365 days
DBT Lifetime Calculated in the ADP
program at month end. This is the
average DBT for all eligible receivables paid in history. (NOTE:
History transactions in MC2 are stored for as long as they are available
in your ERP system.)
High Credit Limit: The high credit limit that the customer has been
assigned.
High
Credit: The
maximum open balance that the customer has had.
This information is captured at the time of the nightly update
program. (*NOTE this is based on high balance since the implementation of MC2.)
High
Exposure: The
maximum AR plus open order value that customer has had. . This information is captured at the time of
the nightly update program. (*NOTE based on implementation date for MC2)
Last Review Unique to JDE this
is equal to the last credit review date.
Credit limit
changes can be made directly in MC2 and will feed back to the source ERP. As credit limit changes are critical to AR
processing the update back to the source system occurs immediately. The ability to update credit limits is
strictly controlled in the user application security set up options.
From the credit
management panel find the customer whose limit needs to be updated. Position the cursor to the credit limit field
and click into the panel to allow editing.
Change the credit limit to the new total, and either click on the enter
button or exit the cell. The system
will prompt to ask whether you are certain you wish to update the credit limit.
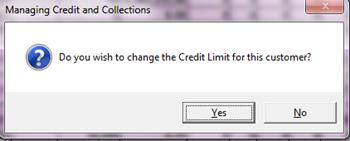
When you click on
yes, the Credit Limit Changes screen will option and prompt for the user to
complete key information:
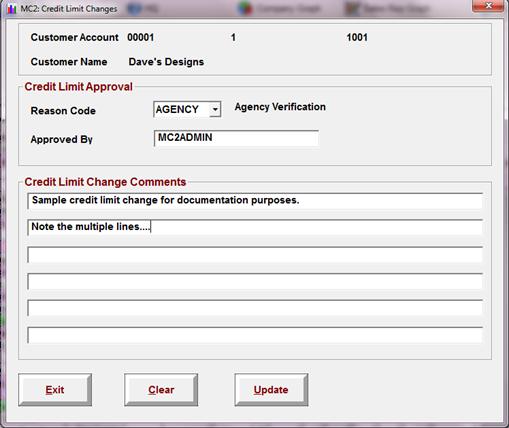
Reason Code The reason
for the credit limit change.
Approved By Key in the name of the person
authorizing the credit limit change.
Credit Limit Change Comments Up to 6 lines of comment are available
for documentation of why the credit limit is being made.
In order for the
credit limit to change on the account, the user must click the Update button.
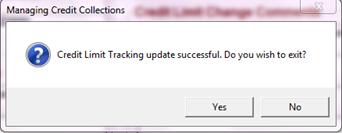
To view the
Credit Limit changes that have been made double click on the account from any
main management view and select Credit Statistics à Credit Limit Changes.

This will launch
the Credit Limit Change History screen.
This screen documents each time the credit limit for an account has been
changed via MC2. This complete audit
trail will log:
·
The
date of the change
·
The
user Id that made the change
·
The
reason code associated with the change
·
Credit
limit before the change
·
Credit
limit after the change
·
Approved
by
·
Up to
6 lines of comment associated with the change
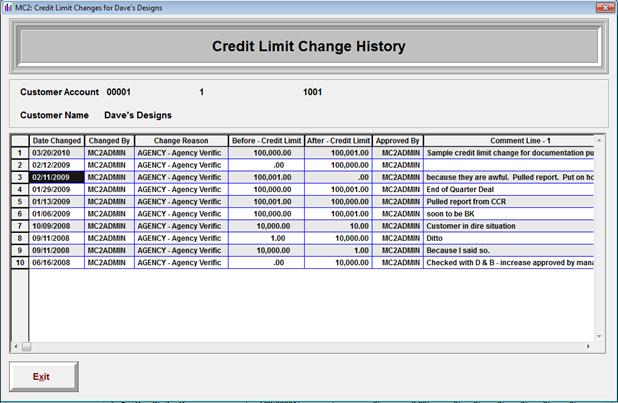
Note: Credit limit changes initiated via the
source ERP will not be captured within the Credit Limit Change History screen.
While this screen
is self titled “Invoice List”, the invoice management view truly manages all
open transactions in the database. As it
is possible to search for a specific transaction across the entire database,
this screen becomes key for researching information. The enhanced subset options at a transaction
level are also critical for managing root cause analysis across the AR
portfolios.
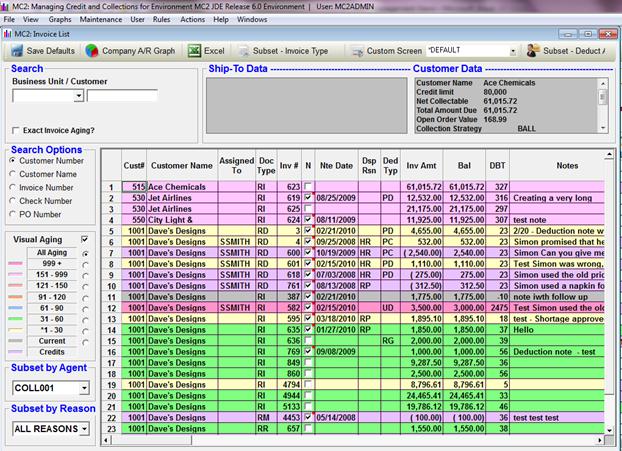
Customer Number Sorts the data by customer number and allows user to
position to specific customer numbers by entering the number in the selection
box at the top of the screen. Business
unit sort is also active in the customer number search.
Customer Name Sorts the data by customer name and allows user
to position to specific customer name by entering the alpha name in the
selection box at the top of the screen.
Invoice Number Allows the user to search for a specific transaction
number across all customers in the database.
(This is the JDE Document number
field.) While the field is named
invoice number, this search is active for credits, debits, invoices and
deductions – all items with a document number in the system.
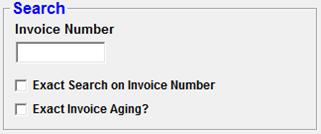
When
the invoice number search is selected, an additional filter becomes available
for use.
Exact Search on Invoice Number will
change the screen sort from a position to search to an exact search. All other invoices will be filtered out.
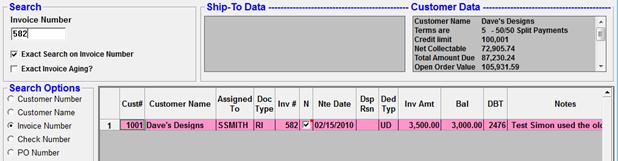
Check Number Allows the user to search for a check number
that has been posted to an invoice.
Note: As this is across accounts, this sort may
take some time. If you are working with
a specific customer or entity it is recommended to use the invoice history look
ups for faster performance.
PO Number Available
in select ERP’s only. Allows the user to
search for a specific PO number across all transactions.
As noted on each
of the customer based screens, MC2 classifies customers and invoices by color
based upon its aging criteria. The
colors that are seen on the invoice management view are assigned based on the
age of that specific transaction. The
Aging Buckets are defined in the Configuration Master and require System
Administrator rights to access and update.
As always the
visual aging buckets on the invoice management view are cumulative. However there is an additional filter on this
screen that is active for all searches that will allow the user to change the
way that the aging buckets work. This is
the Exact Invoice Aging filter:

When this filter
is selected in conjunction with a visual aging bucket, only transactions that
match that aging bucket will display.
For example if we selected the exact invoice aging filter and subset the
screen by the current aging bucket the screen displays items that are current,
and not current plus older.
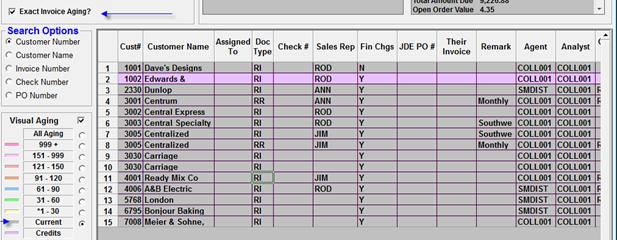
Note: Selecting this option will slow down
the screen load time significantly as MC2 will be required to filter all
invoices before loading the screen display.
Due to the
transactional detail provided on the invoice management screen and the ways in
which this screen can be integrated into the collectors workflow there are
several key subsets that have been added to this screen.
Subset by Invoice Reason/Subset by invoice
type
The default
subset on the invoice management screen is to open by Invoice Reason (Dispute)
code. This allows the user to filter the
screen down to all transactions that are coded with a specific dispute reason
such as PO issues.
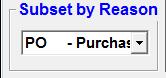
In addition to
dispute reason codes, it is often necessary to drill down to the deduction type
codes that are on transactions. The
invoice management screen is designed to allow the user to toggle to the
invoice type codes (deductions) as well.
To change the available subset over to invoice types, simply click the
“Subset – Invoice Type” button on the center of the main tool bar.

It will then be
possible to subset the screen by a specific deduction type, or to view all transactions.
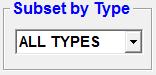
To switch the
screen back to invoice reason codes, simply click the “Subset – Invoice Reason”
button that is now displayed on the center of the main tool bar.

Subset by Agent/Analyst
The default on
this screen will be to subset by the Agent associated with the
transactions. In many implementations,
this filter will be sufficient as the agent assigned to the account is the same
person as the analyst assigned to the account.

For those
implementations where there is a separate deduction analyst, it is possible to
subset on this screen by analyst by clicking on the Subset – Deduction Analyst
from the menu bar.

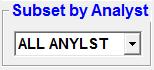
Simply click on
the Subset – Collection Agent button to toggle the screen back to Agent.

As the invoice
management screen is transactional in nature, the columns that are displayed
for quick viewing are the same as those that are seen on any of the detail
screens in MC2: View à Open Invoices, Snap Shot, Hot Point detail.
Doc Type Document
type from source ERP system. For example
in JDE this includes types such as RI, RC, RB, R5 etc.
Invoice # Document
number associated with the transaction.
Order # Sales order
number associated with an invoice transaction.
Invoice Reason The dispute reason code that is associated to
the transaction. The dispute reason code
can be changed on this screen by selecting a code from the drop down menu.
Invoice Type The deduction reason code that is
associated with the transaction. The deduction
reason code can be changed on this screen by selecting a code from the drop
down menu.
Notes? This
column will have a check mark in it if there is an invoice or deduction note
present on the transaction. Hovering the
mouse pointer over the red dot that appears in the right corner of the cell
will allow the user to see the last invoice or deduction note that was posted
in a text tip box.
Note: If there are both invoice notes and deduction
notes present on the transaction, the deduction note will take precedence.
Note Date Date
of the last invoice or deduction note that was entered for that transaction.
Notes The
last invoice or deduction note entered on the transaction will appear in this
column.
Invoice Date Invoice/billing date associated with the
transaction as shown in the source ERP.
Due Date Due date of the
transaction as shown in the source ERP.
Real Age The
number of days beyond terms for that transaction as of the nightly update
program.
Expected Receipt Date This is the date that MC2 assigns to all transactions in the system, and
is the date that payment is expected to be applied to the transaction.
To establish an expected receipt date, the
system first applies the DBT 90 average for the customer and applies that
against the due date for all open transactions.
If there is a promise to pay activity that
has been attached to an invoice, the promise date that is associated with that
activity will override to the expected receipt date in the nightly update.
Terms The
terms that are associated with the transaction at the time of invoicing. In some cases, this may be different than the
terms associated with the customer master.
Statement Date Available in JDE this column is populated when
there is a statement date associated with the transaction in the source ERP.
The deduction
management screen strips out all clean receivable transactions and provides a
complete deduction aging breakdown.
Unlike the invoice management screen which shows only detail lines, the
deduction management screen summarizes the deductions on the account and
provides a high level view. For this
reason, a customer number may repeat multiple times on this screen – one
summary line will appear for each deduction type per customer.
The deduction
management screen is supported at customer level only at this time.
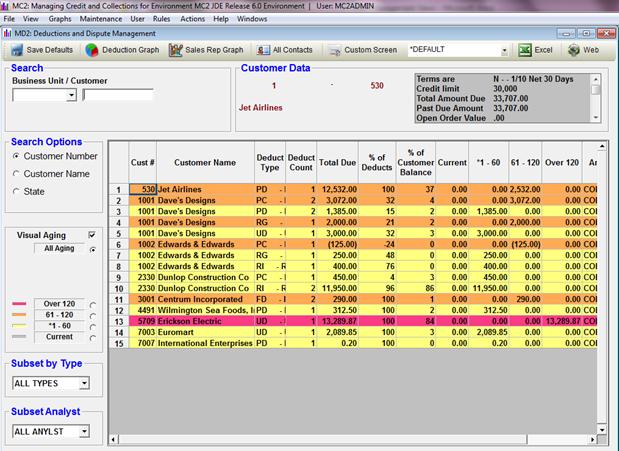
The aging buckets
defined in the deduction management screens do not follow the MC2 Aging Setup
that is defined in the Configuration Master Tailoring. Instead there is separate configuration that
is specific to deduction management; the MD2 Aging Setup. The aging buckets defined for Deduction
Management do not have to be the same as the
regular MC2 aging buckets. Due to the
nature of deduction, it is very common to have extended aging buckets on the
deduction screens.
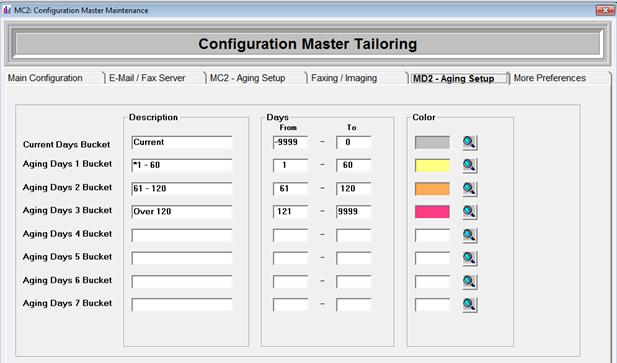
MC2 Admin
authority is required to access or change the deduction aging configuration.
On the deduction
management view each of the aging columns and accumulated aging columns are
sortable by right clicking on the column heading. In addition, primary columns such as
deduction count, % deductions, % customer balance are all sortable with a right
click on the column headers.
To drill into the
detail of what makes up a deduction line on the deduction management screen,
simply double click on the desired line and select Open Deductions from the MC2
Pop-up menu.
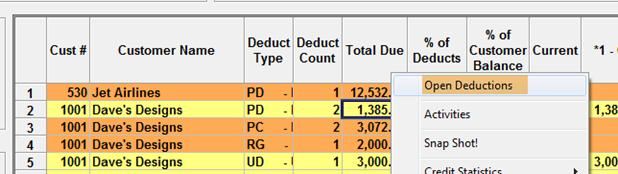
This will open
the Open Deductions screen where analysis can be done on the transaction detail
lines for all open deductions on that account.
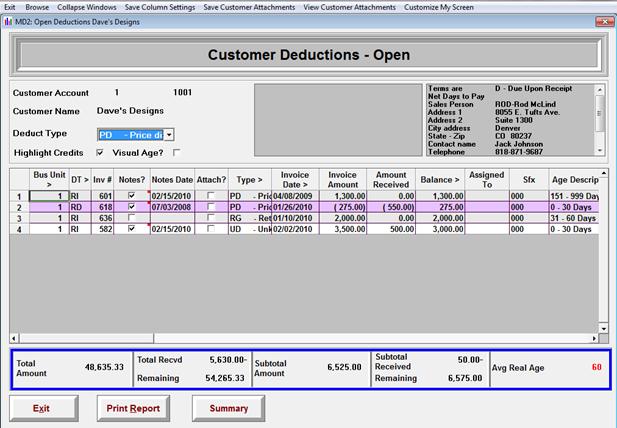
Primary searches
include customer number and customer name.
When either of these options is selected the user can also select a
specific business unit for viewing.
Additionally the visual aging options are available for use, and the
user is able to subset by strategy code if necessary.
Customer Number Sorts the data by customer number and allows user to position
to specific customer numbers by entering the number in the selection box at the
top of the screen.
Customer Name Sorts the data by customer name and allows user to position
to specific customer numbers by entering the number in the selection box at the
top of the screen.
A secondary search by State is available
on this screen as well.
As mentioned
above, the aging buckets that appear on the deduction management screen are
100% deduction aging and are driven by the MD2 aging setup in the configuration
master. Other than this, they function
in the same manner as the MC2 visual aging buckets. Each visual aging bucket is cumulative and
will filter the screen to display the selected criteria.
Subset by Type
The primary
subset available on the deduction management screen is by deduction type. When a specific deduction type is selected
the user will get a summarized list of all accounts with that deduction type.
Subset by Analyst
Deduction
management view can be subset by a specific analyst portfolio, or switched to
ALL ANYLST to view all open accounts regardless of analyst assignment.
*NOTE:
Access to all analysts must be granted by the MC2 Admin for each user.
Deduct Count The number of transactions that make up
that deduction aging line.
% Deductions % of the total deductions that deduction
line makes up for the customer. The
total of all deduction lines for a customer will always equal 100%.
For example there may be 60% pricing 10% Shortage and 30 % unknown
deductions.
% Cust Balance % of the total customer balance (clean and
dirty) that the deduction line makes up for that customer.
Aging Columns All aging columns on the deduction management
screen reflect only the deduction balance for that deduction line.
Accumulated Aging The accumulated aging buckets on deduction
management are the cumulative deduction lines.
From the Activity
Management screen in MC2 the user can manage all activities in the system past,
present and future. From this screen it
is also possible to view the activities that have been closed to the history
file in MC2.
The activity
management view is fully supported at the customer level. Entity number will display however full
search capability is not available at this time.
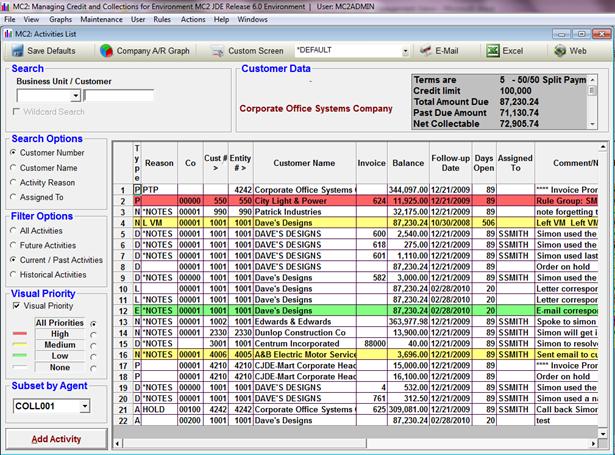
To see the full
details of an activity that has been created, simple double click on the
activity and select the appropriate activity maintenance option. For example on an N (Notes) type activity the
available option would read:

Note:
The caption of the option available will change slightly depending on
the type of activity, (Maintain Promise Activity, Maintain Invoice Activity,
etc.) however the system will always launch the appropriate activity
maintenance screen.
Once this option
is selected, the user is able to view the full Activity Maintenance screen that
was generated when the activity was created.
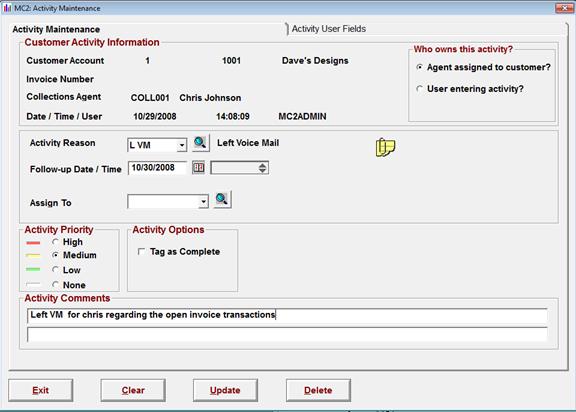
If the user needs
to maintain any portion of the activity, such as the follow- up date, they can
make their change to the activity here, and click the update button.
From the activity
management view the collector can still launch to any of the standard MC2
detail screen such as Snap Shot, At-A-Glance, Viewà Open Invoices etc. simply by double clicking on an account and
selecting the desired view or action from the MC2 Pop-up menu as done in other
screen.
Customer Number Sorts the open activity list by customer number and
allows the user to position to a specific customer using the search field at
the top of the screen.
Customer Name Sorts the open activity list by customer name
and allows the user to position to a specific customer using the search field
at the top of the screen.
Activity Reason Sorts the open activities by the activity
reason code associated with the open activities.
Assigned To The name of the assignee that has been
attached to this activity. The assignee
is an internal person or department that the collector is working with to
adjudicate the open issue or balance.
When the “Assigned To” field is maintained this becomes a powerful tool
for sorting all open activities for that assignee into an actionable listing.
All Activities When this filter is selected all open
activities will display including those whose follow up day is today, in the
past or in the future. It is recommended
to keep the “All Activities” option as the standard default on this screen.
Future Activities When this filter is selected only activities
that have follow up dates in the future will display.
Current/Past Activities When this filter is selected all
current or past activities will display.
This sort mirrors that of the Reminders screen that appears for the
collectors when they first sign in each morning.
Historical Activities Checking the historical
activities filter will display only activities that have been closed to the
history file. Note if an activity is
deleted and not closed, it will not display in history.
Visual priority
on the activity management screen refers to the priority level of an activity
that has been entered into MC2. The
visual priority colors are customizable by install, and are defined in the
final tab of the configuration master.
MC2 Admin authority is needed to change the priority colors. One or more
priority filters can be selected at a time.
Selecting all or none on the screen will show all activities.
High Selecting
this filter only will pull in all activities that are marked as high priority.
Medium Selecting
this filter only will pull in all activities that are marked as medium
priority.
Low Selecting
this filter only will pull in all activities that are marked as low priority.
None Selecting
this filter only will pull in all activities that have no priority assigned to
them.
Depending on
whether a user is set up a *Collections or *Deductions in their user profile
will drive whether this screen defaults to Agent or Analyst.
Activity Types Type of activity that was
generated:
A = Activity Follow Up (Actionà Add Activity or Invoice Activity)
N = Notes Activity Follow Up
D = Deduction Note Follow Up
E = Email Follow Up
R = Rules Generated
L = Letter Generated
P = Promises Activity
M = Multiple Activity Follow Up
Reason The
notes/activity reason code that is assigned to that activity.
Invoice The
transaction document number will appear on all invoice activities or deduction
note activities that were generated.
Balance Depending
on the type of activity that is generated the value that is displayed in this
column will vary. On most activities,
the balance column will display the customer total due balance. However, on deduction activities, the balance
column will display the balance of the transaction associated with the
activity.
Follow Up Date Scheduled follow up date for that
activity.
Assigned To The activity assignment personnel attached to the
activity. This is the internal person or
department that the collector is working with to adjudicate the open issue or
balance.
Comments/Notes The comment or notation that is associated with the activity
maintenance record.
This view manages
all open orders. By default, this screen
displays all active orders in the system, both those that are scheduled to
ship, and those that are on hold. The
open order management screen is a mirror to information that is available in
the operating system.
Depending on the business decisions made in each individual
implementation, this screen can be utilized as inquiry only or to hold and
release orders back to the source ERP system. The ability to hold or release orders in MC2
is secured by user ID.
If there are any custom modifications to the order process in JDE, and
you decide to hold and release from MC2, this process will need to be fully
tested to ensure that the correct programs are called. Please contact your support representative to
discuss.
Orders displayed
on this screen will appear with no color if they are open orders that are
pending but not on hold. Orders that are
on hold will appear in color. The color associated with held orders is
customizable by implementation.

This color is
maintained on the More Preferences tab of the Configuration Master by someone
with MC2 Administrator authority.
Order management
is currently supported at the customer level across all ERP systems.
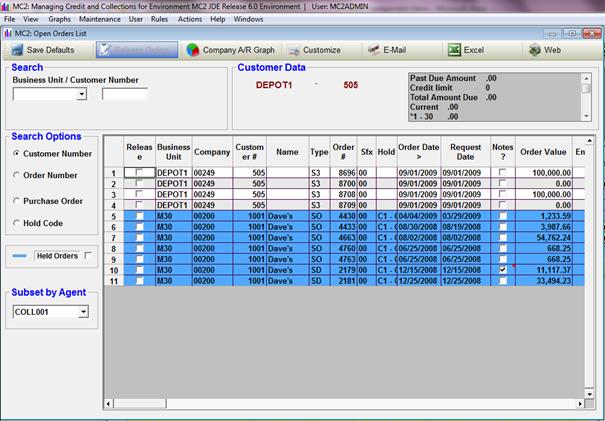
On the order
management view it is possible to sort several key columns by right clicking on
the column headers. These columns
include: Order date, Request date and
Order Value.
To review the
details of an order from the order management screen, simply double click on
the selected order and choose “Display Order Detail” from the MC2 Pop-up menu.

This will launch
the Order Detail screen open to the Order Header tab. From here the collector has access to key
summary information about the account including the Ship-To address
information, container ID, order date, request date and delivery instructions.
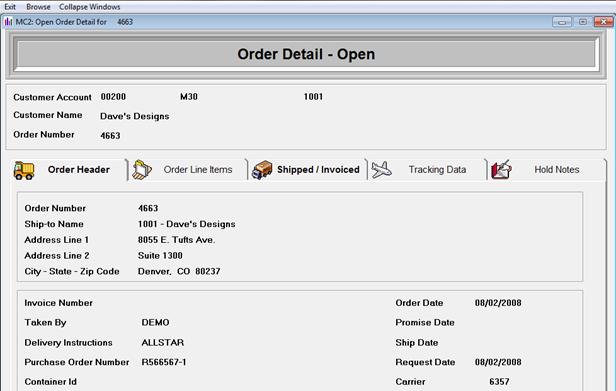
Clicking on the
Order Line Items tab will display the open line items that are pending
shipment:
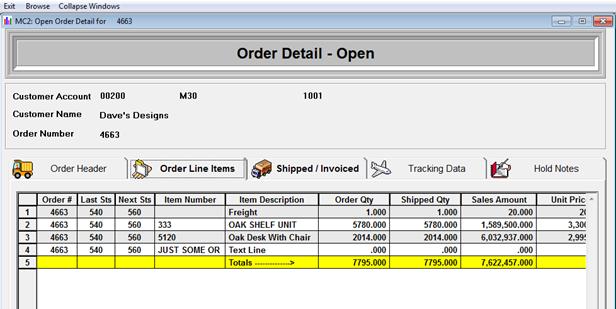
Customer Number The primary search on the order management
screen. When this search is active the
user can also subset the screen by Agent ID.
Order Number Positions to
a specific order number.
Purchase Order Positions to a specific
purchase order number.
Hold Code When
the Hold Code search is active, the user can subset the screen to a specific
order hold type via the drop down menu that displays at the top of the screen.
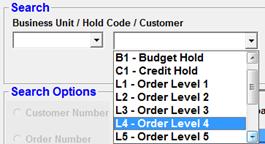
For Example: Selecting the C1
code from the drop down menu will display only those orders that are on C1
credit hold.
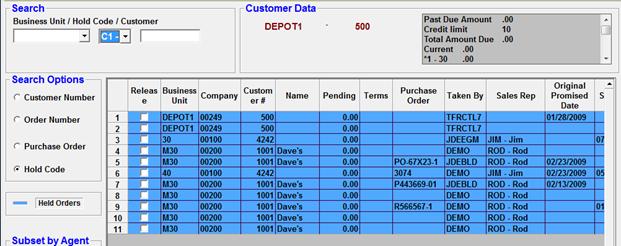
When the Held
Orders filter is selected only orders that are currently on hold will be
displayed. Any orders that are still
pending in the order process but are not on hold will not be displayed on the
screen.
The subset by
agent feature is available for use when the Customer Number search is active.
Availability for this subset will vary by ERP.
Release? Release
option for held orders. Checking this
box and selecting the Release Orders button at the top of the screen will
release the holds on that order back to the ERP system.
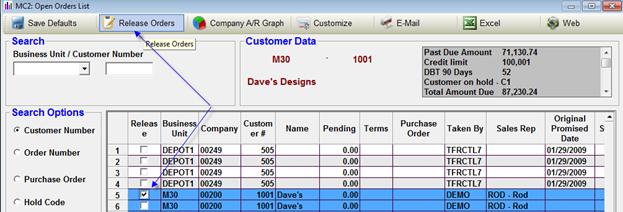
Type Order
Type generated from source ERP system
Order Number Order number
generated from the source ERP
Suffix Order
Suffix associated with the order
Hold Code Hold code that is
associated with the order
Order Date Order Date
Request Date Requested date – not
available in all ERP’s
Notes Order
notes associated with the order
Order Value Value of the open
order
Purchase Order Purchase order associated
with the order
Taken By Person
the order was entered by – pulled from source ERP system
Sales Rep Sales Rep that
is associated with the order transaction
Original Promise
Date Promise date
pulled from ERP system where available
Released By User
ID of the person who released a given order
Released Date Date the order was
released
Promise Date
(Delivery) Delivery date pulled
from source ERP system where available
Days on Hold # of days from order date to current –
calculates on held orders only
Days Order to
Request # of days between order
date and request date
Search for orders
by Item Number, Order Type, Sales Rep, Customer Number, Order Number, Purchase
Order and Business Unit. This is
currently not a customizable screen, but you can resize the column and select
Save Default to save those settings.
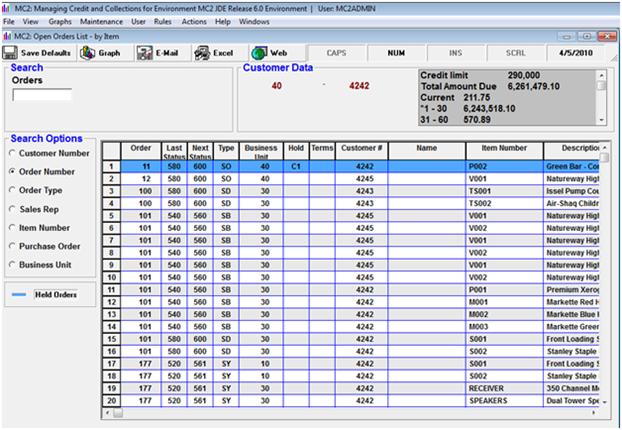
Navigating order
detail in the Open Order List works exactly like Open Order Management.
The
Invoice Detail – Open screen can be accessed from any Main Management View via
the MC2 Pop-Up menu by selecting Viewà Open Invoices. This screen displays all transactions that
are currently open for the customer’s account.
(This same information is available in the open invoices quadrant of the
Snap Shot screen or when drilling to the cumulative HotPoint detail from
At-A-Glance.)
This
screen is a customizable screen, and it is strongly recommended that this
screen be customized to match your business needs so that you can get the most
benefit from this data.
As
there are a vast amount of columns that are available within this view, only a
portion of the screen columns will be detailed in this section. (To
view all options that are available, simply select the My Own Screen Menu à Customize My Screen option from the pop-up menu to see the complete
listing.)
Business Unit> Business Unit
associated with the transaction.
Depending on ERP and business practice, this may vary from the business
unit assigned at the customer level.
Child Customer Visible at the entity
view, this column provides the customer number that is associated with the
transaction.
Type> ERP
document type (Example RI = Invoice, RB = Chargeback)
Invoice> Invoice
number. In MC2 the term “invoice” is
used to reference all open AR transactions.
(i.e. invoices, debit memos, credit memos, unapplied cash, etc.)
Sfx Invoice
suffix number (used only in certain ERP’s)
Notes? Check box
to indicate if there is a note is present on the transaction. Hovering the mouse over the red dot which
appears in the right hand corner of this box will display the notation in the
text tip window.
Notes Date Date of the last
notation on that invoice
Invoice Date> Date the transaction
was billed (invoiced)
Days Open Number of days
that the transaction has been open. This
is the number of days from the invoice date.
Due Date> Due date of the
transaction.
Real Age Number of days
past the due date that the transaction has been open.
Invoice Amount Original amount of the
transaction.
Amount Received Amount that has been applied
to that transaction. This can include,
payments, credit memos or debit memos that adjusted the original amount.
Balance Remaining
Balance of the transaction.
Type> Deduction
type associated with the transaction.
Reason> Dispute reason
code associate with the transaction.
Purchase Order> Displays the data in the
Purchase order/Remarks field.
Remarks Depending on
ERP this can be reference data or PO information that has been mapped to this
field for ease of visibility.
Tax Amount Tax amount that is
associated with the transaction (not available in all ERPS)
Assigned To Responsible party
that is assigned to an invoice level activity.
Activity? A check mark in
this field indicates the presence of an invoice/ deduction level activity.
Sales
Rep Sales
rep code associated with the transaction
Sales Rep Extended Extended description for the
sales rep code associated with the transaction.
Finance Charges Y/N indicator on whether
the transaction is eligible for finance charges. Only present in certain ERP’s.
Terms Terms that
are assigned to that specific transaction in the database.
Note: The terms associated at the transaction level
may vary from the terms that are attached to the customer master if these were
overridden at the time of entry.
Sales Doc #> This is the ERP
assigned order number associated with an invoice. In order to have a value in this field, the
transaction must be tied to an order in the source ERP. Transactions like unapplied cash for example
will not have a value in this field.
Likewise, depending on the manner in which they are entered in the source
ERP, credit and debit memos may not be associated with an order.
Expected Receipt Date The expected receipt date is
calculated against all transactions in the database – both clean and
dirty.
To establish an expected receipt date, the system
first applies the DBT 90 average for the customer and applies that against the due
date for all open transactions. (Please
see DBT 90 Definition)
If there is a promise to pay activity that has
been attached to an invoice, the promise date that is associated with that
activity will override to the expected receipt date in the nightly update
Promised ? A check mark in
this field indicates the presence of an invoice level promise to pay activity.
Check # Check # or
receipt # that is associated with a partially paid transaction.
Promise Date When a promise to pay
activity has been entered against a specific invoice or transaction line, the
date that the collector has entered for follow up will display in this column.
Attachment? A check mark in this
field indicates the presence of an invoice level attachment. Most frequently found on deduction
transactions.
Age
Description Description
of the aging bucket associated with the transaction
Order
Type Order
type associated with an invoice (Not all ERP’s)
Order
Suffix Suffix
associated with an invoice order
Ship
To Ship
To # -Name where applicable on open invoices
User Fields: A series of user
defined fields are reserved in MC2 for the mapping of key data from the source
ERP that may not exist in the current MC2 screen display columns. Depending on your implementation, these
columns may or may not be populated.
Quick access to critical function has been provided on the menu bar in
the View à Open Invoices
screen. Below is a quick reference to
options available.

Browse The Browse
feature allows the user to access many key screens or action events that would
otherwise require them to open a different window. From the Viewà Open Invoices screen you
can efficiently jump to key screens to manage a customer’s account in just two
clicks. Below is a quick list of actions
that are available via the Browse option in this screen:
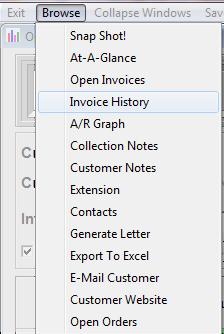
Collapse Windows Closes this window and
returns the user back to the main management view.
Save Columns/Searches Saves both your column settings as
well as your search preferences
Save Attachments This feature is available to
customers with MD2 installed, and it allows the user to attach documents to the
customer level in MC2. By simply
selecting the “Attach” button, the user is able to retrieve data from any file
that they have access to from their PC, and attach a copy of that document in
MC2. (This data is then stored in the
MC2 Attachments file that has been mapped in the Configuration Master.)
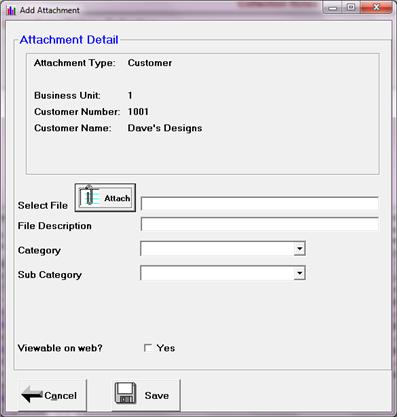
View Attachments Allows the user to view any
attachments that have been stored on the customer’s account. This includes attachments that have been made
at any level within the account.
Invoice Promises When the Invoice Promises
button is selected, the invoice screen will reload with a check box column
titled promises on the far left hand side of the screen.
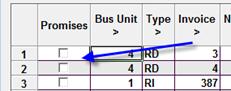
The user selects the transactions that have been
promised by the customer, and then clicks on the Post Promises button on the
bottom of the screen to initiate the promises activity maintenance screen.
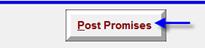
Multi-Reminders Launches the Multi-Reminder
screen which is used to create payment scheduled and tiered escalation follow
ups.
My Own Screen Menu Allows the user to customize their
screen view. Options available from the
menu bar include launching the Customize My Screen window, Save My Settings,
and Restore Default Settings.
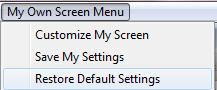
Note: Restoring Default Settings will cause the
screen to restore back to the standard MC2 settings for the Open Invoices
screen only. All column headings and
positioning customizations that the user may have had in place prior to
selecting this option will be lost, and the user will need to resave their
preferences.
By default the
Highlight Credits option will be selected.
The user can turn this feature off, by simply un-checking this box. When active, all credit balance transactions
will appear in the color defined for credits in the configuration master.

The default on
this screen will be to have the visual aging turned off. To activate this feature, simply check the
box on the top of the data window. Once
activated, all transactions will be displayed in the aging colors which have
been defined in the configuration master.

Available in JDE
only. This option has been designed for
use in situations where some suffix invoices lines have been paid, while others
remain open on for an invoice. When this
filter is checked it adds up the Partial Paid Invoice Amounts and Paid Amounts
at the Summary and Detail level.
An
illustration of how this might appear is shown below. First with the Paid Items checked and then
with it deselected:
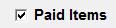
Summary of Open transactions:
|
Invoice
Invoice Amount
Amount
Received
Balance
|
|
12345
10,000.00
4,000.00
6,000.00
|
Detail of Open transactions:
|
Invoice
Sfx Invoice
Amount
Amount
Received
Balance
|
|
12345
00
1000.00
500.00
500.00
|
|
12345
01
500.00
500.00
00.00
|
|
12345
02
8500.00
3000.00
5500.00
|
When
unselected the open invoice display would appear as below:
Summary:
|
Invoice
Invoice Amount
Amount
Received
Balance
|
|
12345
9500.00
3500.00
6000.00
|
Detail of Open transactions:
|
Invoice
Sfx Invoice
Amount
Amount
Received
Balance
|
|
12345
00
1000.00
500.00
500.00
|
|
12345
02
8500.00
3000.00
5500.00
|
Closed items would display the closed suffix line:
|
Invoice
Sfx Invoice
Amount
Amount
Received
Balance
|
|
12345
01
500.00
500.00
00.00
|
Located at the bottom of the screen are
several additional navigation buttons:

The Exit
button will allow the user to exit the Open Invoices screen and return them to
the main management view.
The print report
button will generate a document format report that can be printed. This document will list each of the open
transactions as shown below:
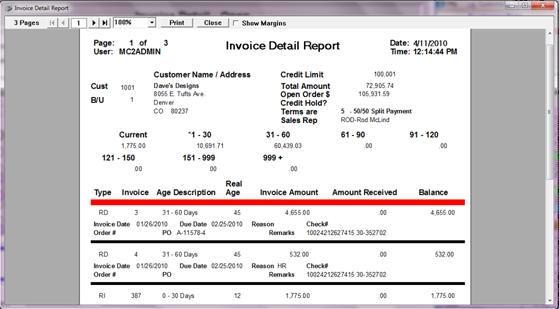
Note: For more detailed information in an editable
excel format, the user may wish to select Actionà Export to Excel Invoice History from any of the main management views
in MC2. Remember that this will pull all
the data for as far back in history as is stored in the source ERP.
This
refers to the ability to see multiple suffixes associated with an invoice as a
separate line item on the display. This option is not available in all ERP’s.
Depending
on the User Application Security set up, this screen will default to either Summary
or Detail display. If the user’s
application security is set to Manage Invoices –Suffix Level, their default
will be to display in detail. When this
security option is unchecked, the default will be set to display in summary.

When
the detail view is activated, the user will see each suffix line as a separate
transaction in the View Open Invoices screen.
In this view it is possible to see the same invoice number multiple
times with different suffix numbers associated.
The Suffix column will only appear when the screen is viewed in detail
mode.
Additionally,
the navigation button option at the bottom of the screen will read “Summary”
when the user is in the detail view.
If
the user clicks the summary button, the screen display will summarize.
When
the summary view is activated, the user will see a single line item for every
invoice number. All suffix lines are
summarized into one line.
NOTE: In the case of installment invoices which
share the same invoice number and different suffix line the due dates are
likely different for each suffix. When
the view is summarized, only one due date will display. MC2 is still using the correct due dates
when aging the account. To see each due
date separately, simply click the detail button.
If
the user clicks the detail button, the screen will display the suffix level
transactions.
The
default sort on this screen is by invoice number. However, it is possible to sort or search by
several different columns on this screen.
In this screen, any column that have an “>” in the column headers is
a sortable column. By right clicking on
a column heading the search criteria at the top of the screen will change to
allow the user to position to a specific transaction.
For
example, if the user right clicks on the “Due Date” column, the search criteria
for that column will be displayed at the top of the screen.
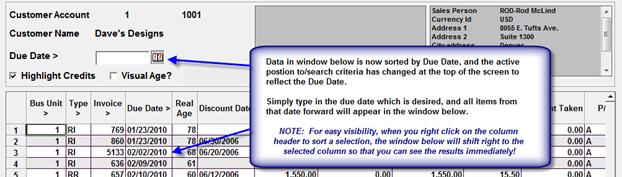
The
MC2 Pop-Up Menu in this view is almost identical to what the user will see in
Snap Shot, HotPoint Detail and the Invoice Management View. As the user is launching the Pop-Up Menu
from a detail screen, the options will allow them to view and respond to
specific transactions within the data base.
A list of available options appears below:
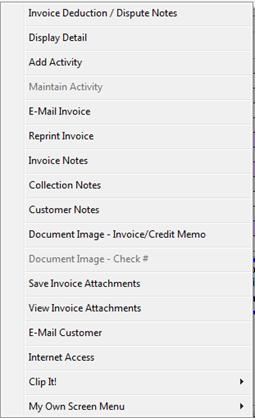
The
display detail option from the ViewàOpen Invoices, Snap Shot,
HotPoint Detail or Invoice Management screens will allow the user to drill into
the pertinent information about that invoice or transaction. Simply double click on any invoice and select
Display Detail to launch this screen.
When the Invoice
Detail – Open screen is launched, it will automatically open at the Invoice
Header tab.
The
Invoice Header tab is broken down into two additional sub-tabs located at the
top of the screen: Invoice Summary and
Invoice Transactions.
This screen is
mission control for all summary level information about the invoice. From this screen the collector has quick
visibility to not just the amount and age of the transaction, but also the
terms associated with the invoice and in some ERP’s the sales rep that is
linked to the account as well.
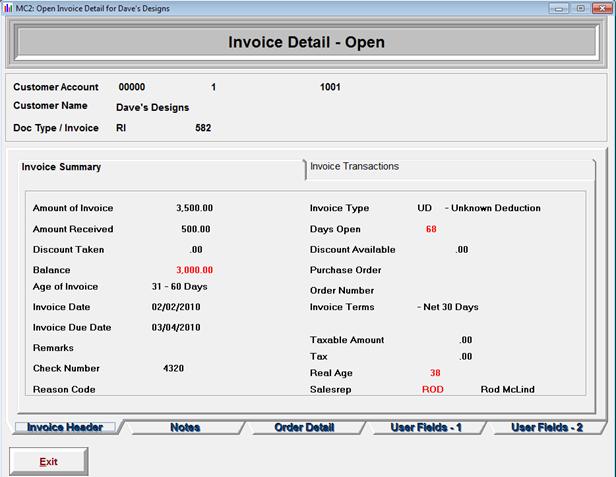
The invoice
transaction tab provides quick visibility to payments or adjustments processed
against the original invoice. Each entry
that effects the transaction will appear as a separate line on this view:
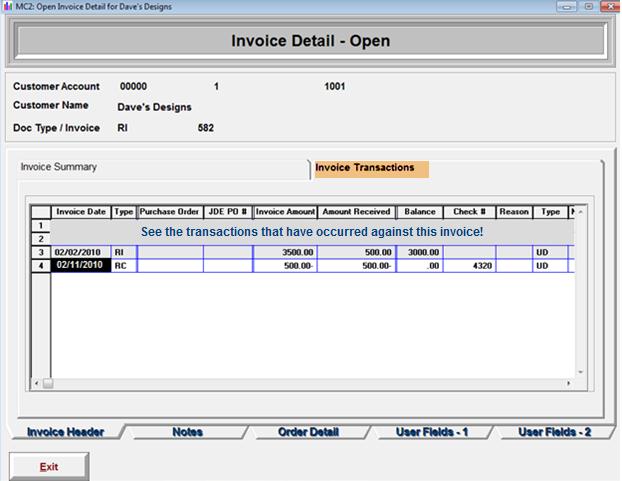
The second tab on
the bottom of the Invoice Detail – Open screen is the Notes tab. Once selected, the user can view or enter
notes at either the Invoice or Deduction/Dispute Note level for the selected
transaction.
Used most
frequently when MD2 has not been installed, these notes provide a blank screen
for notes entry at the transaction level.
In order for this option to be available, the Disable Invoice Notes
check box must be unchecked in the application security. See Invoice Notes Section.
The more frequently used option for entering notes at
the transaction level, this option
provides detailed tracking of all deduction/dispute notes entered
against the invoice.
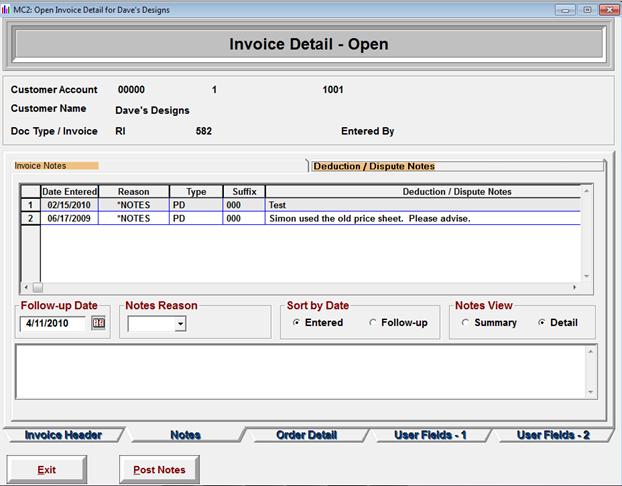
The
third tab on the Invoice Detail – Open screen in the Order Detail tab.
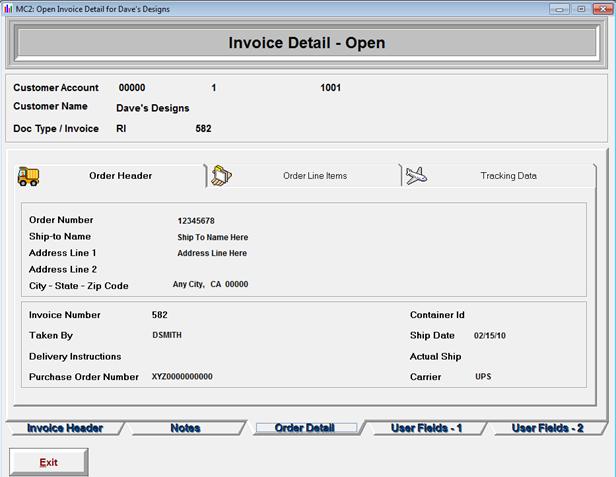
This
screen provides quick access to all items that were shipped on this specific
invoice.
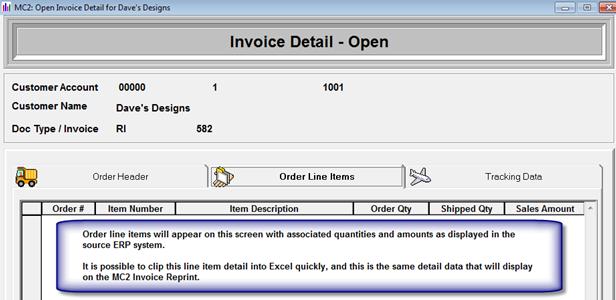
Available in
select ERP’s, this option allows the user to view tracking information and link
out to the carrier websites to review tracking data
In some
implementations additional data has been mapped from the source ERP to MC2 into
selected user fields at the invoice level.
When this occurs, that information is visible to the user in these tabs.
The
Invoice Detail – History screen can be accessed from any Main Management View
via the MC2 Pop-Up menu by selecting Viewà Invoice History. This screen displays all transactions that
are currently closed in full for the customer’s account. (This same information is available in the
payment history quadrant of the Snap Shot screen.)
Invoice
history is retained in MC2 for the same length of time that history is stored
in the source ERP. When you archive data
from your source ERP, this information is removed from MC2 at the same time.
This
screen is a customizable screen, and it is strongly recommended that this
screen be customized to match your business needs so that you can get the most
benefit from this data.
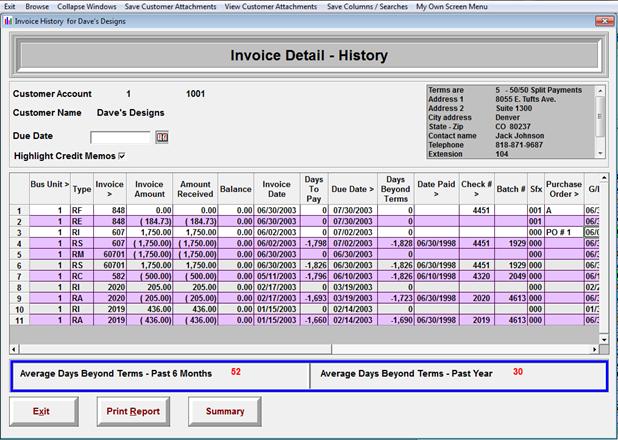
Business Unit> Business Unit
associated with the transaction.
Depending on ERP and business practice, this may vary from the business
unit assigned at the customer level.
Child Visible
at the entity view, this column provides the child customer number that is
associated with the transaction.
Type> ERP
document type (Example RI = Invoice, RB = Chargeback)
Invoice> Invoice
number. In MC2 the term “invoice” is
used to reference all open AR transactions.
(i.e. invoices, debit memos, credit memos, unapplied cash, etc.)
Sfx Invoice
suffix number (used only in certain ERP’s)
Notes? Check box
to indicate if a note is present on the transaction. Hovering the mouse over the red dot that
appears in the left corner of this screen will display the notation in text tip
window.
Invoice Date> Date the transaction
was billed (invoiced)
Due Date> Due date of the
transaction.
Days Beyond Terms At a transaction level, this is
exactly that – how many days beyond the terms of the transaction the customer
has paid.
Date
Paid Date
the payment was posted to the account for that transaction
Balance Remaining
Balance of the transaction.
Amount Received Amount that has been applied
to that transaction. This can include,
payments, credit memos or debit memos that adjusted the original amount.
Invoice Amount Original amount of the
transaction.
Remarks Depending on
ERP this can be reference data or PO information that has been mapped to this
field for ease of visibility.
Check
#> Check
# or receipt # that is associated with a paid transaction.
Batch Batch
number associated with the check/receipt. (Availability may vary by ERP.)
Purchase Order> Displays the data in the
Purchase Order/Remarks field.
Days
to Pay Number
of days between invoice date and date paid
Remarks Depending on
ERP this can be reference data or PO information that has been mapped to this
field for ease of visibility.
Type> Deduction
type associated with the transaction.
Reason> Dispute reason
code associate with the transaction.
Sales
Doc Order
number associated with the transaction (if applicable).
The menu bar
navigation options available in the Invoice History screen are a pared down
version of what is available in the Open Invoices view:

This
includes: Browse, Collapse Windows, Save
Customer Attachments, View Customer Attachments, Save Columns/Searches and My
Own Screen Menu options.
Similar to the
Open Invoices screen, the default sort on Invoice History is by invoice number. However, it is possible to sort or search by
several different columns on this screen.
In this screen, any column that have an “>” in the column headers is
a sortable column. By right clicking on
a column heading the search criteria at the top of the screen will change to
allow the user to position to a specific transaction.
For example, if
the user right clicks on the “Check #” column, the search criteria at the top
of the screen will now be set to enter a check #:
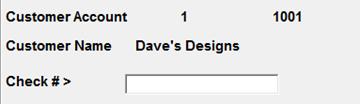
By default the
Highlight Credit Memos option will be selected.
The user can turn this feature off, by simply un-checking this box. When active, all credit balance transactions will
appear in the color defined for credits in the configuration master.
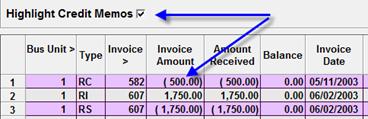
The MC2 Pop-Up
Menu that is available in the Invoice History screen is identical to that which
is found in the View Open Invoices screen.
The Exit button
will allow the user to exit the Open Invoices screen and return them to the
main management view.
The print report
button will generate a document format report that can be printed. This document will list all items closed to
history as shown below:
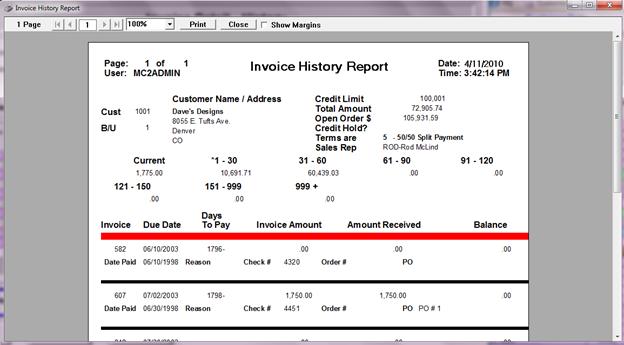
Note:
For more detailed information in an editable excel format, the user may
wish to select the Export to Excel option under the Browse menu bar options.
This refers to
the ability to see multiple suffixes associated with an invoice as a separate
line item on the display. This option is not available in all ERP’s. Please see View Open Invoice
section for additional detail.
The Check
Distribution (Receipts Entry) screen allows the user to look up a specific
check number attached to a customer, and see how that check was applied. While the screen is initially launched from
within the payment history of a specific customer, the search can be expanded
to see if the payment was spread across multiple accounts.
The Check
Distribution screen can be launched from Invoice History or from the Snap Shot
Payment History quadrant in MC2.
Clicking the mouse directly on the Check # will immediately launch the
check distribution screen.
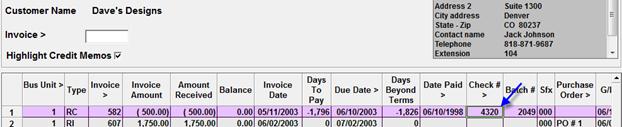
Once launched,
this screen will open with the Check Number, Batch Number and Total amounts
populated across the top of the screen.
In the data window below, the invoice transactions lines that were paid
with this check will display.
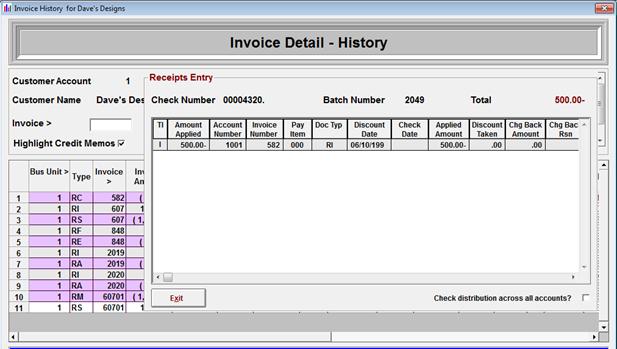
On the bottom
right hand corner of this screen there is an option that will allow the user to
check whether this check was applied against multiple accounts and not just the
one from which the user has launched this screen.
When the check
box is selected, the system will check all accounts to see if additional lines
were identified. These will appear in
the data window and can be noted by the change in account number.
It is not
possible to sort the data in this screen; however the Clip It feature is fully
activated and is the recommended method for sorting and reviewing data from
this view.
Simply double
click on the bottom line of the data displayed to clip this information and
past into an excel spreadsheet.
Sample of what
this looks like is provided below:

The Open Orders
Inquiry screen can be accessed from any Main Management View via the MC2 Pop-Up
menu by selecting Viewà Open Orders. This is a complete list of all orders that
are pending for the account in question, both those that are on hold, and those
that are merely open and have not yet invoiced.
The Open Orders
Inquiry screen is now a customizable screen, and it is strongly recommended
that this screen be customized to match your business needs so that you can get
the most benefit from this data.
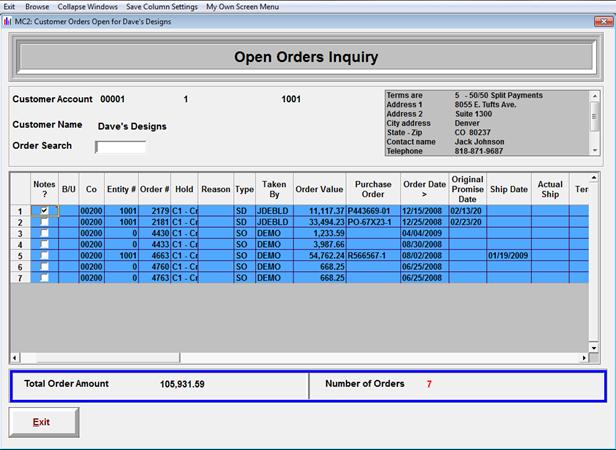
The orders that
display on this screen in white are pending orders, and those that appear in
color are orders that are on hold in the source ERP system. The color of the held orders is controlled in
the Preferences tab of the Configuration Master Maintenance.
If the user
double clicks on any order line listed in this screen and selects the Order
Detail option from the MC2 Pop-Up Menu, they are able to see all the detail
transactions that make up that order.
The order detail that is available will vary by ERP; however the first
two tabs shown below are standard.
The Order Header
screen provides the summary data about the order including the shipping
address, PO#, key dates (Order, Promise, Ship and Request) and carrier ID if
specified in source ERP system.
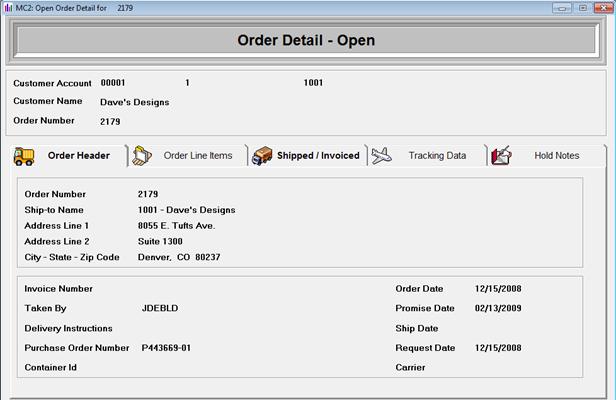
The order Line
Items Tab provides the transactional detail of the order. Fields on this screen again may vary by
ERP. Standard data that is displayed
includes:
·
Order
Number
·
Item
Number
·
Item
Description
·
Order
Quantity
·
Shipped
Quantity
·
Unit
Price
·
Extended
Price
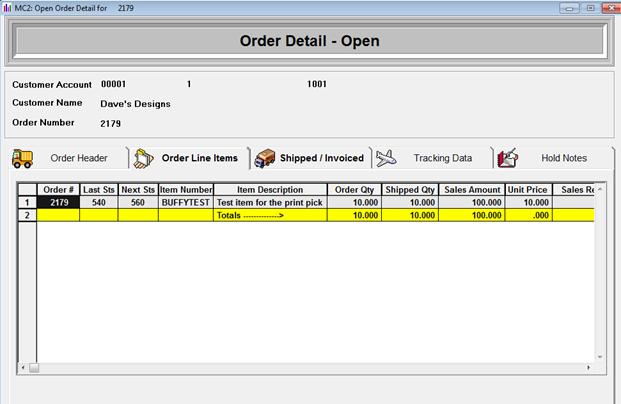
The shipped
invoice tab is only available in select ERP’s.
This screen is populated only if an order has been partially shipped or
partially invoiced.
Tracking Data tab
stores information regarding the shipping tracking information and is pulled
direct from the source ERP system.
Displays hold
notes that may have been entered against the order.
Business Unit Business unit that is associated
with the order.
Company Company or division
associated with the order.
Entity The entity (parent)
account number associated with this order.
Order # The order # assigned by
the source ERP system.
Hold Code When
populated this is the hold code that is assigned to the order. The
hold codes that appear in this column are identical to those that are
in the source ERP system.
Type Order type assigned
by source ERP system.
Taken By Order taken or entered by
depending on ERP.
Order Value $ value of the order.
Purchase Order The
purchase order entered at the time of order entry.
Order Date Date order entered.
Promise Date Date the order has been promised
to the customer.
Request Date Requested
delivery date.
Agent The agent assigned to
the customer.
Name Customer Name
Address Customer Address
Released By When populated, this field displays the user ID of
the person who released the order from hold.
Customer Strategy Strategy code that is assigned to the customer account
associated with this order.
Entity Strategy Strategy code that is assigned to the entity (parent)
account associated with this order.
Note Last order note
posted to the account
Note Date Date of order note posted to
the account.
Day – Order to
Req # of days past request date.
Days on Hold # of days from order date to
current – calculates on held orders only.
The menu bar
navigation options available in the Open Orders Inquiry screen are a pared down
version of what is available in the Open Invoices view:

Available options
are: Browse, Collapse Windows, Save Column Settings and My Own Screen Menu.
The MC2 Pop-Up
Menu that is available on this screen is different than what you would find in
other screens as it relates specifically to non-invoiced transactions. In addition to the Display Order Detail
option described above, the other options available include:

E-Mail
Customer Launches a
basic email form which will automatically populate with the primary contact
email address if one is present. If no
primary contact is present
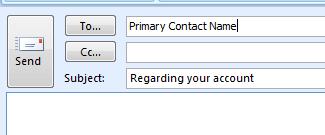
NOTE: Once you have clicked on the Email Activity
option, you must either complete the email transaction and send, or cancel out
of the email activity before you will be able to continue working in this
session of MC2!
Once this email feature is activated, upon
completion, the system will prompt to add an E-mail activity. If the user selects yes to create an email
activity, the Activity Maintenance window will open to allow the user to enter
any key follow up notations and specify a date to follow up. This generates an “E” (Email) type activity
record.
Internet Access If a Website address has
been attached in the customer extension record for this account, clicking this
option will create a direct launch to the customer’s website location.
If
no website address is listed in the customer extension record, the system will
return an error message to the user notating that no website has been found.
Clip It! Clip
information to excel. This can be done
as a single line or subsetted rows.
My Own Screen Menu Screen customizations can be done from this option: Change a Heading or Hide a Column
The MC2: Activity
History screen can be accessed by selecting Viewà Activity History from any of the main
management views.
This screen
automatically tracks all posted notes or activities that have occurred in the
history of the account, and is a great reference for managing customer
relationships. This expanded tracking
provides insight to trends occurring on the account.
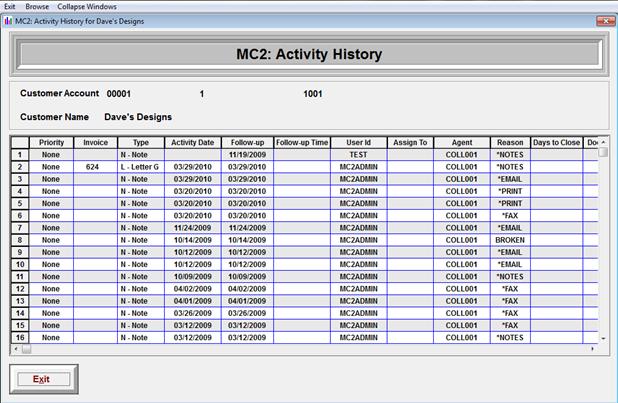
This information
can also be viewed in the Customer Activity quadrant of Snap Shot or by
clicking on the Activity Log Tab found in the Collection Notes screen.
Tracking of User ID and Agent
Not only does
this screen capture the activity information, it also captures the User Id that
generated the note or activity in addition to the agent that is assigned to the
account.
Documents Sent
In addition to
tracking the standard letter follow up activities (L) in the system, this
screen is designed to also capture an activity record each time a letter in
generated and sent to an output source such as a printer, faxed or emailed. The document ID and name is captured on this
record in addition to where that output was sent.
Comments
The first lines
of the comment on activities and notes displays for each transaction in
history. The comment field is used to
indicate the output source for letters that have been generated.
ClipIt!
The information
displayed on the Activity History screen can be clipped into an excel format at
either for a single row of for a sub set of rows. Simply double click in the data window and
select Clip It! à
Subsetted Rows.

Snap Shot is exactly that – it provides a quick view of a customer
status. This is the one of the primary
collection screens within MC2 as it provides quick access to different data
views. From this screen the user has
access to almost any transaction within MC2.
The Snap Shot screen is divided into 4 distinct quadrants:
Customer
Activities: Displays
all activities for this customer
Collection
Notes Displays
collection notes
Open
Invoices Displays
open invoices
Payment
History Displays
invoice history
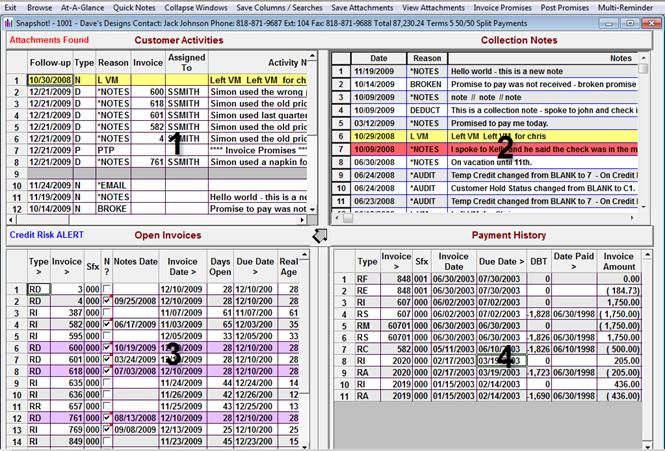
The quadrant that is selected will
determine what transactions are available to you. Each transaction within the Snap Shot is
documented in this manual. We will list
the transactions within each quadrant.
The
upper left hand quadrant of the Snap Shot view is the Customer Activities which
provides complete activity management .
A collector can quickly look to this quadrant to view all pending
actions which have been scheduled for follow up action. This quadrant is divided into two sections
defined by a grey line.
Above
the grey line are all open activities on the account that are pending action by
the collector.
Below
the grey line are all activities and notes that have been closed to the MC2
activity history log.
Depending
on the type of activity that has been created, different information will
display on the activity lines for the collector review:
Screen Columns
Follow Up Date
that the follow up action is scheduled to take place.
Type Single
character code which notates the type of activity this is
A = Activity
D = Deduction/Dispute (Invoice Level)
E = Email
L = Letter
M = Multi-Reminder
N
=
Notes (Collection)
O
=
Order Hold
P
=
Promises
R
=
Rules (Posted Rules Activities)
W =
Web Portal (Only if Web Portal installed)
Reason This is the
activity reason code that associated with this transaction.
Invoice # If an activity
follow up was done on a specific invoice (click Add Invoice Activity) or as a
follow up on a deduction/dispute note that was entered. The launching invoice number is retained in
the activity file and displays on this screen for ease of identification.
Assigned To The
Assigned To person is the person that is internal to the organization who is
responsible for working with the collector to bring a specific activity to
closure.
Activity Notes Activity
notes that have been entered – combines lines 1 and 2
Comment Line1 First
line of the activity notes
Comment Line2 Second
line of the activity notes
Document Name On letter activities, the
name of the letter generated will appear in this column.
Document Number On letter activities, the
document number associated with the letter generated will appear in this
column.
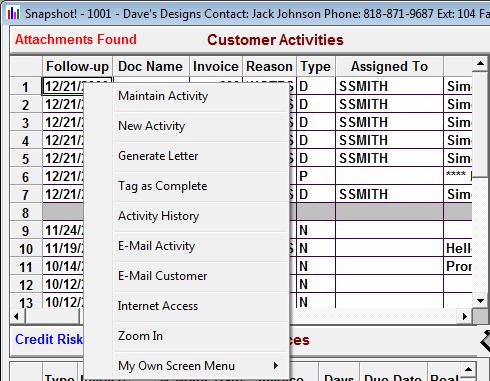
Navigation Options
Options available to the user when they
double click in this quadrant and via the pop-up menu include:
Maintain Activity Activates the Activity Maintenance screen for the
line selected
New
Activity Opens
a blank Activity Maintenance screen so that the collector can create a new
account level activity.
Generate
Letter Launches the
MC2 Letter Engine allowing the collector to select a letter to be sent to that
customer.
Tag as Complete Closes the activity and sends it to the activity
history file.
Activity
History Opens the
MC2 activity history log which allows the user to view all closed activities on
the account in one place.
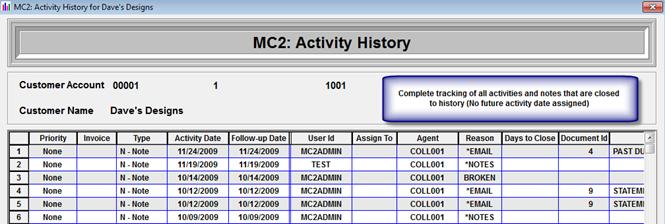
E-Mail
Activity Opens a
basic email form with the activity information present in the body of the email
form.
If there is an assignee present on the
activity, the email will populate with that assignee’s email in the “To…”
line.
If
no assignee is present on the activity, the system will default to the
collection agent email as defined in the Agent Maintenance screen
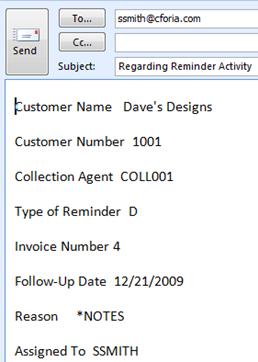
NOTE: Once you have clicked on the Email Activity
option, you must either complete the email transaction and send, or cancel out of
the email activity before you will be able to continue working in this session
of MC2!
E-Mail
Customer Launches a
basic email form which will automatically populate with the primary contact
email address if one is present. If no
primary contact is present.
NOTE: Once you have clicked on the Email Activity
option, you must either complete the email transaction and send, or cancel out
of the email activity before you will be able to continue working in this
session of MC2!
Once this email feature is activated, upon
completion, the system will prompt to add an E-mail activity. If the user selects yes to create an email
activity, the Activity Maintenance window will open to allow the user to enter
any key follow up notations and specify a date to follow up. This generates an “E” (Email) type activity
record.
Internet Access If a Website address has
been attached in the customer extension record for this account, clicking this
option will create a direct launch to the customer’s website location.
If
no website address is listed in the customer extension record, the system will
return an error message to the user notating that no website has been found:
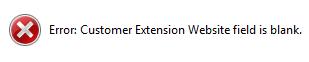
Zoom In Zoom In mode
is available on the drop down menu in any of the 4 Snap Shot quadrants, and
allows the user to expand their window ( or zoom in) so that one of the
quadrants displays as the entire screen view.
To
return to the normal 4 pane view, simply double click anywhere within the main
grid and select the “Zoom Out” option.

My
Own Screen Menu This option
provides the user with a quick menu of options available to them to customize
the Snap Shot quadrant if that user has the appropriate authority to customize
their screens.
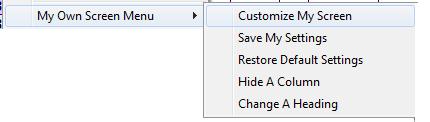
(Below the Grey Line in the Customer
Activity History Quadrant)
The activity history log below the gray line in this quadrant is a
complete list of all collection level notes, or closed activities which have
been posted against this account. The
history log included here records actions such as letters generated and sent
via E-mail, fax or printed in addition to collection notes entered or manual
activity follow ups created.
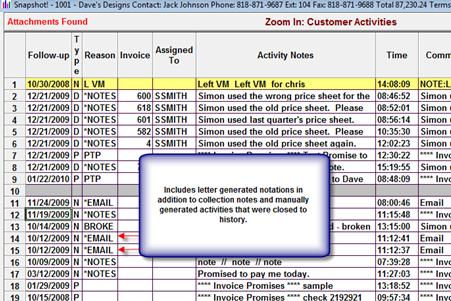
These notes are tied to the customer and not the invoice. They are used to document the collections
related information between the agent and the customer. These notes are typically detailed in nature
and store conversation threads. It is
important to note that the Follow-Up
Date can be used as a reminder to follow-up on a specific note. Changing the follow up date prior to posting
the note will auto generate an activity follow up.
Screen Columns
Date Date the
collection note was entered
Reason
Activity/Notes
reason code that is assigned to the notation
Notes Text of
the note that was entered into the system
Time Time
that the note was entered
Follow Up If a follow up
action was assigned to the collection note, it would be displayed in this
column. If no follow up date, this field
will be equal to the entered date
Entered By User Id of the
person that entered the collection note in the system
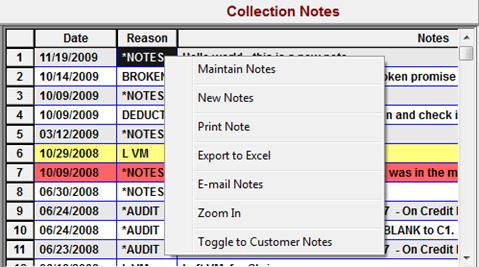
Navigation Options from the Collection
Notes Quadrant
Maintain Notes Activates the notes
maintenance panel so that the user can update an existing collection note. Access to this feature is restricted in user
ID set up.
New Notes Activates the
notes maintenance screen so that a new collection note can be entered.
Print
Note Prints
a specific collection note in a document format.
Export
to Excel Exports
the collection notes into an excel document
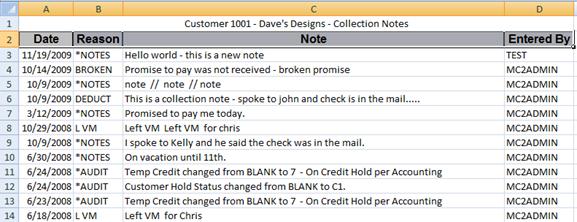
E-mail Notes Opens an email which
merges the basic collection note information into the body of the letter.
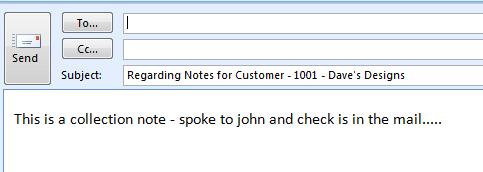
Zoom
In Feature
zooms into the notes quadrant
Toggle to Customer Notes MC2 supports two types of notes. Customer notes can be created, viewed and
maintained by selecting this option.
The
Open Invoices quadrant contains all open transactions that are currently open
for the customer’s account. The data
displayed in this quadrant is the same base data that can be found by selecting
View à Open Invoices from any of the main
management views in MC2. The benefit
to providing this data in Snap Shot as well, is that this screen allows the
user to quickly view payment history, notes and activities while discussing the
open items with the customer.
This
screen, like all views in Snap Shot is a customizable window. It is strongly recommended that this screen
be customized to match your business needs so that you can get the most benefit
from this data. As there are a vast
amount of columns that are available within this view, only a portion of the
screen columns will be detailed in this section. (To
view all options that are available, simply select the My Own Screen Menu à Customize My Screen option from the pop-up menu to see the complete
listing.)
Screen Columns
Business Unit> Business Unit
associated with the transaction.
Depending on ERP and business practice, this may vary from the business
unit assigned at the customer level.
Child Customer Visible at the entity
view, this column provides the customer number that is associated with the transaction.
Type> ERP
document type (Example RI = Invoice, RB = Chargeback)
Invoice> Invoice
number. In MC2 the term “invoice” is
used to reference all open AR transactions.
(i.e. invoices, debit memos, credit memos, unapplied cash, etc.)
Sfx Invoice
suffix number (used only in certain ERP’s)
Notes? Check box
to indicate if a note is present on the transaction. Hovering the mouse over the red dot that
appears in the left corner of this screen will display the notation in text tip
window.
Notes Date Date of the last
notation on that invoice
Invoice Date> Date the transaction
was billed (invoiced)
Days Open Number of days
that the transaction has been open. This
is the number of days from the invoice date.
Due Date> Due date of the
transaction.
Real Age Number of days
past the due date that the transaction has been open.
Invoice Amount Original amount of the
transaction.
Amount Received Amount that has been applied
to that transaction. This can include,
payments, credit memos or debit memos that adjusted the original amount.
Balance Remaining
Balance of the transaction.
Type> Deduction
type associated with the transaction.
Reason> Dispute reason
code associate with the transaction.
Purchase Order> Displays the data in the
Purchase order/Remarks field.
Remarks Depending on
ERP this can be reference data or PO information that has been mapped to this
field for ease of visibility.
Tax Amount Tax amount that is
associated with the transaction (not available in all ERPS)
Assigned To Responsible party
that is assigned to an invoice level activity.
Activity? A check mark in
this field indicates the presence of an invoice/ deduction level activity.
Sales
Rep Sales
rep code associated with the transaction
Sales Rep Extended Extended description for the
sales rep code associated with the transaction.
Finance Charges Y/N indicator on whether
the transaction is eligible for finance charges. Only present in certain ERP’s.
Terms Terms that
are assigned to that specific transaction in the database.
Note: The
terms associated at the transaction level may vary from the terms that are
attached to the customer master if these were overridden at the time of entry.
Sales Doc #> This is the ERP
assigned order number associated with an invoice. In order to have a value in this field, the
transaction must be tied to an order in the source ERP. Transactions like unapplied cash for example
will not have a value in this field.
Likewise, depending on the manner in which they are entered in the
source ERP, credit and debit memos may not be associated with an order.
Expected Receipt Date The expected receipt date is
calculated against all transactions in the database – both clean and
dirty.
To establish an expected receipt date, the system
first applies the DBT 90 average for the customer and applies that against the
due date for all open transactions.
(Please see DBT 90 Definition)
If there is a promise to pay activity that has
been attached to an invoice, the promise date that is associated with that
activity will override to the expected receipt date in the nightly update
Promised ? A check mark in
this field indicates the presence of an invoice level promise to pay activity.
Check # Check # or
receipt # that is associated with a partially paid transaction.
Promise Date When a promise to pay
activity has been entered against a specific invoice or transaction line, the
date that the collector has entered for follow up will display in this column.
Attachment? A check mark in this
field indicates the presence of an invoice level attachment. Most frequently found on deduction
transactions.
Age
Description Description
of the aging bucket associated with the transaction
Order
Type Order
type associated with an invoice (Not all ERP’s)
Order
Suffix Suffix
associated with an invoice order
Ship
To Ship
To # -Name where applicable on open invoices
User Fields: A series of user
defined fields are reserved in MC2 for the mapping of key data from the source
ERP that may not exist in the current MC2 screen display columns. Depending on your implementation, these
columns may or may not be populated.
MC2
has build in search capabilities on many of our screens, including the Snap
Shot open invoices and payment history quadrants. Columns that are noted with a “>” after
the column header are sortable fields.
Simply
right click on the column header to activate this feature. Once you right click on the column header, a
search box will display to allow you to key in the data string that you are
looking for:
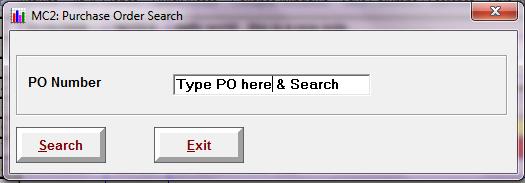
Simply clicking the “Search” options without entering a specific starting
point will sort that column in ascending order.
Note: When using this sort feature, MC2 will
automatically reposition your screen so that column that you had sorted will be
to the left of your screen.

Navigation Options from the Open Invoices
Quadrant
The
open invoices quadrant of the Snap Shot view can launch many key actions via
the pop-up menu. This section defines
those actions and provides short example screen shots of how these may be used
in daily collection processing.
Invoice Deduction/
Dispute Notes Brings the user to the
Invoice Deduction/Dispute notes entry screen, where they will be able to enter
and post notations. Similar to Invoice
Notes, deduction notes remain attached to a specific transaction line and are
visible in text tip notes and exports to excel.
When entering a note through this option, if a follow up date is
entered, it will also generate a “D” activity record.
Display Detail This option launches
the open invoice detail screen, and allows users to see more detail relating to
that transaction.

Maintain Invoice Activity Allows the user to maintain an invoice
activity that is already associated with this transaction line.
Add Invoice Activity Opens an activity maintenance
screen for this specific invoice. Activities created via this option, will be
marked as an “A” type activity record.
E-mail Invoice Opens an email form
populated with the basic invoice data captured in the body of the email and
addressed to the primary contact on the account.
Note: Due to
formatting restraints in some email applications, the format of the data sent
may vary once that program takes ownership of the email. For example in Lotus Notes the data remains
the same however the output will appear in more of a paragraph format.
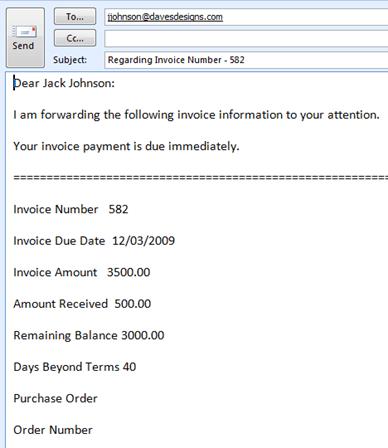
Reprint Invoice Launches the letter
engine and opens an invoice reprint document.
This is a reproduction invoice in MC2 format which contains much of the
same data found in the source ERP invoice reprint.
E-Mail
Customer Launches a
basic email form which will automatically populate with the primary contact
email address if one is present. If no
primary contact is present
NOTE: Once you have clicked on the Email Activity
option, you must either complete the email transaction and send, or cancel out
of the email activity before you will be able to continue working in this
session of MC2!
Once this email feature is activated, upon
completion, the system will prompt to add an E-mail activity. If the user selects yes to create an email
activity, the Activity Maintenance window will open to allow the user to enter
any key follow up notations and specify a date to follow up. This generates an “E” (Email) type activity
record.
Generate Letter Launches the user to the
MC2 letter engine
Invoice Notes Brings the user to the
invoice notes entry screen, where they will be able to enter and post
notations. Invoice Deduction/Dispute
Notes, Invoice Notes remain attached to a specific transaction line and are
visible in text tip notes and exports to excel.
Note:
These notes may appear grayed out and inactive. If that is the case, this option has been
turned off in the application security for that user ID. This has become a frequent practice for
customers who have purchased MD2 or are on Release 6.0 or higher due to the
additional functionality available in the Invoice Deduction/Dispute Notes.
Document Image – Invoice Available to customers with Imaging
Integration, this feature launches the user to the imaged copy of the customer
invoice.
Document Image –
Check# Available
to customers with Imaging Integration, this feature launches the user to the
imaged copy of the customer check.
Save Invoice Attachments Launches the Add Attachments screen in
MC2. This feature is available to
customers with MD2 installed, and it allows the user to attach documents to the
transaction in MC2 for ease of viewing at a later date. By simply selecting the “Attach” button, the
user is able to retrieve data from any file that they have access to from their
PC, and attach a copy of that document in MC2.
(This data is then stored in the MC2 Attachments file that has been
mapped in the Configuration Master.)
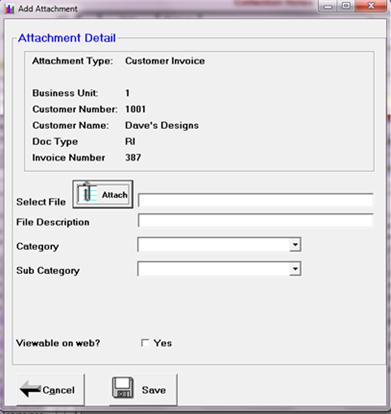
View Invoice Attachments Allows the user to view any attachments
that have been stored at the invoice level.
Collection Notes Quick launch to the
Collection Notes for this account
Customer Notes Quick launch to the
Customer Notes for this account
Internet Access If a Website address has
been attached in the customer extension record for this account, clicking this
option will create a direct launch to the customer’s website location.
If
no website address is listed in the customer extension record, the system will
return an error message to the user notating that no website has been found:
Zoom In Feature Zooms
into the Open Invoices quadrant.
Clip It Copies either a single row or the entire
visible subset to the Windows Clipboard.
The user can then open excel and paste.
My Own Screen Menu Launches menu options which allow
the user to customize the Open Invoices quadrant of Snap Shot. Options available include the ability Hide A
Column, Change A Heading, Save My Settings and Restore Default Settings.
The
Payment History quadrant contains all transactions that have been closed in
full for this customer’s account. MC2
retains historical items for as long as these items are stored on your source
ERP system. The data displayed in this
quadrant is the same base data that can be found by selecting Viewà Invoice History from any of the main management views in MC2.
As
would be expected, many of the columns that appear in the Payment History
quadrant are similar to those found in the open invoice quadrant. Key fields are described below for a complete
list of available fields to display, simply click on the My Own Screen Menu
option in this quadrant.
Screen Columns
Business Unit> Business Unit
associated with the transaction.
Depending on ERP and business practice, this may vary from the business
unit assigned at the customer level.
Child Visible
at the entity view, this column provides the child customer number that is
associated with the transaction.
Type> ERP
document type (Example RI = Invoice, RB = Chargeback)
Invoice> Invoice
number. In MC2 the term “invoice” is
used to reference all open AR transactions.
(i.e. invoices, debit memos, credit memos, unapplied cash, etc.)
Sfx Invoice
suffix number (used only in certain ERP’s)
Notes? The check
box will be checked to indicate if a note is present on that transaction. Hover over the mouse over the red dot that
appears in the right corner of this screen to display the notation in text tip
window.
Invoice Date> Date the transaction
was billed (invoiced)
Due Date> Due date of the
transaction.
Days Beyond Terms At a transaction level, this is
exactly that – how many days beyond the terms of the transaction the customer
has paid.
Date
Paid Date
the payment was posted to the account for that transaction
Balance Remaining
Balance of the transaction.
Amount Received Amount that has been applied
to that transaction. This can include,
payments, credit memos or debit memos that adjusted the original amount.
Invoice Amount Original amount of the
transaction.
Remarks Depending on
ERP this can be reference data or PO information that has been mapped to this
field for ease of visibility.
Check
#> Check
# or receipt # that is associated with a paid transaction.
Batch Batch
number associated with the check/receipt. (Availability may vary by ERP.)
Purchase Order> Displays the data in the
Purchase order/Remarks field.
Days
to Pay Number
of days between invoice date and date paid
Remarks Depending on
ERP this can be reference data or PO information that has been mapped to this
field for ease of visibility.
Type> Deduction
type associated with the transaction.
Reason> Dispute reason
code associate with the transaction.
Sales
Doc Order
number associated with the transaction (if applicable).
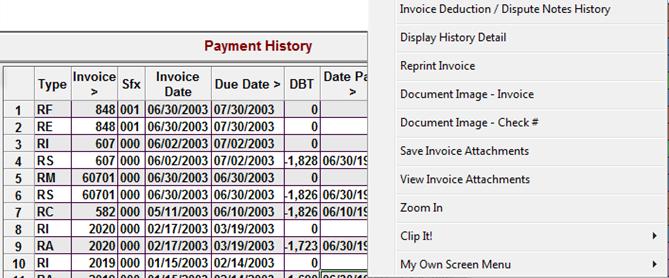
Navigation Options from the Payment
History Quadrant
Invoice
Deduction/Dispute Notes History
Brings the user to the
Invoice Deduction/Dispute notes entry screen, where they will be able to view and
post notations.
Display History Detail Similar to the open invoice detail,
this option launches the history detail screen, and allows users to see more
detail relating to that transaction.
Reprint Invoice Launches the letter
engine and opens an invoice reprint document.
This is a reproduction invoice in MC2 format which contains much of the
same data found in the source ERP invoice reprint.
Document Image – Invoice Available to customers with Imaging
Integration, this feature launches the user to the imaged copy of the customer
invoice.
Document Image –
Check# Available
to customers with Imaging Integration, this feature launches the user to the
imaged copy of the customer check.
Save Invoice Attachments Launches the Add Attachments screen in
MC2. This feature is available to
customers with MD2 installed, and it allows the user to attach documents to the
transaction in MC2 for ease of viewing at a later date. Save Invoice Attachments
View Invoice Attachments Allows the user to view any attachments
that have been stored at the invoice level.
Zoom
In Feature
Zooms into the Payment History quadrant.
Clip It! Copies either a single row or the entire
visible subset to the Windows Clipboard.
The user can then open excel and paste.
My Own Screen Menu Launches menu options which allow
the user to customize the Payment History quadrant of Snap Shot. Options available include the ability Hide A
Column, Change A Heading, Save My Settings and Restore Default Settings.
The
Snap Shot view in MC2 can be accessed from any of the main management screens by
simply double clicking on an account and selecting Snap Shot from the drop down
menu.
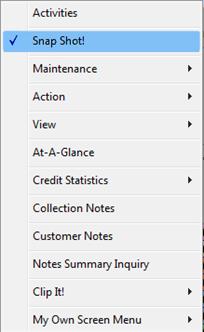
For
your convenience, Snap Shot is also accessible by selecting this option from
the menu bar in screens such as At-A-Glance:

Or
from the Browse menu on most transaction level screens in MC2
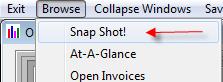
The
Snap Shot title bar provides key summary information to a collector as soon as
the screen is launched.

In addition to the customer number and customer name, the title bar
displays the following information:
Primary Contact
Information
Depending on what information is filled
out in the primary contact maintenance screen in MC2, the title bar will
display the contact name, phone number and fax number information.
Note: Updating the primary contact is key - if no
primary contact is specified in the contact maintenance for the account, the
first contact record in the maintenance file is displayed on the title bar.
Total Due The total due
displays after the contact information.
This is the true total due on the account and includes both the clean
and the dirty receivable balances.
Terms The
customer terms as shown in the ERP customer master are displayed.
Quick
access to critical function has been provided on the menu bar in the Snap Shot
view.

Browse The Browse
feature allows the user to access many key screens or action events that would
otherwise require them to open a different window. From the Snap Shot screen, you can efficiently jump to key screens to
manage a customer’s account in just two clicks.
Below
is a quick list of actions that are available via the Browse option in Snap
Shot view:
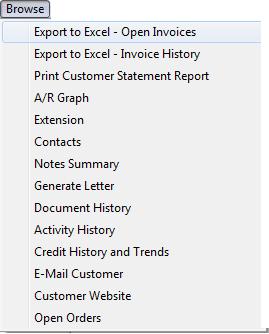
At-A-Glance Used to quickly
access the At-A-Glance customer summary screen.
Quick Notes MC2 provides a quick entry note function
that minimizes keystrokes, and allows the user to retain visibility to the
transaction detail while typing their collection level note. All note entered using this feature will go
into the MC2 Collection Notes.
Once you click on this option, the top portion of
the screen will turn into a notes entry screen:
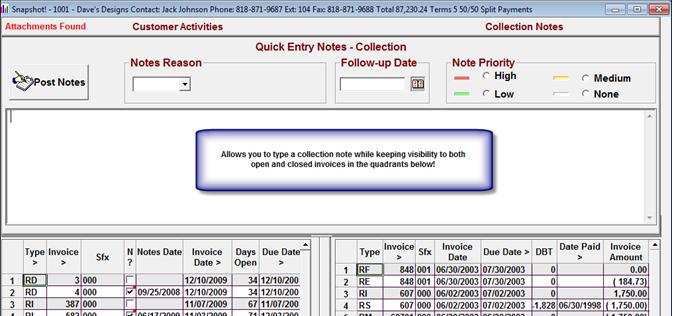
To enter a note, perform the
following:
·
Key
in the text
·
Select
a note reason code from the drop down combo box
·
Enter
a follow-up date if you wish to create a reminder
·
Assign
the priority to the note (and the resulting reminder)
·
Press
enter
Collapse Windows Closes the snap shot view and
returns the user to the main management view.
Save Columns/Searches Saves both your column settings as
well as your search preferences.
Save Attachments This feature is available to
customers with MD2 installed, and it allows the user to attach documents to the
customer level in MC2. By simply
selecting the “Attach” button, the user is able to retrieve data from any file
that they have access to from their PC, and attach a copy of that document in
MC2. (This data is then stored in the
MC2 Attachments file that has been mapped in the Configuration Master.)
View Attachments Allows the user to view any
attachments that have been stored on the customer’s account. This includes attachments that have been made
at any level within the account.
Invoice Promises Used in conjunction with
the Post Promises menu option to create a promise to pay reminder activity. When the Invoice Promises option is selected,
a column with check boxes will appear in the open invoice quadrant of MC2.
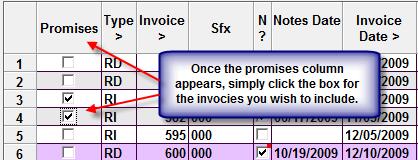
Simply click
next to the invoices that you wish to include on the promise to pay activity.
Post Promises Once you have selected
the invoices using the Invoice Promises menu option, simply click the post
promises button to launch the Invoice Promises form.
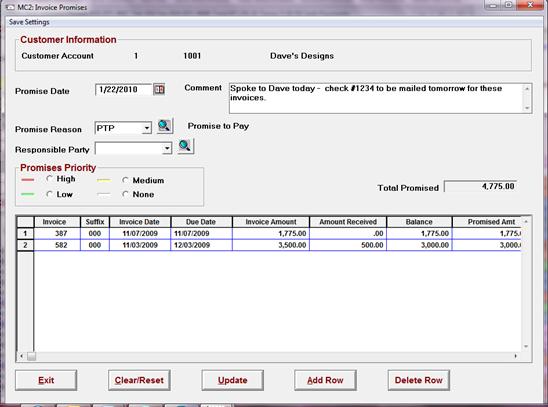
Fill in the activity follow up date,
activity reason code and comments lines prior to clicking the Update button to
post the promise activity.
Note: To maximize on function, the promise to pay
date that you select should be the date that you would expect the transaction
to clear in your source ERP system.
Multi-Reminders Launches the Multi-Reminder screen
which is used to create payment scheduled and tiered escalation follow
ups.
To use this feature simply enter the date of the
first reminder, the number of reminders you wish to generate, how frequently
these reminders should appear and any necessary comment. Once you generate, the system will
automatically determine the reminder dates based on your criteria.
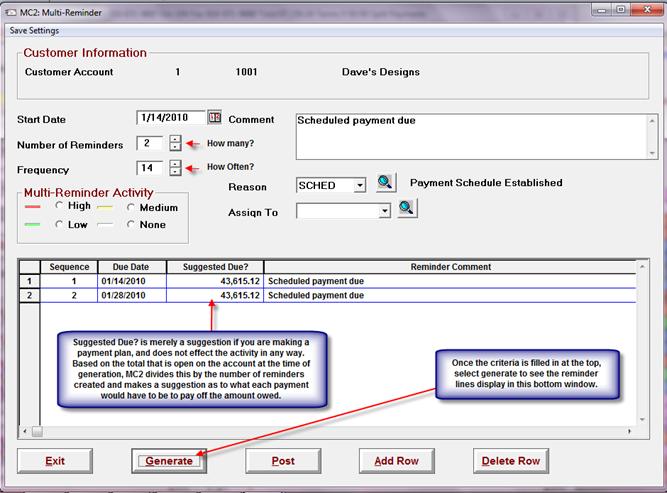
Once you have reviewed the data, select Post to
post the activities to the account.
Note:
Although you generated these activities through one step, they will appear as
individual reminders on the account with unique follow up dates.
Each of the 4 Snap Shot quadrants is labeled on either the top title
pane or the center title pane. In
addition to identifying the quadrants, important information and function are
imbedded as well.
When you open the Snap Shot view, on the top title pane to the left of
the Customer Activities Title, the system will identify if there are any
attachments found on the account.
If attachments are found at any level (customer or invoice) the
notation Attachments
Found will appear as shown below:

If no attachments are found, this section of the pane will appear
blank:

The
center pane of the Snap Shot screen provides both information and function:
By
selecting the  icon that is directly in the center of the
Snap Shot screen, you activate the split screen mode that displays collection
notes in the top window and open invoices on the bottom window of the screen.
icon that is directly in the center of the
Snap Shot screen, you activate the split screen mode that displays collection
notes in the top window and open invoices on the bottom window of the screen.

To
exit the split screen mode select the  icon in the center of the page to return to
the normal view:
icon in the center of the page to return to
the normal view:

On the left side of the center pane, the customer credit risk will
display if a credit risk has been assigned to that account.
Note: This feature is only active if credit risks
have been defined in the table code maintenance in MC2 and attached at the
customer level.
There
are several key columns in the Open Invoices and Payment History quadrants of
the Snap Shot view that allow the user to quickly total ranges of data.
In
the Open Invoices quadrant, this feature is available on the following columns:
·
Invoice Amount
·
Balance
·
Real Age
In
the Payment History quadrant this feature is available on the following
columns:
·
Invoice Amount
·
Amount Received
·
Days Beyond Terms
To
use this feature simply:
·
Click into the first cell that you want to total in one of the columns
that identified here.
·
Holding the left mouse button, drag down the column
·
You will see the total appear on the center pane on the left side.
To
total items that are not sequential:
·
Click on the first cell that you wish to include
·
Press and hold the Control key on your keyboard
·
Click on the next cell that you wish to include (or click and drag to
include a range)
·
You will see the total appear on the center pane on the left side
Note: Be sure to click on out of the column to
reset before attempting another sum total.
Use
this feature to get custom DBT calculations!
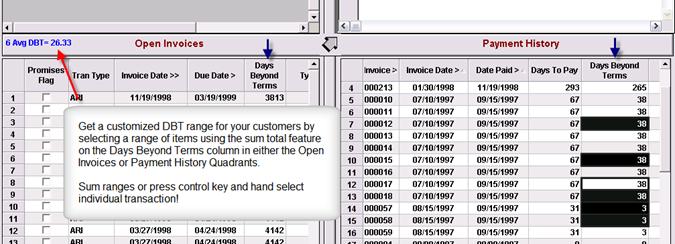
In the Open Invoices quadrant, it is possible to easily read all notes
that have been entered at a transaction level without having to drill into another
screen. To use the text tip feature,
simply hover your mouse over the red dot in the “Notes?” column to open a text
tip box displaying the notes on that transaction line.
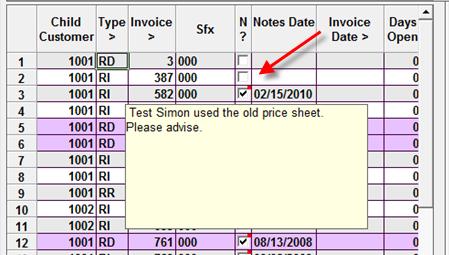
This hover feature displays with the most recent note at the beginning
and will display all notes related to that invoice. (Tip: If you start your notes with a date – you
will see the logical breaks in your notations when there are multiple notes
posted to the same invoice.)
Only transaction lines with a note associated with them will have the
red dot displaying.
Note: This text tip feature
works for both invoice notes and deduction notes. By design the deduction dispute notes will
take priority in the text hover feature.
At-A-Glance
provides a collector with a high-level customer summary that includes aging
data, credit data and user definable fields in a single location. In most ERP’s, this screen can be accessed at
the customer or entity (parent) level.
There are 5 main tabs available for each account in At-A-Glance each
of which will be reviewed in detail in this section. These include:
- Account Credit -
Provides a summary aging at the full account level and clean receivables
only level, as well as key credit statistics and quick access to last
collection and customer notes.
- Account Statistics –
Statistical information for the account
- Payment History -
Summary listing of all payments that have been received from this
account.
- Decision Tree – Key
information captured to help you make informed decisions regarding pending
orders.
- User Fields –
Summary screen at customer or entity level which displays the User Fields
that are currently populated for your implementation.
The key fields on this Account Credit tab remain constant regardless
of whether the collector chooses to look at the “Collectables – All” or
“Collectables – Net” aging views on this screen.
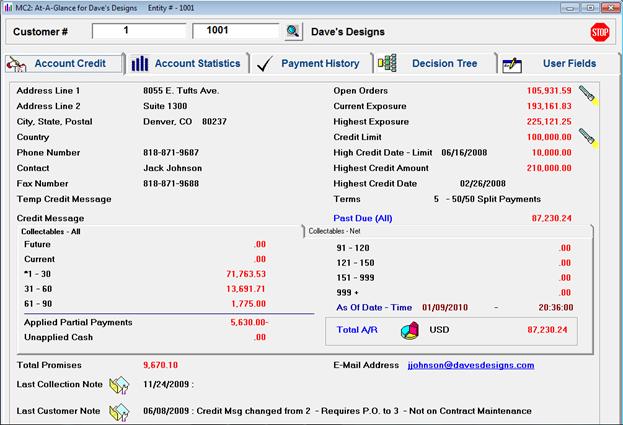
Field
Definitions
Address Line 1 First
Line of Customer Address
Address Line 2 Second
Line of Customer Address
City, State Postal City,
State Postal Code
Country Country
Phone Number Primary
Contact phone number
Contact Primary
Contact name
Fax Number Primary
Contact fax number
Temp Credit Message Temporary
credit message – pulled directly from JDE
Credit Message Credit
message – pulled directly from JDE
Open Orders Total
of all pending orders on the account that are in JDE. This total includes both held orders and
orders pending shipment.
Current Exposure The
current AR plus open order value that the customer has as of the nightly update
program.
Highest Exposure: The
maximum AR plus open order value that customer has had. This information is
captured at the time of the nightly update program. (*NOTE
based on implementation date for MC2)
Credit Limit Current
credit limit that is attached to the customer
High Credit Date – Limit Reflects
the date and amount of the highest credit limit assigned to the customer.
Highest Credit Amount Highest
AR balance on account
Highest Credit Date Date
of highest AR balance on account
Terms Terms
that are currently on the account
Past Due (All/Net) Total
of all transactions that are not in either the Future or Current aging
buckets. This total will reflect clean
and dirty receivables (ALL) when the user is looking the “Collectables-All”
aging tab, and will reflect only clean past due receivables (NET) when the user
is reviewing the “Collectables – Net” tab.
Total Promises Sum
total of all transactions on the account that have been marked with a promise
via the Promise to Pay activity maintenance.
Email Address Primary
Contact email address
There are 2 tab views in the center portion of the At-A-Glance Account
Credit screen that allow the user to view either the full account aging, or the
clean receivables only.
The “Collectables – All” tab provides an aging of all open items that
are open on the account both clean and dirty.
The “Collectables – Net” tab provides an aging of the clean
receivables only. What this means is
that all items that have been coded with a deduction type code are removed from
the aging buckets to allow the collector to view the true open invoice balance
aging.
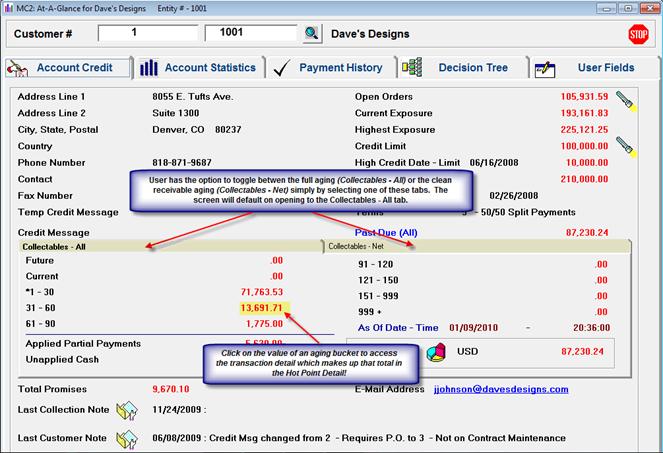
Note: Depending
on your business needs, it is possible to set up deduction types as
‘collectable’ or clean receivables via the INVYP code maintenance. This maintenance is controlled by the MC2
Administrator and would be effective for all users.
From either the Collectables – Net or the Collectables –All tabs, it
is possible to drill to the transactions that make up the aging bucket totals.
Simply click on the red $ value
corresponding to a specific aging bucket and you will be launched to the
transaction detail that makes up that aging bucket. This is called the Hot Point Detail screen in
MC2.
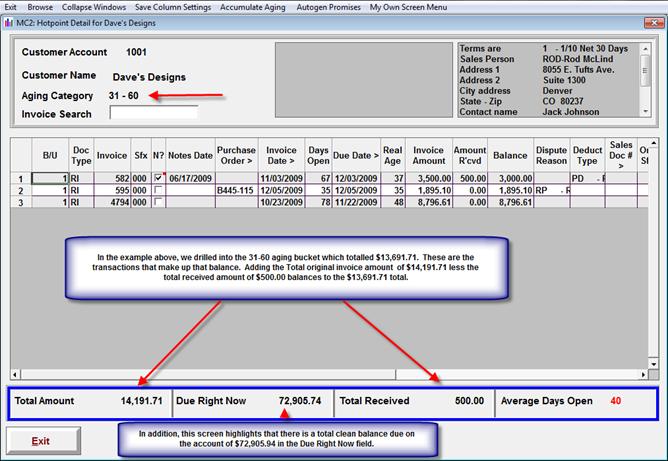
Once the user has launched into the HotPoint detail for the 31-60
aging bucket, if the users would like to expand the system to include all items
greater than 31 days, simply click on the Accumulate Aging button on the top of
the screen and you will see all transactions that are greater than 31 days past
due.
All the basic transaction detail functions that are available via the
Open Invoices or Snap shot view are available to the user in the Hot Point
screen as well. Examples of some of
those functions include:
- Sorting or searching for data on any column
that has an “>” for quick identification
- Invoice and Invoice Deduction dispute notes
and follow ups can be posted against transactions
- The text tip hover function has been enabled
on this screen
- The user can use the balance sum feature to
highlight data in the Invoice Amount or Balance columns to quickly
calculate information
- The Browse feature is enabled on this screen
to allow the user to quickly navigate to other screens or perform key
actions.
As noted in following screen shot, the aging category will now display
with the original aging bucket followed by the “+” sign to indicate that this
is an accumulated aging view.
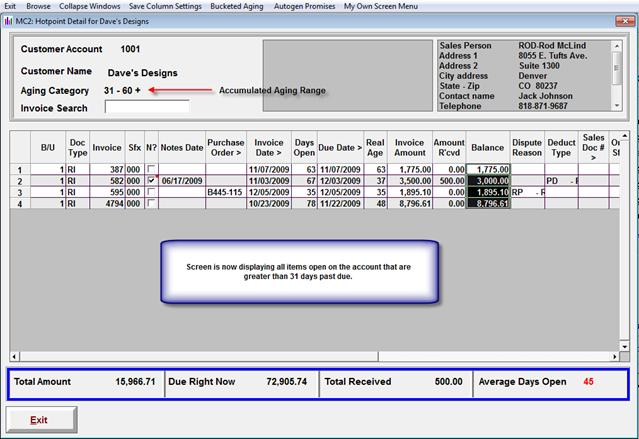
Hot Point detail is one area that provides the collector to auto
generate a promise activity which includes all transactions that are within the
selected aging buckets on the user screen.
Simply select the “Autogen Promises” option from the top of the screen
to open the promises activity with the data already populated. Simply select the follow up date, reason and
add a notation similar to a manually selected promise.
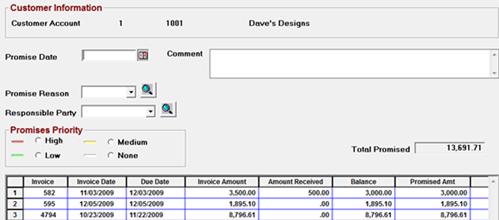
As cash is applied all day, it may be desirable to re-age an account
on the fly to see the current summary aging buckets. Anytime the user clicks on the Net
Collectable aging tab, the account will re-age the data and the “As Of
Date-Time” stamp will update.

To update the All Aging tab, click first on the Net Collectables tab,
and then back to the All Aging Tab in At-A-Glance. If you then click on the pie chart on the
bottom of the aging section you will see the “As Of Date-Time” stamp refresh.

The last collection note and last customer note on the account are
visible at the bottom of the Account Credit tab in At-A-Glance and can be
accessed simply by clicking on the folder icon next to the appropriate note
level:

Last Collection Note Collection
notes are the last calls or collection activities performed on the account by
the collector
Last Customer Note Customer
notes are generally high level customer notations
Accessing
Orders via the Flashlight Icon
The open order value is visible on the top right hand side of the
At-A-Glance screen, and the details of the transactions that constitute that
total can be accessed simply by clicking on the flashlight icon next to the
order value:

Once this icon has been clicked, MC2 will launch the Open Order
Inquiry screen which will allot the user to review the open orders pending for
that account.
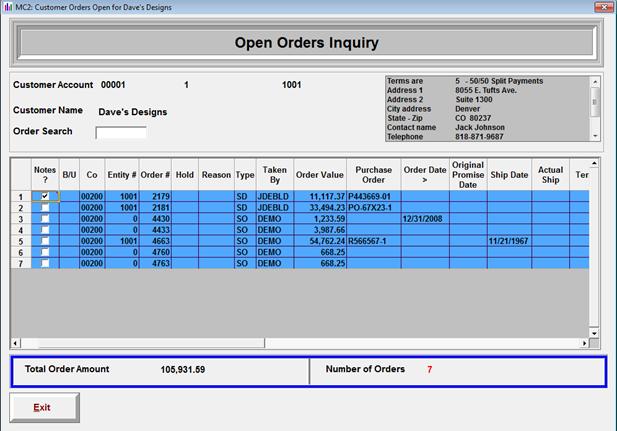
The current Credit Limit is visible on the right hand side of the
At-A-Glance screen. If credit limit
changes are being made via MC2, it is possible to view the credit limit change
history on the account by clicking on the flashlight icon next to the credit
limit value:
Once this icon has been clicked, MC2 will launch the Credit Limit
Change History screen in MC2. This is a
view only screen which provides information about who changed the limit, when
they changed it, and why it was changed.
Note: Credit limit updates back to ERP require the
user to have appropriate application security set up on their user ID. This feature only captures data if the credit
limit is changed in MC2 and will not capture this same information if the
credit limit is updated solely in the source ERP.

The Account Statistics tab in At-A-Glance provides quick access to
statistical information for the account.
This information is a combined look at data direct from the source ERP
system in addition to several MC2 calculated figures such as Days Beyond
terms. As each ERP is slightly
different, the statistical information that is available to be provided on this
page may vary slightly.
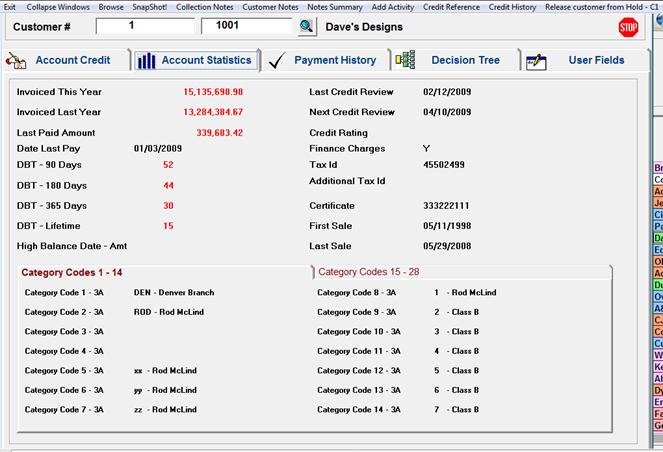
Field
Definitions
Invoiced This Year Data
is pulled directly from the statistical analysis run in JDE
Invoiced Last Year Data
is pulled directly from the statistical analysis run in JDE
Last Paid Amount Last
invoice amount paid on the account
Date Last Pay Date
of the last payment posted to the account
DBT 90 Calculation Calculated
in the ADP program at month end, the formula is as follows:
(Average DBT last 90 Days + Average Real Age of open invoices) / 2)
Other
conditions that are added to this calculation are:
·
If there are no open
invoices, then this will only calculate the DBT 90 and not divisible by 2
·
If there are no
payments in history for the last 90 days, yet there are open invoices will use
the average real days open (cusavedy1)and will not divide by 2
DBT 6 Months Calculated
in the ADP program at month end. This is
the average DBT for all eligible receivables paid within the last 180 days
DBT 1 Year Calculated
in the ADP program at month end. This is
the average DBT for all eligible receivables paid within the last 365 days
DBT Lifetime Calculated
in the ADP program at month end. This is
the average DBT for all eligible receivables paid in history. (NOTE:
History transactions in MC2 are stored for as long as they are available
in your ERP system.)
Last Credit Review Date Last
credit review date – pulled directly from JDE
Next Credit Review Date Next
credit review date – pulled directly from JDE
Finance Charges Y/N
indicator on whether account receives finance charges
Tax ID Tax
ID number that is populated in JDE (if applicable)
First Sale Date
of first sale
Last Sale Date
of last sale
As noted above,
the DBT calculations listed here are calculated in MC2 via the Average Days to
Pay (ADP) program which is ran on a regular schedule. The DBT calculation in MC2 can be customized
to include or exclude specific transaction types. For example, deductions can be excluded from
this calculation so as to better provide true performance metrics on how a
customer is paying.
In order to
allow quick visibility to key information regarding your accounts, category
codes 1 – 28 are pulled directly from JDE and updated into the Account
Statistics tab during the nightly update program.
The Payment History tab in At-A-Glance is a listing on all checks and
credits that have been applied to the account in history. The data listed on this screen is listed in
G/L Date order.
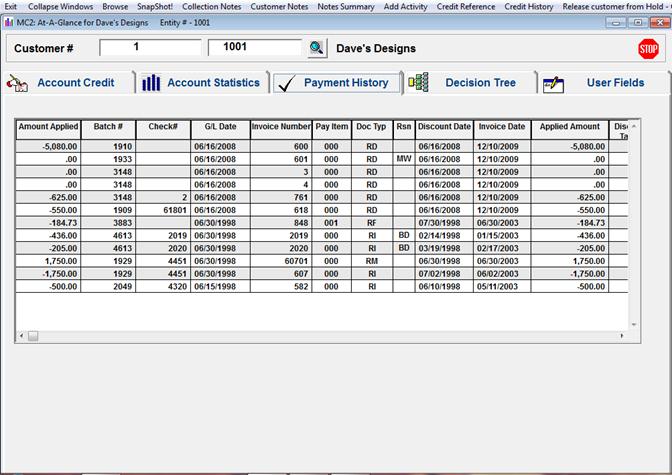
Currently the Payment History screen is a view only memo screen which
allows the user to scan for specific items that were paid in history on the
account.
Tip: If you prefer to see data displayed in a
different format or would like to export to excel, you can view the same data
in either the Payment History quadrant of Snap Shot or in the Invoice History
screens.
The Decision Tree tab in At-A-Glance is designed to provide a
collector the key information to help make informed decisions regarding pending
orders.
This screen is segmented into 3 key sections as noted here:
Credit History Each time the ADP program is ran
(monthly) a line is captured in the Credit History and Trends section of MC2
which displays the account performance at that time. This information is duplicated here in the
Decision Tree so that the collector can note key changes or trends with the
account. Data is reflected in descending
order from the most recent capture date.
Open Orders A listing of all orders for the
account which have not yet been invoiced.
If there are orders that are on hold, they will display on this screen
in the color that is defined in the configuration master.
Activity History The activity history window provides
a quick look at all closed activities and collection notes that have been
posted to this account in history. If collectors
are taking full advantage of the activity and notes reason codes, this view can
really provide a quick review to customers who have made or broken promises in
the past. (Note the Reason code is
attached to each activity.
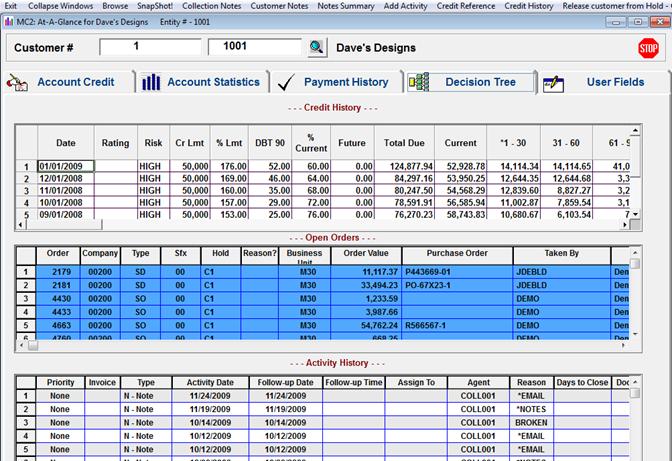
User Fields – Summary screen at customer or entity level which
displays the User Fields that are currently populated for your
implementation. Based on management
decisions at the time of implementation, the user fields in the system are
populated with any key additional information that was needed in the main
customer views.
Items that appear in the User Field tab in At-A-Glance are also
visible on the main Collection Management view in MC2 as a column.
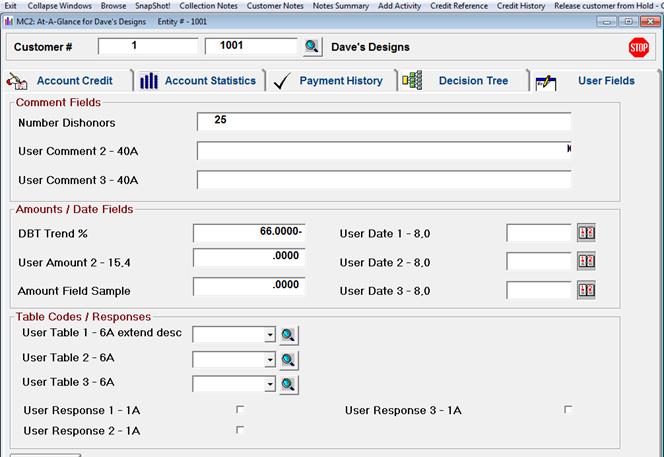
The menu bar in the At-A-Glance screen provides quick access to many
of the key functions that are necessary when evaluating the status of a
customer. Simply clicking on one of the
available options will allow the user to navigate to that screen.

Collapse Windows Closes the At-A-Glance view
and returns the user to the main management view.
Browse The Browse
feature allows the user to access many key screens or action events that would
otherwise require them to open a different window. From the At-A-Glance screen, you can efficiently jump to key screens
to manage a customer’s account in just two clicks. Below is a quick list of actions that are
available via the Browse option in Snap Shot view:
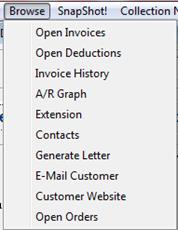
Snap Shot Used to quickly
access the Snap Shot customer summary screen
Collection Notes Launches the user to the
Customer Collection Notes screen
Customer Notes Launches the user to the
Customer Notes Screen
Notes Summary Launches the user to the
Customer Notes Summary – Inquiry screen which provides visibility to notes
posted across all levels.
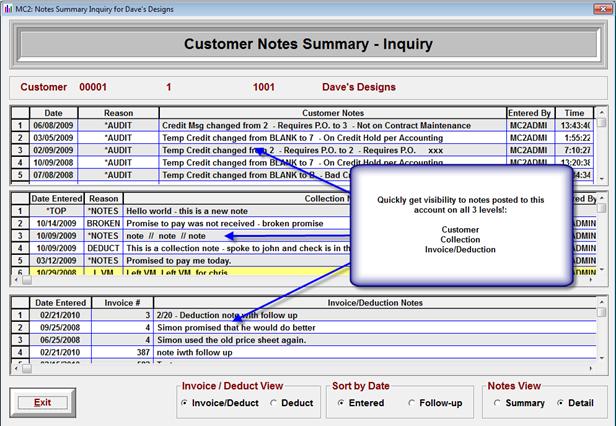
Add Activity Launches a blank
Activity Maintenance Screen at customer level.
Credit Reference If you have a credit
reference letter created in the system, clicking this button on the menu bar
will merge the default credit reference template in the letter engine.
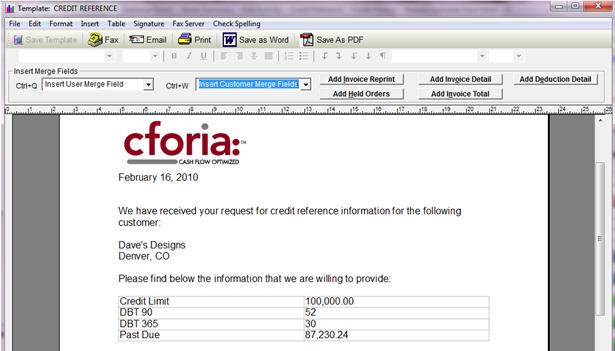
Note: A letter is designated as a credit reference
letter by selecting *CRDRF as the type when saving a document template in the
MC2 Letter Engine.

Credit History Launches the Credit
History - Trends screen which displays historical tracking information related
to this account. From this screen you
can track or trend based on a variety of metrics.
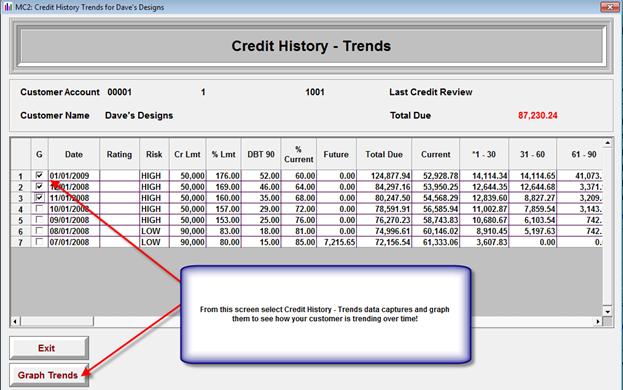
Additional Features:
This
feature is specific to JDE implementations only, and should be fully tested
through the order management process before activating in case there are back
end order processes to be considered.
When activated this feature will allow the user
to place an account on credit hold or release the account from credit hold in
JDE. There are several security steps
that are required by the MC2 Administrator in order to activate this feature.
1. Configuration Master Maintenance:
The primary order hold type for putting an account on Credit Stop is
specified in the more preferences tab of the Configuration Master.

This code can be used to put the whole account on hold and not just a
specific order if your JDE implementation is set up to use this field. (Updates to the A5HOLD filed in the F03012)
2.
Application
Security Maintenance:
In order for a user to be able
to use this feature, or any of the updates available from At-A-Glance back to
JDE, the Application Area “AAGMAINT: At-A-Glance JDE Updates” must be selected
in each authorized user’s profile.

Depending on the
current status of the account only one of the two available options will
display when At-A-Glance is opened:
“Place Customer on Hold” or “Release Customer from Hold”.
To place a
customer on Hold, Simply click on the “Place Customer On Hold” option from the
menu bar.
The system will
prompt to ensure that the user is certain that they wish to take this action:
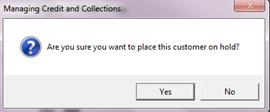
Once the user
selects yes to place the customer on hold, a red stop sign will display in the
upper right hand corner of the At-A-Glance screen as an indicator that the
account is on credit stop. Also, the
menu bar at the top of screen will now display the option to “Release customer
from Hold”.
At this point the
system is writing back the hold code (C1 or other code as specified in the
configuration master preferences) back to the A5HOLD field in the F03012 file
in JDE.
Simultaneously, a
“*AUDIT” customer note will be generated by the system as a permanent note to
the account. These are written to the
Customer Notes file, and are immediately visible on the bottom left side of the
At-A-Glance screen next to the Last Customer Note folder.

To release a
customer from hold simply click the “Release customer from Hold” button at the
top of the screen.
The system will
prompt to ensure that the user is certain that they wish to take this action:
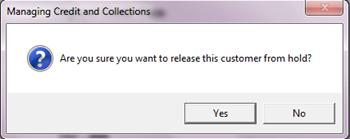
Once the user
selects yes to release the customer from hold, the red stop sign will disappear
in the upper right hand corner of the At-A-Glance screen as an indicator that
the account is no longer on credit stop.
Also, the menu bar at the top of screen will now display the option to
the “Place Customer On Hold .
At this point the
system will write back to JDE and clear the hold code from the A5HOLD field in
the F03012 file in JDE.
Simultaneously, a
“*AUDIT” customer note will be generated by the system as a permanent note to
the account. These are written to the
Customer Notes file, and are immediately visible on the bottom left side of the
At-A-Glance screen next to the Last Customer Note folder.

Additional At-A-Glance Updates back to JDE -
Not
available in all ERP’s.
There are a few
additional fields that can be updated from MC2 back to JDE on a live time
update process if the application security for the user has the “AAGMAINT:
At-A-Glance JDE Updates” selected.
The eligible
fields that can be updated via At-A-Glance include:
·
Credit
Message
·
Temp
Credit Message
·
Terms
Any time an
update is done from MC2 for one of these fields, a “*AUDIT” note will be
generated and stored in the Customer Notes for that account.
Attachments can
be stored at both the customer level and at invoice level.
- Items that are stored at invoice
level are visible through the View Invoice Attachments at the transaction
level and also are visible in the View Customer Attachments at the top of
the screen
- Items that are stored at customer
level are visible through the View Customer Attachments
- While these may be invoice related,
they have been stored at customer level and not linked back to the
invoice line.
Documents can
be attached at the Customer/Entity level or at the Invoice/Deduction Level.
Attachments at
the Customer/Entity can be added and/or viewed through the menu bars in Snap
Shot view, View Open Invoices and Open Deductions.

This feature is
available to customers with MD2 installed, and it allows the user to attach
documents to the customer level in MC2.
By simply selecting the “Attach” button, the user is able to retrieve
data from any file that they have access to from their PC, and attach a copy of
that document in MC2. (This data is then
stored in the MC2 Attachments file that has been mapped in the Configuration
Master.)
Attachments at
the Invoice/Deduction level can be added and/or viewed in Invoice Management,
Snap Shot - Open Invoices, View Open Invoices and Open Deductions.
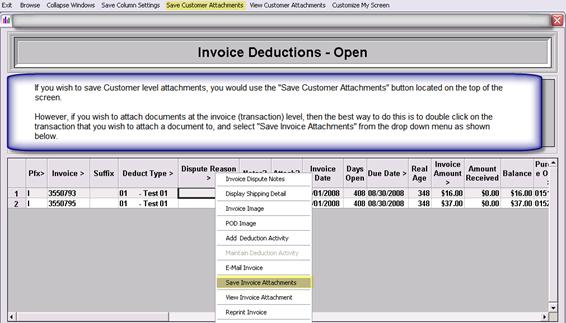
Benefits to
attaching at the invoice level:

This attachment
flag carries through to the transaction detail screens throughout MC2:
- Snap Shot
- View à Open Invoices
- View à Open Deductions
- Open Deductions
- Invoice Management View
Attachments can
be done at transaction level in each of these screens as well – you do not have
to be in the Open Deductions screen to attach documents at the invoice level.
Depending on
where the document was attached, the visibility will change.
If invoices are
attached at the invoice or deduction level, when you double click on that
invoice and select View Invoice Attachments, you will see only the attachments
that are linked to that specific invoice.
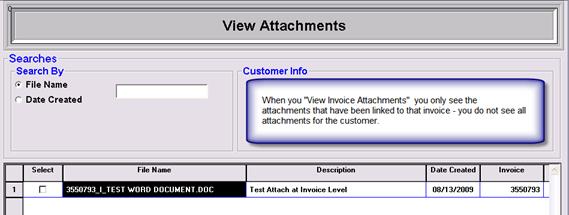
When you click on
View Attachments, you are able to see all attachments (Customer/Entity and
Invoice/Deduction) that are linked to that account number or invoice number.
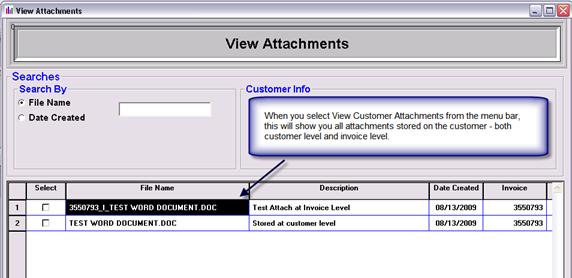
You can also view
All Attachments in Snap Shot by selecting View Attachments.

Additional
information regarding attachments in MC2/MD2 can be found on our website under
the video library at: http://www.cforia.com/mc2user/videos/MD2_Attachments.wmv
MC2 has many
different types of notes and activities to support the collections
efforts. There are customer and
collection notes at the customer, entity and headquarter levels. At the transaction level, MC2 also supports
invoice notes. If MD2 is installed then
deduction notes are available at the invoice level.
Depending on
business rules that are in place in each installation these notes be used
slightly differently. For example
purposes in this document the standard use examples have been used.
A customer level
activity that is not associated with a collection note can be created from any
of the screen views by double clicking on a customer number and choosing Action
=> Add Activity from the pop-up menu.
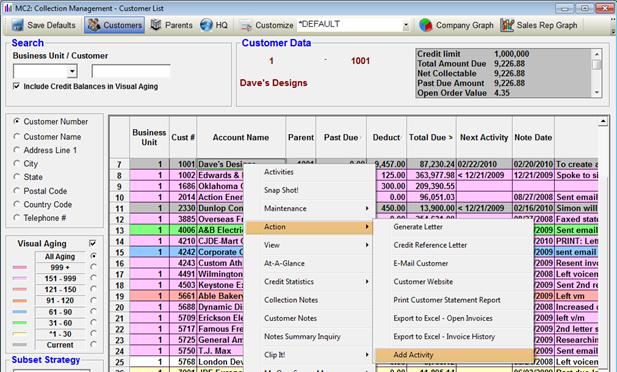
Once this option
is selected, the collector will see the Activity Maintenance screen. This screen is used to maintain all relative
information pertaining to the activity.
The screen will
auto populate the following information:
o Business Unit/Company
o Customer Number
o Customer Name
o The collection agent assigned to the
account
o Date/Time/User that entered the activity
The collector
then chooses the additional information that they wish to see on the activity
at the time of follow up review:
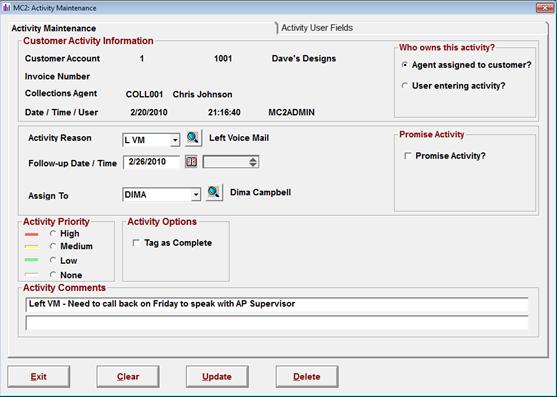
Fields available for use:
Activity Reason Code The
activity reason codes are designed to identify the type of action the activity
has been created for.
Activity Date Date on which the follow up activity is
due à A
pop-up calendar box will display that allows the user to select a specific
date. To navigate to a different month,
click on the arrows to the left or right of the month. To navigate to another year, click on the
arrows to the left or right of the year.
Assign To Identifies
whom the collector will be following up with for status on the account. This can be left blank or changed to an
internal stakeholder within the organization.
The list of assignees can include any internal contacts that
collectors work with regularly, regardless of whether those people have access
to MC2. This is a method of tracking
open activities associated with internal stakeholders and can be expanded to
include order entry, customer service and sales representatives.
Activity Priority When creating the activity, the user can
choose to use a visual priority to highlight specific actions.
Note: It is recommended to save
the high priority for those specified for immediate action.
Who Owns This Activity Activities will default to the agent
that is assigned to the customer in the customer extension maintenance; however
it is possible to change ownership to the person entering the activity by
updating the appropriate field.
·
If
the agent assigned to customer radio dial is selected, the activity will
reflect in the agent’s reminder screen when he/she opens MC2 for that day.
·
If
the user entering activity radio dial is selected, the activity will reflect in
that user’s reminder screen when they sign in.
(This can be used effectively when covering another desk, or for
management review)
Once the activity
has been updated, if there was an assignee selected, the system will prompt to
ask whether to email the activity to the assignee. Select no to create an activity without
sending a follow up email to the assignee.
Select yes to continue with the email.
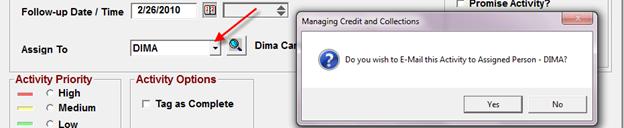
Select yes to
continue with the email.
Note: Depending on network configuration, if using
Outlook as your email application you may notice the Outlook email tab flashing
orange on the taskbar at the bottom of the screen. After clicking on the Outlook window, a
dialog box will display requesting the user to grant access to Outlook for MC2. On the dialog box click the radio dial so
that a check box shows in Allow Access for 1 minute and select Yes. This grants MC2 access to use your email
program to mail the activity:
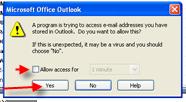
If the user has
selected to email the activity, an email will generate using the default mail
program. Details listed in the activity
maintenance screen are automatically populated to the body of the email as
shown below:
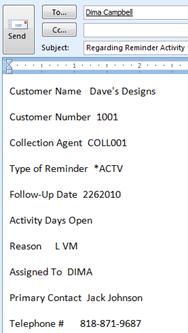
Once the activity
has been updated the system will prompt the user to exit the activity screen.
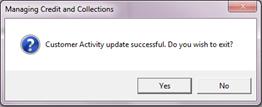
NOTE: Regarding
emailing reminders to an assignee: Once
this process has been started by clicking “Yes” to email the activity, the user
must complete the email or cancel it before they will be able to continue
working in MC2.
Activities that
are created via this method will appear as an “A” (Activity) type when
displayed in any of the activity management or snap shot forms.
These notes
generally relate to high-level customer information such as customers going on
hold, off of hold, credit increases, decreases, etc. In addition, whenever an update is done in
MC2 via the At-A-Glance update process, the system will automatically write and
audit trail note (*AUDIT) to the Customer notes.

Navigation selections available:
Date Entered: Date the note was
entered.
Notes Reason: Activity reason code associated with the
customer note. User selects this option
from a drop down selection list.
Notes View: Toggles between the
default setting of Detail and Summary view.
Detail: In detail mode all lines of the note are
visible.
Summary: In summary mode only
the first line of the note appears which is useful when searching through many
notes.
Note Priority: Select a note priority
color by level of importance.
Exit: Exit
the note without saving changes.
Post Notes: Enters the note.
Print Notes: Prints all notes
for the customer.
Options available from the MC2 pop-up
menu:
Edit Note: Allows the user
to make changes to an existing note.
Delete Note: Allows the user to
delete to an existing note.
Email Notes: Opens an email with
the customer note information.
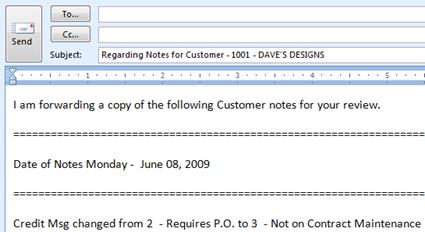
Print Note: Prints the
customer note.
Make this Note On Top: Selecting this option on a previously
entered customer note will allow change the date on the note to read *TOP and
it will remain as the top note displayed even after new notes are entered.
Release This Note From Top: If a note has previously been made the *TOP
note in the customer notes screen, this option will become active. Releasing a note from the top will release it
back to the original entered date.
Similar to
customer notes, collection notes are tied to the customer and not the
invoice. They are used to document the
collections related information between the agent and the customer. These notes are typically detailed in nature
and store conversation threads.
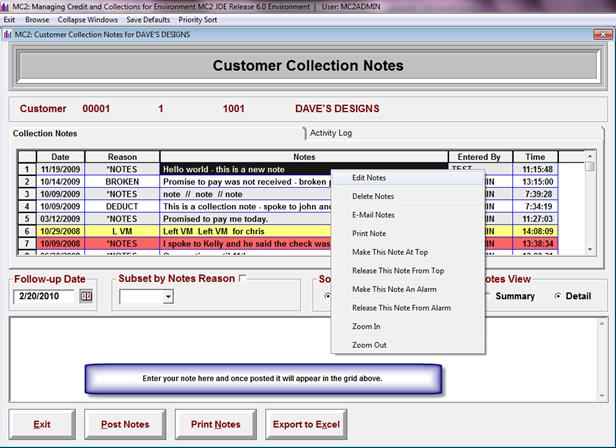
Navigation selections available:
Date: Default
display will be by date entered, and this can be changed to follow up date by
using the Sort by Date feature.
Notes Reason: Reason code associated with the note. (See
Reason Codes in Table Codes Section to set up auto-include comments when
entering Notes).
Subset By Notes Reason: Radio box located above the notes
reason code. This option filters the
collection note grid at the top of the screen to display every instance of
where that activity code has been used.
Note: If your collectors are
tagging promises and broken promises with an activity reason code – this is a
very effective tool!
Sort by Date: Toggles the view on the notes grid by
either the default sort of the date entered or by the date of associated follow
up actions.
Date Entered: Sorts notes grid by the date entered.
Follow-Up Date: Sorts notes grid by the follow-up date
Notes View: Toggles between the default setting of
Detail and Summary view.
Detail: In detail mode all
lines of the note are visible in the notes grid.
Summary: In summary mode only
the first line of the note appears in the notes grid. This feature is very useful when searching
through many notes.
Note Priority: Select a note priority color by level of
importance. Please note; the Priority
field box will appear once you begin to enter a note.
Post Notes: Posts the note into the system.
Print Notes: Prints out the collections notes for the
customer.
Options available from the MC2 pop-up
menu:
Edit Note: Allows the user to make changes to an
existing note.
Note: This option is security controlled – in order
to edit any notes in MC2 the user ID must have the “Edit/Change Notes”
application security area checked in their security profile.
Delete Note: Allows the user to delete to an existing
note.
Note: This option is security controlled – in order
to delete any notes in MC2 the user ID must have the “Delete Notes” application
security area checked in their security profile.
Email Notes: Opens an email with the collection note
information.
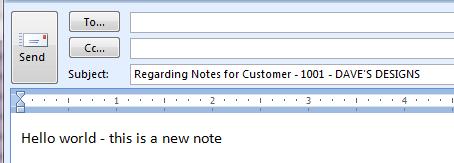
Print Note: Prints the collection note.
Make this Note On Top: Selecting this option on a previously
entered collection note will allow the system to change the date on the note to
read *TOP and it will remain as the top note displayed even after new notes are
entered.
Only one *TOP note may be placed on the account. If the user attempts to place a second one on
the account an error message will return asking the user if they wish to
replace the *TOP flag on the prior note with this one.
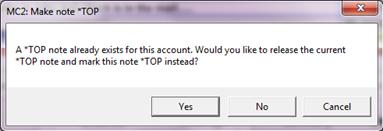
Once a note has been made a *TOP note, this note will be the one that
appears on the collection management screen, however the note date on the
collection management screen will appear to be blank.
Release This Note From Top: If a note has previously been made the *TOP
note in the collection notes screen, this option will become active. Releasing a note from the top will release it
back to the original entered date.
Make this Note an Alarm: Selecting this option on a previously
entered collection note will allow the system to change the date on the note to
read *ALARM and move it to the top of the collection notes list. As noted below, if there is also a *TOP note
on the account the *ALARM note will appear directly below it.

Only
one *ALARM note may be placed on the account.
If the user attempts to place a second one on the account an error
message will return asking the user if they wish to replace the *ALARM flag on
the prior note with this one.
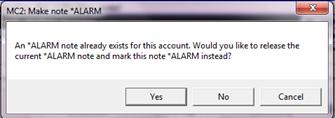
If an account has been flagged to have an alarm note on it, this will
be displayed in the “Alarm?” column on the Collection Management screen with an
alarm clock icon. Hovering the mouse
over the red text tip cell above the alarm clock will allow the user to read
the alarm message.
Note: There is no change to the
note column itself on collection management.
It will still display the last collection note or *TOP note as always.
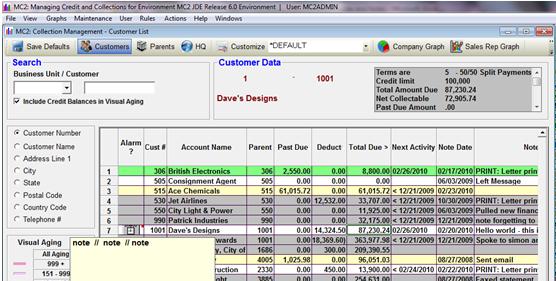
Release this Note From Alarm:
If a note has previously been made the *ALARM note in the collection
notes screen, this option will become active.
Releasing a note from alarm will release it back to the original entered
date.
Zoom In: This
feature will remove the bottom entry screen and allow the user to see more of
the notes lines in the display.
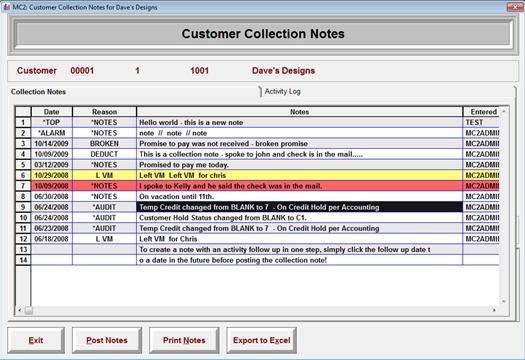
Zoom Out: Clicking
Zoom Out will return the user to the default Collection Notes entry view.
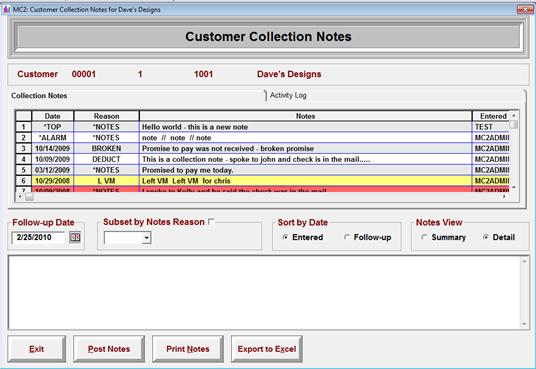
A second tab has
been added to the Collection notes form, and can be accessed by clicking on the
Activity Log tab just below the customer name.
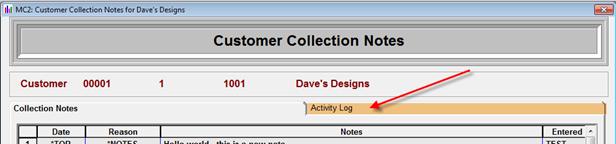
The activity log
tab is a comprehensive view of not just collection notes that have been entered
for the account, but also all activities that have been posted to the account
as well. The purpose of this view is to
allow the collector to get a full view of all follow up touches that have
occurred with the customer in a single screen.
The types of
transactions that are listed in this view include:
·
Collection
notes
·
Collection
note activities
·
Promise
to Pay activities
·
Multiple
Reminder activities
·
Deduction
Note Activities
·
Invoice
Activities
·
Posted
Rules Activities
·
Letter
Activities
·
Email
Activities
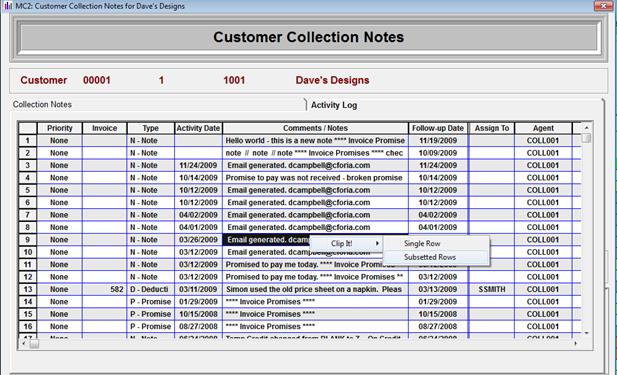
In order to copy
the items in the Activity Log to excel, the Clip It! Feature has been activated
on this screen. Simply double click on
the last line and select Clip it! à Subsetted Rows to capture all items that
have loaded on the screen and then open excel and paste.
As collection
notes often require the collector to take follow up action, additional
functionality has been added to these notes to allow the user to set a
follow-up reminder on any collection note that they post. In order to activate this feature, the user
simply changes the follow up date associated with the note to a date in the
future prior to posting the note.
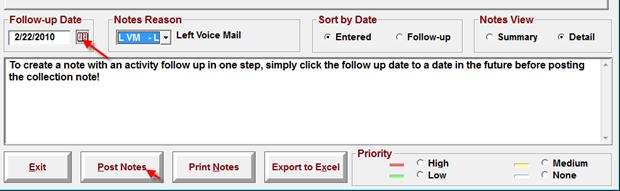
When a collection
note with a future follow-up date is entered, once the post note option is
selected the user will be prompted to assign this Follow-up Activity to a
particular person in the organization.
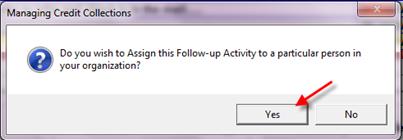
When the user
selects 'Yes', the MC2 Activity Maintenance form will open and can be updated
for items such as activity ownership and designation of Assignment
Personnel. The form can be completed as
noted above in the Customer Activity section.
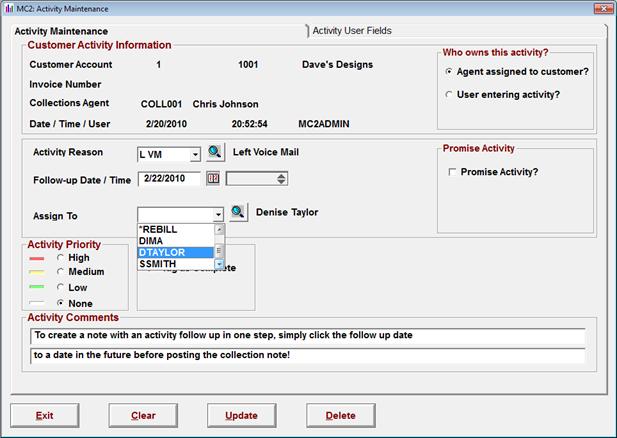
Once the
collection note activity is posted, it will appear as both a collection note
and as an “N” type (Notes) activity.
This can be seen clearly by viewing the snap shot view.
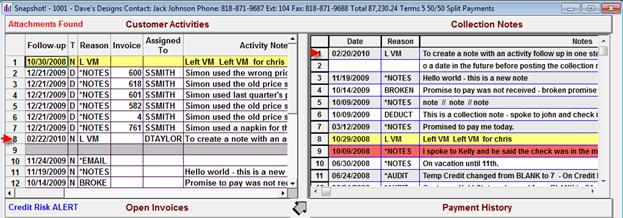
These
notes can be accessed by double clicking on an invoice line and selecting
Invoice Notes from any of the detail screens in MC2:
- Invoice Management
- View à Open Invoices
- Snap Shot
- Hot Point Detail
Or, the
invoice notes can be accessed via the notes tab on the invoice detail screen.
Note:
In order to have access to invoice notes, the application security area
“Disable Invoice Notes” unchecked. The
feature to disable invoice notes was added as many implementations choose to
enter all transaction notes in the Deduction/Dispute area due to the additional
functionality and security that those notes offer.
Invoice
Notes are entered into an open data entry screen which has 9999 lines with 80
characters per line available. Invoice
Notes cannot generate a follow up activity.
Those must be created in a separate step.
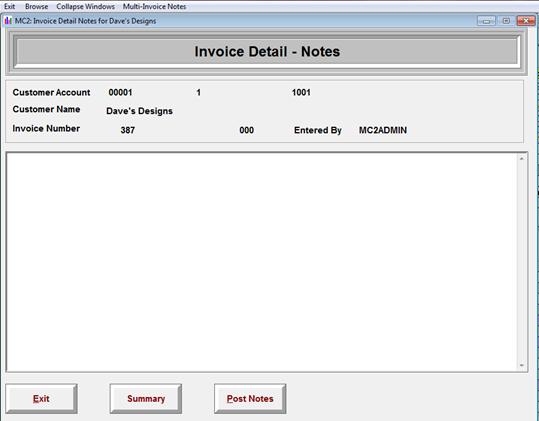
It is
possible to post an invoice note across multiple transactions. Simply select the “Multi-Invoice Notes”
option from the top menu bar and the screen will change to display a list of
available invoices on the right side of the screen.
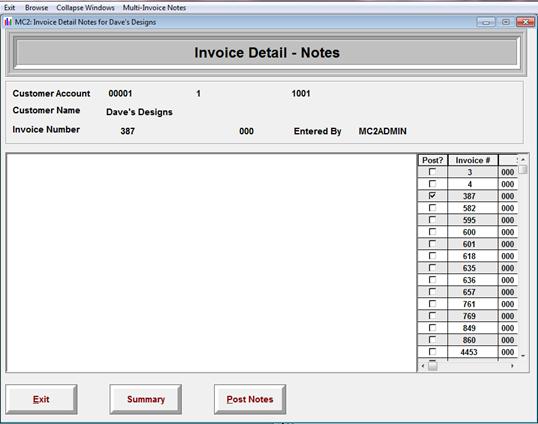
Simply
key the note into the notes field, check the invoices to which the note should
be posted, and click the Post Notes button at the bottom of the screen.
Invoice level
activities are tied to a specific invoice number in the MC2 system.
Invoice level
activities can be created from the invoice management view, View Open Invoices,
or the Snapshot view. In each screen the
process is the same:
- Click on the invoice that you wish to
create a follow up for, and select “Add Invoice Activity” from the pop-up
menu.
The activity
maintenance screen that displays is similar to the one that was previously
illustrated in the customer activity example.
The key difference is that the invoice number is captured in addition to
the customer number. These activities
will display as an “A” (Activity) type in all of the activity management views,
and the invoice number that it is tied to will also display in each view.
Note:
Using the Add Invoice Activity function does not create a note against
the invoice. It will only create a
follow up activity associated with the invoice.
Deduction/Dispute
notes are another option for entering notes at a transaction level. These notes are available when the MD2 module
is unlocked in the configuration master.
Originally designed for use with the Managing Deductions and Disputes
module, these transaction notes have emerged as the leading method for entering
any transaction level notes on an account.
There are several
key features of Invoice Deduction/ Dispute Notes that make them stand out as
compared to invoice notes including:
- Date stamp, time stamp and user ID
are captured at the time of note entry.
- Multiple notes can be entered against
a transaction without losing prior note history.
- Dispute/Deduction notes are included
in excel downloads along with invoice notes when the include invoice notes
“yes” is selected
- Allows the collector to create a
follow up activity without having to move to another screen.
Dispute/Deduction
notes can be accessed from several screens via the drop down MC2 toolbar:
- Invoice Management
- Deduction Management
- Snap Shot
- View à Open Invoices
- Hot Point Detail
The Deduction/Dispute note entry screen is very similar to those used for
entry of customer or collection notes, except it is specific to the
transaction.
Simply enter the desired notation in the lower portion of the form, and
once it has been posted, the note will move to the window at the top of the
screen.
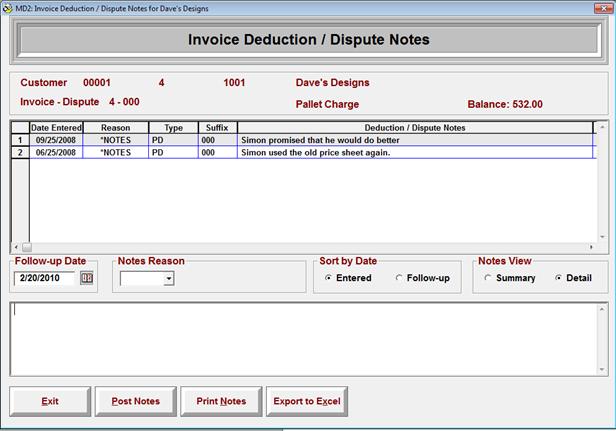
Columns displayed on this
form:
Date Entered: Default display will be by date entered,
and this can be changed to follow up date by using the Sort by Date feature.
Reason: Activity
reason code associated with the note.
Type: The
invoice type (deduction type) code that was associated with the transaction at
the time of notes entry.
For
a full open invoice, the Type field will appear blank. It is possible to track a transaction that is
moving between type codes.
Suffix: Indicates
the invoice suffix - (ERP specific)
Deduction/Dispute Notes: The notes that have been entered.
Entered By: User ID that entered the notation.
Time: Time
stamp of notes entry.
Available
option on the form:
Follow Up Date: Default date will be set to the present
day. Clicking the calendar next to the
follow up date will allow the user to update the follow up date to a date in
the future to generate an activity follow up at the same time a note is
created.
Notes Reason: Notes and activity reason code associated
with the note being entered.
Sort by Date: Toggles the view on the notes grid by
either the default sort of the date entered or by the date of associated follow
up actions.
Date Entered: Sorts notes grid by the date entered.
Follow-Up Date: Sorts notes grid by the follow-up date
Notes View: Toggles between the default setting of
Detail and Summary view.
Detail: In detail mode all
lines of the note are visible in the notes grid.
Summary: In summary mode only
the first line of the note appears in the notes grid. This feature is very useful when searching
through many notes.
Note Priority: Select a note priority color by level of
importance. Please note; the Priority
field box will appear once you begin to enter a note.
Post Notes: Posts the note into the system.
Print Notes: Prints out the collections notes for the
customer.
It is possible to
post deduction/dispute notes across multiple invoices at one time. To activate this feature from the Invoice
Deduction/Dispute Notes screen, simply click on the Multi-Dispute Notes option
at the top of the window.

A list of open
deductions/disputes for this account will appear on the right hand side of the
screen. Select each of the notes should
be posted to by clicking in the “Post?” column.
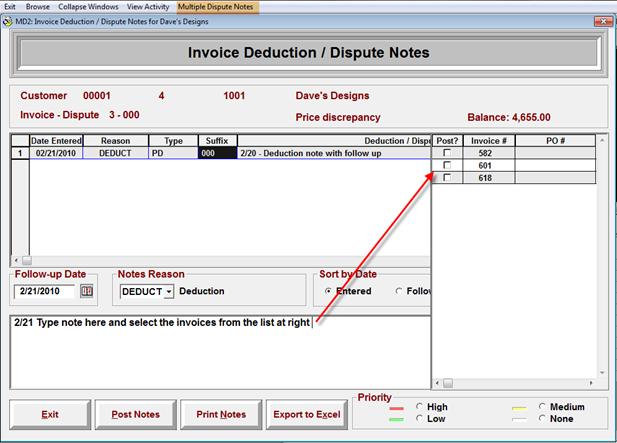
Once you have
selected the invoices and completed the note, select Post Notes at the bottom
of the screen.
Please note: Only invoices with a deduction/dispute type
will appear in the selection window.
To add an
activity to the transaction at the same time as entering a dispute note simply
change the Follow-Up date future prior to posting the Deduction/Dispute
note. It is important to note that while
you can have multiple deduction notes posted to a transaction, there is only
one activity that is assigned to a deduction.
Activities that
are entered via the Deduction/Dispute notes feature will display in all
activity management view as a “D” (Deduction/Dispute) type activity.
NOTE: If the date is not changed to a future date,
an invoice activity will not create and the dispute note will merely be
attached to the invoice in a similar manner to invoice notes.
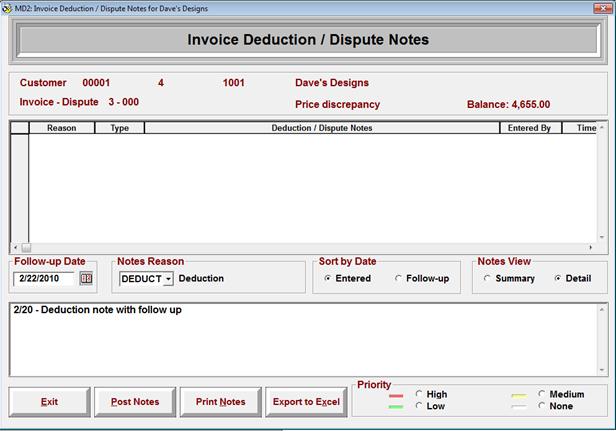
When the post
notes option is selected, the user will receive a pop up box that asks if you
want to add an activity?
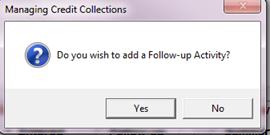
Click yes to open
the Activity Maintenance screen with much of the activity information already
populated:
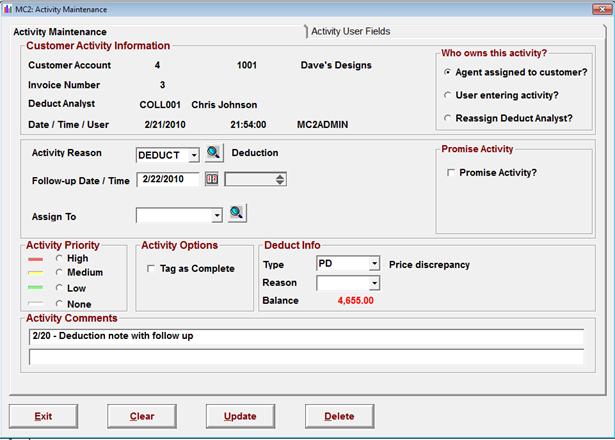
Complete the
following areas:
Who owns this activity? This field identifies which workflow
queue that the activity will fall into on the date the follow up is due. The default will be to the analyst assigned
to the customer. This can be changed to
the user ID that is entering the activity.
On
a deduction activity there is a third option that allows the
activity to be assigned a different deduction analyst than the one
that is assigned to the customer.
Assign To This
is an optional field which allows the user to select an internal stakeholder
that the collector will be working with to adjudicate the open balance.
If an assignee is selected, the system will prompt the user to email
the activity information. If selection
is made to email the assignee, the email process must be completed or ended
prior to resuming function in MC2.
A multi-reminder
allows the collector to schedule a payment plan or series of follow up calls to
a customer. Suggestions on use of this
feature include Payment Schedules, Escalation Follow Up, and reminders for call
or statement on specific dates.
- Similar to promise activities,
Multi-Reminders can be accessed from the View Open Invoices screen or from
the Snapshot view.
Sample menu
bar from the Snapshot view screen:

When the
Multi-Reminder button is selected, a Multi-Reminder activity reminder screen
will prompt to fill out.
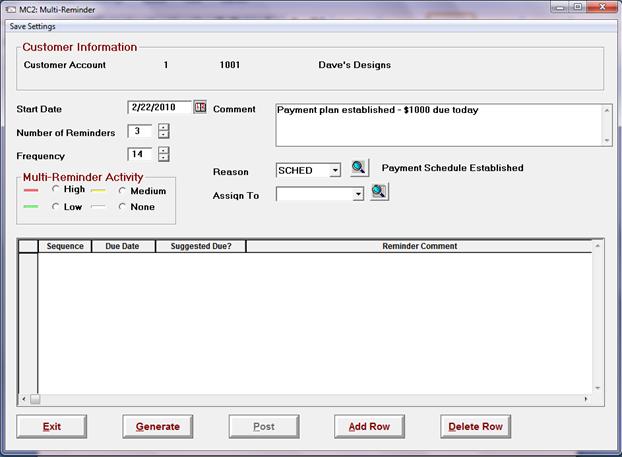
The company,
customer number and customer name will auto-populate into the activity. The following information would need to be
completed:
Start Date: Date of first activity follow up
activity. This is selected in the same
manner as other follow up dates by using the pop-up calendar to select the
Year, Month and Date.
Number of Reminders: How many follow up activities will be
generated
Frequency Number
of days between activity activities (example:
entering 14 would generate an activity every 14 days.
Comment Comment
that will display on the follow up activity
Activity Reason Select appropriate reason from drop down menu
Assign To Person
or department that the follow up will need to be done with
Priority None,
Low, Med, High for visual prioritization.
Once the
information is populated press the generate button on the bottom of the screen in
order to view the activities that will be posted.
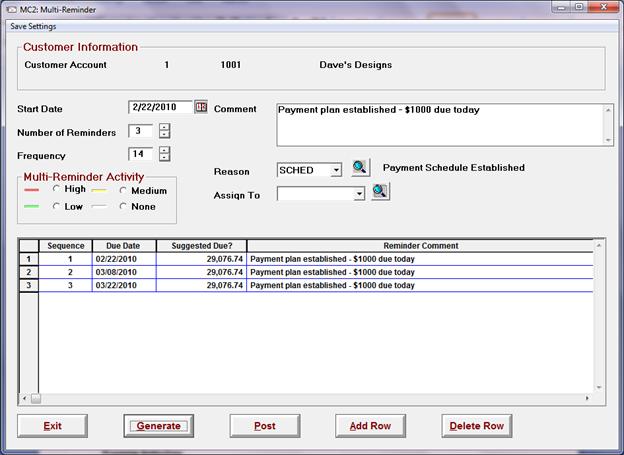
When finished
select the “Post” button on the bottom of the screen to post the activity. The new Multi-Reminders will reflect in the
Customer Activities view as a type “M” (Multi-Reminder). Note that due to the unique follow up dates
associated with each of the generated activity lines, they will appear as a
separate activity records once the multi-reminder has been posted.
At any time it is
possible to view the details of the activities that have been posted. On the Multi-Reminder example this is done by
double clicking on the activity in question and selecting “Maintain
Multi-Activity Activity” from the pop-up menu.
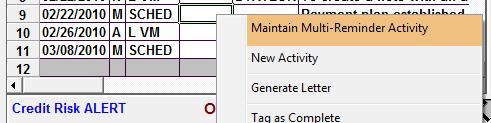
The information
will be translated onto a standard Activity Maintenance screen.
Promise
activities are a powerful collection follow up tool as it allows a collector to
consolidate promised invoice payments to one activity, and manage payment
effectively.
Promise to pay activities also directly impact cash forecasting in
MC2. If there is a promise to pay
activity that has been attached to an invoice, the promise date that is
associated with that activity record will override the system generated
expected receipt date in the nightly update.
This allows for more accurate forecasting based on hard promise dates
received from the customers.
There are two
places a Promise Activity can be generated from - either in Snap Shot or Open
Invoices views.
- Click on the Invoice Promises from
the menu bar at the top of the screen a new column will be visible on the
Open Invoice quadrant titled promises, and will have selection boxes for
update. Based on the customers
payment promise, check the invoices that should be tied to this activity.
- Once the boxes have been checked,
click the “Post Promises” option on the bottom of the Invoice Detail –
Open screen ( or from the menu bar in Snap Shot)
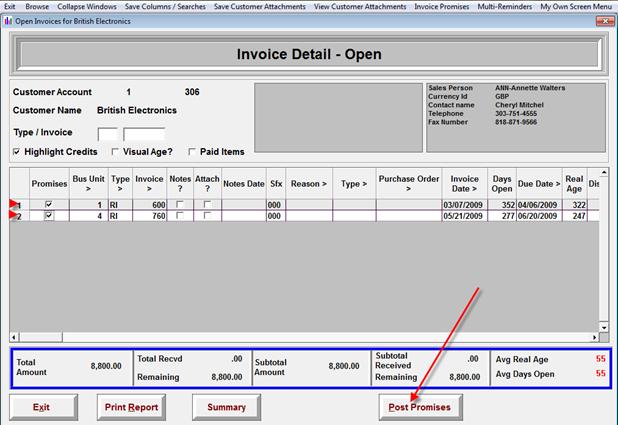
When “Post
Promises” is selected, a new Invoice Promises screen prompt which displays the
detail of the invoices that were selected.
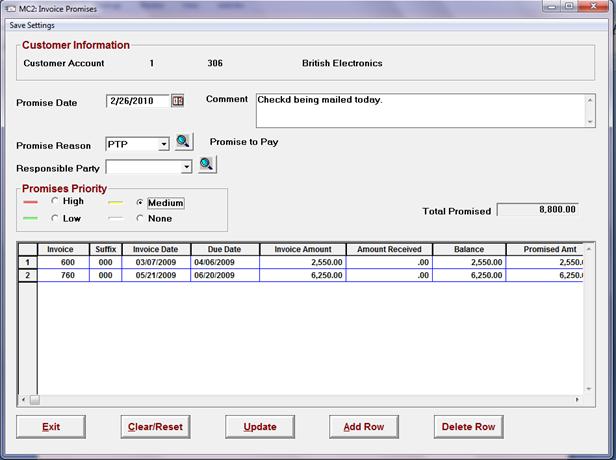
The following
information on would need to be completed on the activity screen:
Promise Date: Date payment due and
flagged for collector follow up.
Promise Reason: Commonly
PTP is used
Responsible Party: Assignee responsible can be used if internal – usually left blank
Comments: Specific
information relating to the promise to pay
Promises Priority: Follow
up priority
Optional
functions available to adjust the promise activity:
During the review
process, if the user realizes that one of the invoices should not have been
included, it is possible to delete an invoice row from the activity via the
following steps:
·
Click
onto the row that to be removed from the activity, and press the “Delete Row
button on the bottom right hand corner of the screen.
·
The
system will prompt to ask if you are certain you wish to delete this row.
·
Click
“Yes” to continue the delete row function, and then the system will recalculate
the activity to reflect only the remaining items.
It is also
possible to add additional lines after the promises form has been launched
using the following steps:
·
Click
on the “Add Row” button at the bottom of the screen.
·
A
blank line will appear below the last selected invoice. Simply key the invoice number that needs to
be added to the promise in the invoice number column, and then tab to the next
line.
·
As
long as a valid invoice number has been entered, the form will update with the
full invoice line information and the total promise amount will be adjusted to
include the additional line(s).
When complete,
press the update button on the center bottom of the screen.
The activity will
now appear in the Snapshot! view and in Activity management as a type “P”
Promise Activity.

To maintain or
review a promise activity, simple double click on the activity and select
“Maintain/Display Promise Activity” from the drop down menu. This will launch the activity maintenance
form for review.
To clip the items
that are selected on that PTP activity drop them into excel, simply double
click on the bottom line of the promises info in the activity maintenance
screen. A message will prompt that the
items are ready to paste to excel.
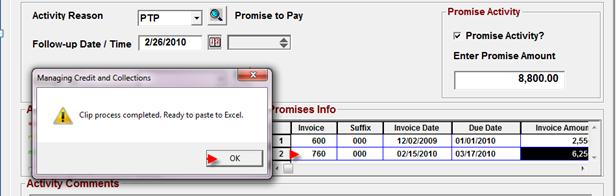
Depending on the
decisions made during the MC2 implementation, the closing of promises can be
managed in two ways.
·
The
collector is always able to manually review a promise to pay activity and tag
it as complete once the check has been received in house.
·
The
nightly update program can systematically close a promise to pay transaction
once the cash has been posted to the invoices listed on the promise
activity. The promise to pay transaction
will only close if all invoices listed on the promise are paid in full – any
skipped invoices or partial payments posted to the transactions will leave the
promise open for collector review.
Note:
This option is unique to promise to pay activities created at specific
invoice level only.
Hot Point detail
is one area that provides the collector to auto generate a promise activity
which includes all transactions that are within the selected aging buckets on
the user screen at a click of a button!
From At-A-Glance
double click on the selected aging bucket to open the Hot Point detail
screen. (Optional: Select “Accumulate Aging” from the menu bar
to include all items that are older than the selected aging bucket.) Press the Autogen Promises button at the top
of the screen to launch the Promises Activity form.
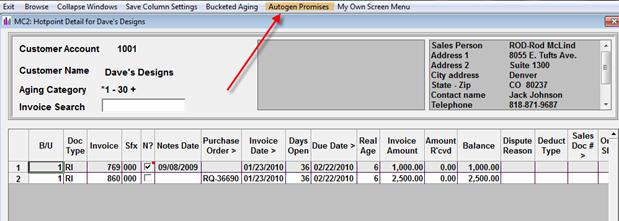
The promises form
will open as shown below with all invoices selected on the form. The user can then delete lines if needed, and
add the standard follow up information to prior to posting.
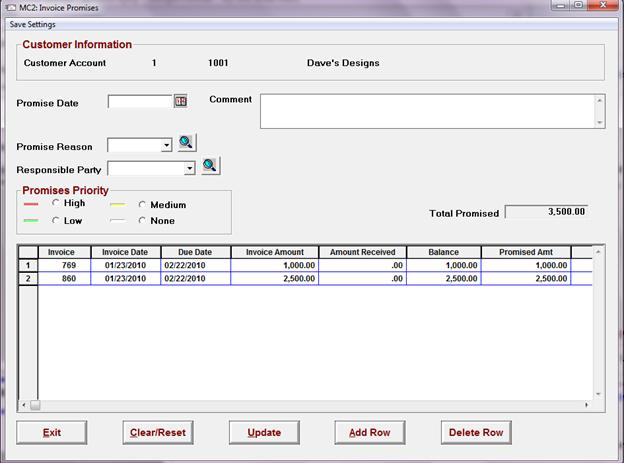
In the
application security set up, there is an option to add a prompt for the user to
generate an activity follow up record after a letter is merged. (LETTERACTV – Auto Letter Activity). This option is recommended, especially when
working with rules automation workflow.
When this option
is selected, each time a user generates a letter via the MC2 letter engine, the
system will prompt to ask the user whether they wish to create an follow up
activity.
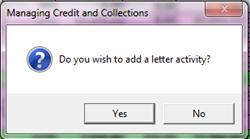
Selecting “Yes”
at this prompt will open the activity maintenance screen with the data filled
as shown below:
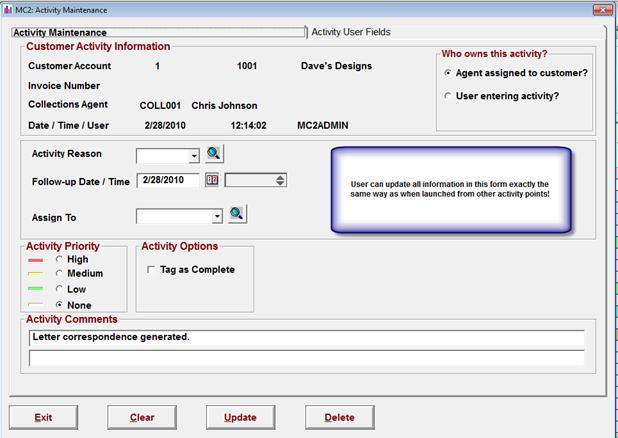
Once the activity
maintenance screen is updated, the activity will post as an “L” Letter type
activity.
It is possible to
use MC2 as a reminder source for emails that were generated directly to a customer
as well. While the email itself is not
retained in the MC2 notes, this is a quick way to keep all follow up actions in
one place. To email a customer from one
of the main management views in MC2, simply double click on the customer and
select Actionà Email customer.
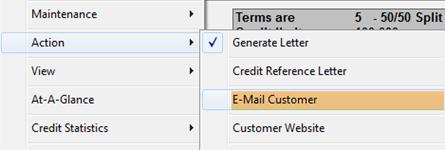
This will launch
a blank email form with the default primary contact email address
populated. If the primary contact has no
email address populated in MC2, this will launch a blank email form. The user can type their note to the customer
as normal and select to send the email.
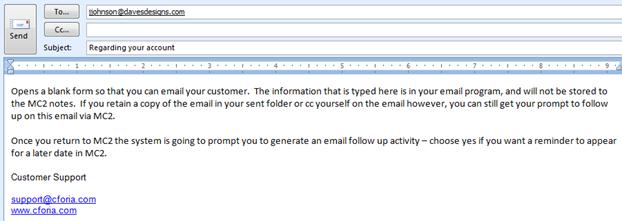
MC2 will then
prompt the user to enter an e-mail follow up activity.
Selecting “Yes”
will launch the activity maintenance form, and the user can fill out the data
they wish to see when the follow up reminder comes due.

Once posted, this
activity will display as an “E” (E-Mail) activity type in all of the activity
management screens in MC2.

It is sometimes
necessary to see all notes that have been posted to an account regardless of
what level those notes were entered. The
Customer Notes Summary – Inquiry screen will display all invoices that have
been entered at a customer, collection or invoice/dispute level.

There are 3
additional filter options available on this inquiry view:
Allows the user
to toggle between displaying both
invoice and deduction notes or just displaying the deduction notes.
Toggles between
entered date and Follow-up date.
Toggles between
Summary and Detail view in the collection notes window.
MC2 provides
several methods of transferring key customer information into excel
worksheets.
These include the
following:
·
Company
Export
·
Deduction
Export
·
Account
Aging (Export to Excel à
Open Invoices)
·
Historical
Data (Export to Excel à Invoice History)
·
Clip
It!
·
Copy
and Paste to Excel
·
Export
Activities to Excel
·
Export
Notes to Excel
The company level
export to excel can be accessed from the main tool bar from Collection
Management, Credit Management, Invoice Management, Activity Management or Order
Management.

Once the user
clicks on this excel button, the system will launch the “Generate Excel Export”
screen which will allow the user to make additional selections about the data
that they wish to download.
Note:
In some installations, when the user profile is set to “*Prompt”, the
user may be prompted an additional sign in box when this option is
selected. This would be the AS400 user
name and password.
When the Generate
Excel Export screen opens, the standard default will be all accounts associated
with the agent assigned to the user profile.
If no agent is assigned to the user launching this feature, the default
will be a wide open export for ALL AGENTS.
As noted across the top of the screen leaving the range criteria blank
will export all accounts. However, the
user has several filter options to narrow down the export:

Range Options Option to create a range based on customer
number or customer name.
Range The
range selection criteria will vary depending on whether the user selected a
range option of customer number or customer name.
When
customer number is selected as a range option, the user can specify business
units or customer numbers for a customized export. For example to select a certain range of
customers associated with business unit/company 1 fill in as shown below:
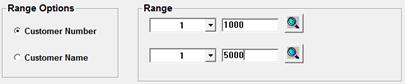
When customer name is selected as a range option, the user can specify
the alpha characters that they are interested in viewing. For example if the user wanted all customers
with a name range of A through L they may fill out the form as shown below:
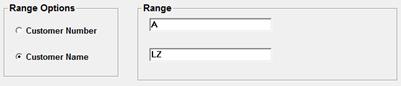
Level The
export can be done at summary or detail level.
The default is to provide a summary aging – a single line per customer
showing the balance due in each aging bucket.

When
detail is selected, the user will get a summary line for the customer followed
by a line item detail for every open item that makes up the customer balance.
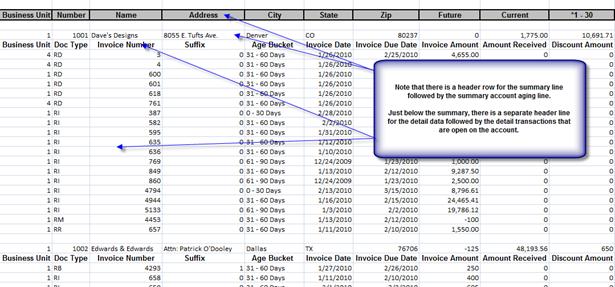
Depending on the ERP, when a detail summary aging is selected, the
user will have some additional selection options such as whether to include
invoice notes and where applicable to include invoice suffixes.
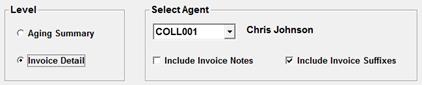
Select Agent Default will be the agent assigned to the
user, however any agent can be selected, or an ALL AGENT export done.
Customer Balances Default will be to Non-Zero balance accounts,
however the user can choose to export all accounts with a Zero or Non-Zero
balance.

Similar to the
main management views in MC2, the aging columns that display on the export to
excel are based on the clean receivable balances. Add the clean receivable aging columns to the
Total Deductions column on this report to get the Total Due amount for each
customer.
The Deduction
Export is available in select ERP’s and is accessible via the excel icon on the
Deduction Management View. This feature
will allow the user to export specified ranges of information based on the
deduction type codes (INVTYP) that are assigned to transactions in the
database.

(NOTE:
If you have multiple environments, you will be prompted to select an
environment choice - similar to when you sign into MC2 each morning.)
Once this option is selected, the user will see an MD2: Data Extraction
window that allows the user to select from a list of criteria:
·
Division
Number (Company Number)
·
Customer
Number Range
·
Amount
Range
·
Date
Range
·
Open
or Paid
·
Invoice
Type (Leave blank for all deduction types)
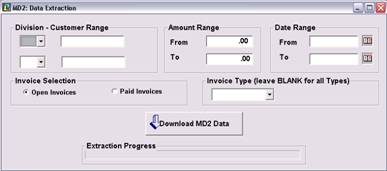
Select the
Download MD2 Data button on the bottom of the screen to begin the data extract
to excel. Depending on database size,
this may take a couple minutes. Be sure
to wait for message that states the extract is complete:
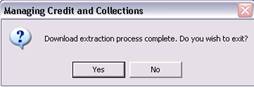
The fields that
will display on this report may vary by ERP, but typically will include:

From almost any
screen in MC2 it is possible to export an account aging to excel. Although the title suggests that this
export is open invoices only, in reality this export feature will truly give
the user a full detail of all open transactions on the account as of the time
the report is generated. The export to
excel may be done at a customer, entity or headquarters level where
applicable.
From any of the
main management view, position to the account and select Actionà Export to Excel – Open Invoices.
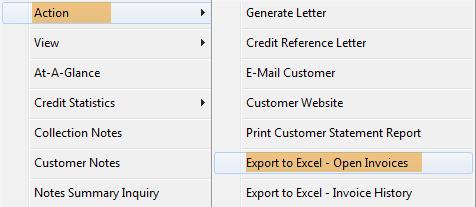
Alternatively
from many of the detail screens, the export to excel option can be found under
the Browse menu options.
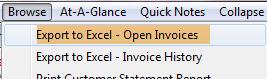
Once the user
selects the Export to Excel - Open Invoices option, they will be asked whether
they wish to include invoice notes. If
the Yes option is taken, any deduction/dispute or invoice notes that are
attached to transactions will be included in a column on the export to excel.
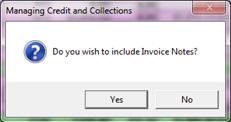
Once an answer
has been given to the notes, an excel form will open, and the data transfer
will begin. When the export is complete,
the columns will automatically resize to match the column width of the data.
NOTE: It
is important for the user to allow the export to complete before attempting
expand or move columns on the screen!
Failure to do so may result in a run time error message stating that
either an unknown error has occurred or that the export was cancelled by the
callee. An error message can also occur
if a dialogue box is open on excel when the export is launched.
When
the export is complete the report will display similar to what is seen below:

Note there is a
summary line across the top of screen showing the summary aging status, and then
beneath that are the detail transactions that make up the customer balance.
The process to
export to excel for invoice history is identical the above export for open
items. The only variance is that these
are all transactions that have been closed to the history file. As MC2 retains information for as far back in
history as what is stored in the source ERP, this export can contain several
years worth of data.
The columns on
the report are similar to Export to Excel à Open Invoice report, except that the date
paid replaces the expected receipt date, and days beyond terms is also
displayed.
The Clip It!
Feature has been added to most of the customizable screens in MC2 and can be
accessed by double clicking on the screen to activate the drop down menu and
then selecting the Clip It! option.
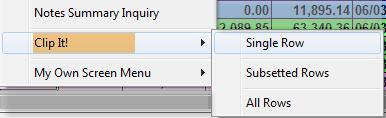
Clip it! will
copy a data selection in the exact format as it appears on the collector’s
screen into the PC clipboard so that it is ready to paste into an application
such as excel.
Depending on
which screen the Clip It feature has been launched from the user has the option
to clip a single row, subsetted rows or all rows:
Single Row This option will pull in the column headings and the
single line that was selected.
Subsetted Rows This option will pull in the column headings and all of
the data records that have been loaded on the collector’s screen. Please note this option does not pick up the
entire data set – only what has been loaded to the PC. When working with large amounts of data it
is necessary to scroll down the screen to load the data first prior to
selecting this option. Likewise, as MC2
loads in batch, the user may get a few extra lines below the line on which they
clicked.
All Rows Available
only on selected screens, this option will pull the column heading line and all
available data for the screen in which it was launched.
In each of the
customizable screens in MC2 you can highlight a cell, a row or all rows and
copy these into Excel.
To copy a
specific selection, simply click the row to copy or highlight the data
selection desired as shown below, then select “CTRL” + “C” to copy the data to
the clip board. Open excel and past the
data into the spreadsheet.
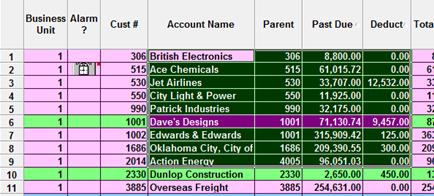
This is a great
way of transferring large portions of data into excel quickly. There are two things to note when using this
option:
·
When
highlighting as selection as shown here, any hidden columns on the user’s
screen will be picked up in the copy feature and will be pasted to excel.
·
Additionally
when highlighting a section as shown above, the column headers will not be
transferred to the spreadsheet.
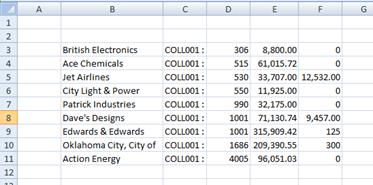
To copy all data
that has been loaded on the screen, similar to excel you can select the blank
cell between the rows and columns (see below) and then select “CTRL” + “C” to
copy the data to excel.
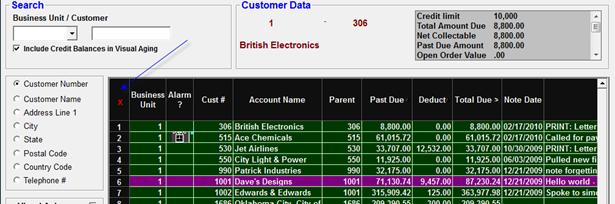
This option will
pull the column headers into the export, but will only go include the data as
far down as the user has scrolled.
Again, all hidden columns will display when the data is copied to excel.
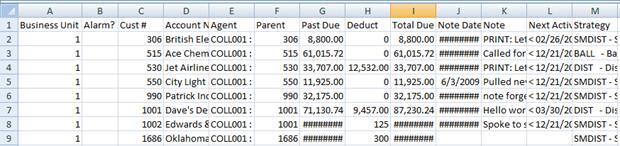
Note:
Once pasted into excel, the user will need to expand the column width of
the cells to view any items that are displayed a #####.
While it is
advisable to work activities on line, it is possible for a collector to export
their open activity reminders to a list.
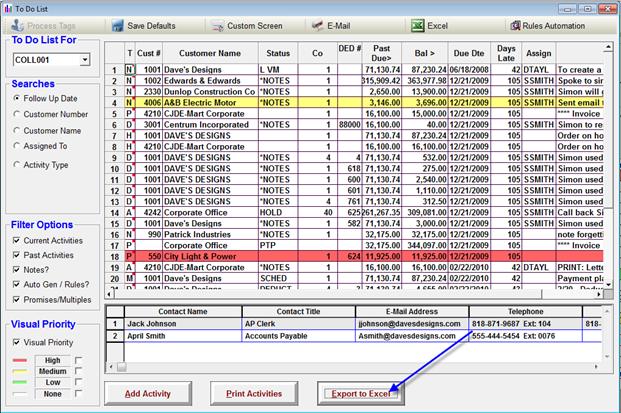
Simply click the
Export to Excel button at the bottom of the screen to get an activity report of
the data:
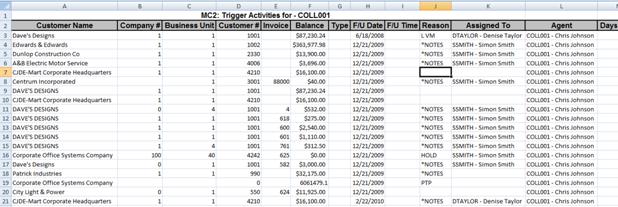
An export to
excel option has been added to both the Collection Notes and the
Deduction/Dispute notes. To use this
feature, simply click on the Export to Excel button on the bottom of the notes
screen.

The export to
excel will clearly display all notes by date, activity reason code, note and
who entered the transaction:
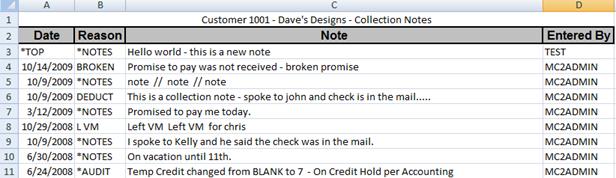
MC2’s letter engine is a database driven word processor. The letter engine can be used to create any
type of entity/customer letter or even reprint invoices. These letters can integrate customer and
invoice information from your accounting system into the body of a
document.
Creating letters is a two step process.
- The first
step is for a power user to create one or more master templates. These templates are generic letters
that contain placeholders for the entity/customer or invoice information
you wish to merge.
- There is
one reserved template called an invoice reprint. That is used specifically for creating
an invoice reprint document. Keep
in mind that this is not your systems invoice reprint but an MC2
document.
- When you
are in a specific entity/customer and select generate letter, you will be
presented with the master template list.
Selecting the merge option will generate the letter.
When MC2 creates a letter, it uses the User ID related data from
within MC2 Application Security to create the return information. MC2 assumes that the user who creates the
letter is the one who wishes to sign it.
Users can create an Agent Signature from within a letter template.
All of the template and document information is stored on the AS/400.
The letter engine
can be accessed by double clicking on any main management view and selecting
Action à Generate Letter, from the Browse menu
from any invoice detail screen, or at direct access to the templates by
selecting Maintenance à Documents and Faxesà Document Templates from any main management view.

This screen will appear anytime the Generate Letter option is taken
from the standard MC2 pop-up menu and displays the list of available Merge
Document Templates. It also provides the
entry point to create new templates, edit existing templates and delete
existing templates.
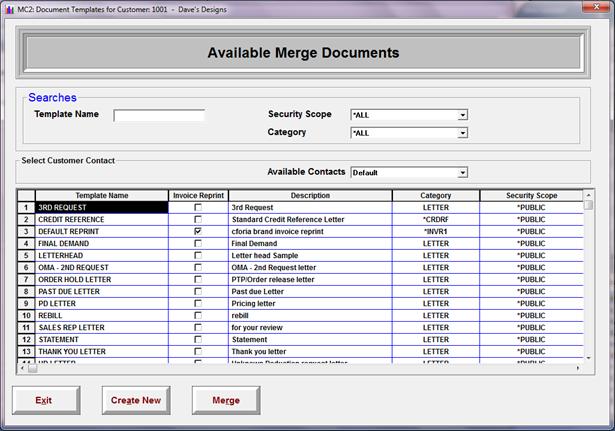
Searches
Use this area of
the screen to narrow the selection of merge documents which will appear in the
available merge document listing. If the
list of merge documents is extensive, this will allow the user to sub-select
which documents to work with.

Template Name
Enter the name of
the merge document template. The list
will be sorted so that the name
entered will
appear at the top of the list of available merge document templates.
Selecting from
the Security Scope combo box will narrow the criteria as well. Available options include: *All, *Public, or
*Private. By selecting one of the
security scope values, the list of available merge document templates will be
changed to show only those merge document templates that match the selected
security.
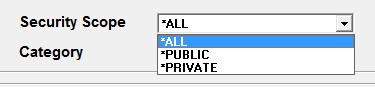
For example, if you
select *Public, then only merge document templates that have assigned security
values of *Public will be listed. All
merge document templates with assigned security values of *Private will be
excluded from the list.
Category
Selecting this
combo box narrows down the category of documents viewed in the list. The
options are defined in the Document Type Table.
The Document Type table code maintenance can be accessed by users with
administrative authority by selecting Maintenance àTable Codes àDocument Type from any management
view. Example document type codes may
be: LETTER, STMNT (Statements), INVRP (Invoice), CORR (Correspondence). By selecting one of the document categories,
the list of available merge document templates will be changed to display only
those merge document templates that match the selected category.
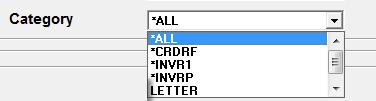
Select Customer Contact
This section of the Available
Merge Documents screen will only appear when the access path source was from an
object action menu/ generate letter where the object was a customer, entity or
headquarters. It is not available when
the access path source was from the Maintenance / Document Templates menu
selection.

The available contact will
default to the objects default contact name.
If you wish to override this name, you will select from the combo box
list as shown below:
This grid lists the available merge document template listings. It is sorted and sub-selected by the values
you entered in the search section as describe previously.
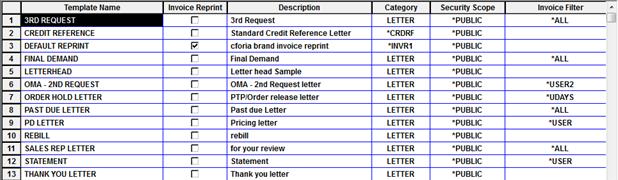
Template Name The merge document template ID.
Invoice Reprint If this box is checked, the output of the merged document
is a reprint of an invoice. This flag is
used by the system to determine which merge document template to use when a
user select the action to Reprint Invoice.
Description The description entered that describes the selected
merge document template.
Category The document type ID
assigned to the merge document template.
Security Scope The security scope assigned to the merge document
template. The possible options are
*Public and *Private.
Invoice Filter Identifies which filter has been
selected for the specific template.
By placing the
mouse cursor over the merge document template line and double clicking with the
mouse button you will display the Object Action Menu which will allow the user
to take action on a template.
Options available
are to Merge, Edit, Delete or Clone

Merge Selecting
the merge option from the Object Action Menu will merge the selected customer
data with the document template. The
Merged Document Screen will then display the information in a visual
format. You will then have the option of
sending or deleting the merged document.
Edit Selecting
the edit option from the Object Action Menu will open the template in edit mode
so that it may be modified.
Delete Selecting
the delete option from the Object Action Menu will delete the Merged Document
Template.
Note: You should always validate that a letter template
is not in use via the MC2 Rules Engine prior to deleting a letter
template. Failure to do so could result
in errors when attempting to run the linked rule.
Clone Selecting
the clone option from the Object Action Menu will create a duplicate of the merged
document template and open the Merged Document Editor. You can then edit and save as a different
template. This saves time when you have
similar document templates to create.
You can close the
Available Merge Document Screen by selecting the windows close button
( )
or by clicking on the MC2 icon in the upper right hand corner and selecting the
close option.
)
or by clicking on the MC2 icon in the upper right hand corner and selecting the
close option.
Additional navigation options are located at the bottom of the screen

Exit Select
the Exit button to close the Available Merge Document screen. This will return you to the access point that
you were at prior to selecting the Available Merge Document.
Create New Select
the “Create New” button when you desire to create a new merged document
template. You will launch the Merged
Document Editor.
Merge If
you accessed the Available Merge Documents screen from a customer list action
object menu, you will be able to select the Merge button to execute a data
merge with the merged document template.
You will launch the Merged Document Editor.
The Merged
Document Editor is a fully functioning editor with the ability to insert text,
tables, images and Merge Fields (Customer and User). Creating a document is as simple as typing
in the text that you want and using the Customer and User Merge Field drop
downs to insert place holders for values that MC2 will pull into the document
based on the customer from which the letter was merged. All of the popular formatting options such
as fonts, colors, bullets, styles, etc. are available.
To enter the MC2
Merged Document Editor select the Create New Option from the bottom of the
screen or double click on an existing letter template and select the Edit
Template option.
In this section,
the options available to the user when creating a new template will be
explained. This includes the formatting
option offered via the menu bars as well as the available merge fields at both
the user and customer levels.

File This option
provides the user the option to Save Template, Print Screen and Exit.
Saving the template will prompt the user to complete
the MC2: Save New Template screen which
will then save it to the list of Available Merge Documents.
Print Screen option will allow
the user to take a picture of the information displayed on their screen and
save that to a file or email that print screen if additional help is needed.
Selecting the exit option will
exit the template and return the user to the list of Available Merge Documents.
Edit This option
provides quick access to basic editing such as Cut, Copy, Paste and Select All
functions. Shortcut keys are listed next
to each option. In addition the Find and
Replace options can be activated from this
location.
Format Provides detailed
formatting for Font, Paragraphs, Style and Tab settings in the document.
Font options are similar to most word processors and
include options to change the font, size, attributes, color and text
backgrounds:

Paragraph
options allow the user to control the line spacing, alignment, indents
and distances for the document.
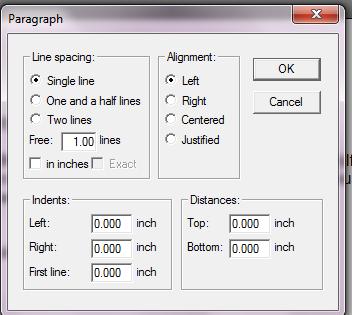
Syles option allow the user to select from a list of
styles that may have been saved. The
default style that MC2 will use is Normal.
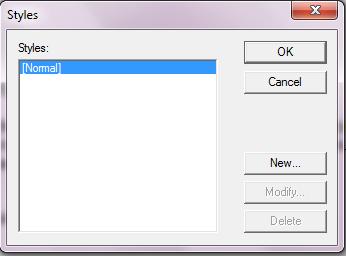
The tabs options allow the user to control the tab
positioning and alignment for the current document.
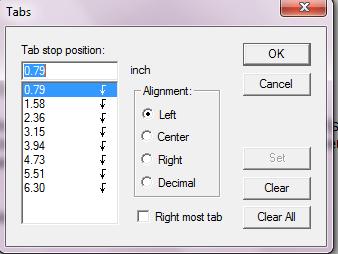
Insert The Insert option
from the menu bar has several key elements that are needed in the creation of
letters within MC2. From this option the
user can insert an image, the agent signature, a date marker or the standard
address block.
To insert graphics to a document
position the cursor to the desired location and select “Insert à Image” from the menu bar.
The system will prompt up an insert image window that
will prompt the user to navigate to where that image is stored.
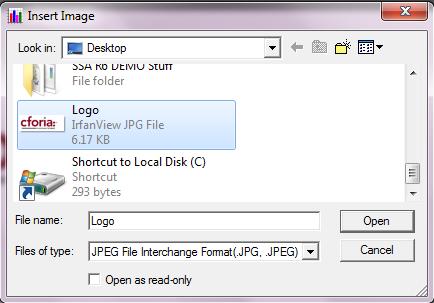
Select the image to be inserted and select the open
button and the image will be inserted to
the document:
Selecting Insert
à Agent Signature will insert an <Agent
Signature> marker to the document.
When a letter is merged, if the user has their signature set up in the
system, this marker will insert that signature.
Selecting Insert
à Date will insert a <Date
X> marker into the letter that will pull the current date into the letter
each time it is merged.
Note: The calendar date that is pulled into the
document is dependent on the date that is set on the users PC.
The date format used in the letter engine can be
selected and modified depending on the type of document and user
preference. When the Insert à Date option is selected
on a new template the user is prompted to select the format they desire from a
listing as shown below:
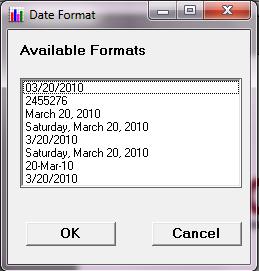
Insert à Address block has been added to this menu option as it is a
frequently used option. This option is
also available in the list of standard customer merge fields.
Table Similar to other word
processors, the MC2 Letter engine has fully functional table support. It is possible to insert, modify and store
tables in any document.
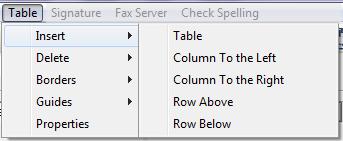
Signature Through this option the
user that is signed into MC2 can save and modify their Signature file.
Note: MC2 references signatures based upon which
user is logged into the system. To
create a signature for a specific User ID, you must be logged into MC2 as that
user when this option is selected.
Creating a Signature File is as simple as selecting Signature à Edit Signature from the letter engine menu bar.
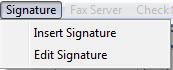
MC2 will display a blank Signature File screen. Complete the signature as it is should appear
whenever a letter is merged.
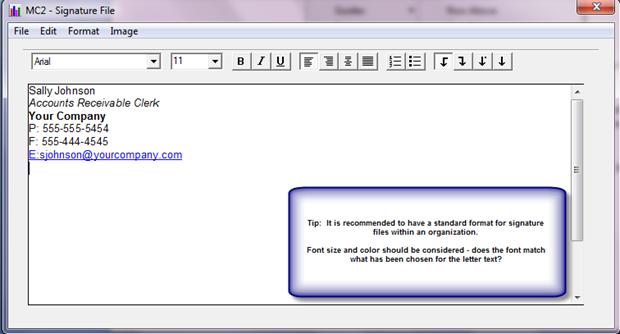
Once the signature has been entered, select File à Save to store the
signature file.
Selecting Signatureà Insert Signature is another way to insert the <Agent
Signature> marker into a letter.
Fax Server Opens the MC2: Fax Assistant
Status screen which is used only if you are faxing direct from your PC via a
fax server.
Check
Spelling Standard spell check
functionality is available for use on all documents.
Below
the primary menu bar, an output menu bar is provided. When the usre is in the edit template mode,
only the Save Template option will be active on this menu bar:

The
other output options (Fax, Email, Print, Save as Word document and Save as PDF
will become active for the user when a saved letter template is merged against
a specific account.
A
standard format editing menu bar is provided to assist the user with formatting
the letter text to match the business needs:

Standard font selection User can choose from a variety of
common font styles and sizes by selecting them from the drop down lists. For best results, highlight the text in the
letter body first, and choose the desired fonts attributes.
Text Formatting Selecting the  buttons will allow the user to add bold, italic or underlined text to their document.
Text Alignment Selecting the  options will allow the user to adjust the text
positionint: align left, align text
right, center or justify.
options will allow the user to adjust the text
positionint: align left, align text
right, center or justify.
Bullets
and Numbering Creates a bulleted
or numbered list.
Show or hide formatting Clicking on the  symbol will display the formatting present in
the document.
symbol will display the formatting present in
the document.
Styling Normal is
the default style that the MC2 word editor uses.
If you wish to
insert additional user information, MC2 provides a list for you. Select the area in the letter you wish to
insert the user information and then navigate to the user merge field
list. All of the user information is
taken from the User Information Panel in the application security header. If there is no information in that record,
then the user information will be blank.

A Customer Merge
Field is a field within the MC2 or accounting system database that you wish to
insert into your letter. To accomplish
this, click on the location within your document where you want the information
displayed. Then select the field from
the merge field list.
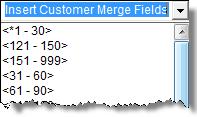
Once a merge
field has been added to a template and saved, each time you merge that letter
against a customer, the appropriate data will be pulled into the letter for
that specific customer.
Note: When inserting a single Merge Field on a line,
put a space after it before pressing the enter key. If you do not do that, MC2 will automatically
freeze the line and any editing to that line will delete the field.
The
list of available customer merge fields availbal in Release 6.0 has been
expanded significantly. The merge fields
are displayed alphabetically in the drop down selection list. Please find below a brief outline of the key
fields that are avaialble for selection.
Aging buckets Depending on the aging
buckets that are set up in the configuration master, the aging buckets will
appear as selection options. Due to the
alpha sort these may not appear sequentially the numerics will be listed at the
top of the list with Current and Future options listed farther down.
<Address> Address Line 1
from the customer master
<Address 2> Address Line 2 from
the customer master
<Address 3> Address Line 3 from
the customer master
<Address 4> Address
Line 4 from the customer master
<Address Block> A single click short cut
option for address formatting that will pull the standard merge fields for a
customer address into a letter block:
<Address>
<Address 2>
<Address 3>
<Address 4>
<City>, <State> <Postal Code>
<Business
Unit> Pulls the
Business unit associated at the customer level.
<City> City is
pulled from the customer master.
<Contact Name> Primary contact name is
merged from the MC2 contact records unless an alternate contact record was
selected prior to merging the document.
<Contact
Title> Contact
title from the primary contact record designated in MC2.
<Country> The country code that is associated on
the customer master record (when present).
<Credit
Limit> The
existing credit limit for the customer at time of letter merge.
<Current> Current aging
bucket value.
<Customer
Name> Customer
(account) name as listed on customer master record.
<Customer
Number> Customer (account)
number as listed on customer master record.
<Date First Sale> Date of first sale. (Depending on implementation and ERP this may
be date of first invoice in system.)
<Date Last
Sale> Date of last
transaction.
<DBT 365> MC2 DBT calculation for the last year
based on the most recent ADP run.
<DBT 90> MC2 DBT calculation for the last 90
days based on the most recent ADP run.
<Email> Customer email address as listed
on the primary contact record in MC2.
<Extension> Customer’s telephone extension as listed
on the primary contact record in MC2.
<Fax> Customer’s fax number as listed
on the primary contact record in MC2.
<Future
Due> Future
Due aging bucket value.
<Highest Credit> Highest Credit (AR plus
open orders) value.
NOTE: The standard value that is populated in this
field will be the Highest Credit since the time that MC2 was implemented. For true historical information of highest
credit ever extended to the customer it may be necessary to look back to source
ERP.
<Net Collectables> The total of the clean
receivables balance. The net collectables total includes all
transactions with a blank invoice type (INVTYP), plus any items that are coded
with a collectable invoice deduction type.
<Over
*X- XX - Accum> Accumulator
aging buckets are available for the letter merge. Depending on
the aging buckets that are set up in the configuration master, the
accumulator buckets will appear as
selection options. Due to the alpha sort
these may not appear sequentially.
Reminder: Each accumulator bucket is
the amount due for that period (days late) plus all of the other later
buckets. For example, “Accumulator Bucket 3” represents the amount due
for the 3rd aging bucket plus all older aging buckets. If the 3rd aging bucket in the
configuration master is equal to “61-90 Days past due”, then <Over 61-90
Accum> represents all balances 61 days past due and older.
<Postal
Code> Zip code
associated on the customer master record.
<Salutation> Pulls the salutation that is present on
the MC2 customer contact record (when present).
<State> State that
is associated on the customer master record.
<Telephone> Customer’s telephone number as listed on
the primary contact record in MC2.
<Terms> Customer terms
from the customer master record.
<Total Amount Due> Total amount that is due from the
customer including both clean and dirty receivables.
<Total Credits> Depending on ERP and/or
implementation, this can be the sum total of all transactions with a remaining
credit balance or a specific credit transaction type code in source ERP.
<Total Deductions> Sum total of all transactions
that are coded with a deduction type (INVTYP) code.
<Total Disputes> Sum total of all
transactions that are coded with a dispute (INVRSN) reason code.
<Total Open> The total A/R due
(clean) plus any open orders on the account.
<Total Past Due> Total
past due amount for clean receivables.
<Unapplied Cash> Availability is limited by
ERP for this marker. The sum total of
the unapplied cash within this customer.
For available ERP’s this is determined by transaction type (i.e. RU
transactions)
In addition to
the user and customer merge fields that have been described above, some special
letter markers have been created in MC2 to provide the user with very detailed
transactional level data.
Note:
When you are saving a template with one of the invoice or deduction
letter markers from this list below, the user will be prompted to select
additional parameters relating to what aging should be merged or which types of
deductions they are interested in displaying when the letter is merged.

It is important
to note that the invoice reprint marker that is available in MC2 is a standard
reproduction format, and will not mirror the existing invoice format that is
available in the source ERP. This is a
standard marker used across all ERP’s and implementations. This standard invoice reprint format provides
quick access to the detail lines that were invoiced to a customer and can often
be used to satisfy customer requests.
It is recommended
to have one invoice reprint template available as a default, as it will be
readily available to the user when working at an invoice detail level in MC2
from any of the pop-up menus.

To create an
Invoice Reprint document template simply open a New Template and select the
“Add Invoice Reprint” letter marker as shown:
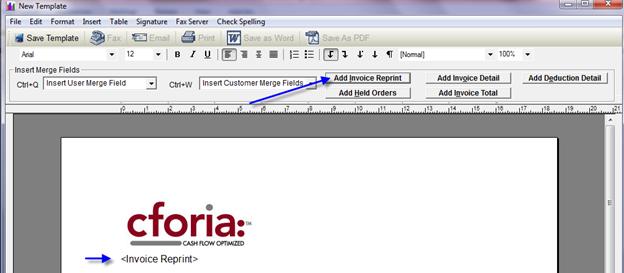
Select the Save
Template option from the top of the screen and complete the Template Attributes
screen as shown below. Be sure to select
either the *INVRP (or *INVR1) options as the type, as these will flag the
system that this is an invoice reprint documents
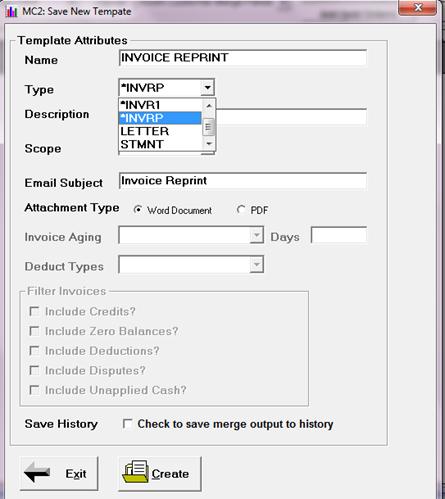
The invoice
reprint will now appear in the list of available merge documents:

From any customer
or invoice in MC2 it is now possible to select the Invoice Reprint option and
merge this document as shown below:
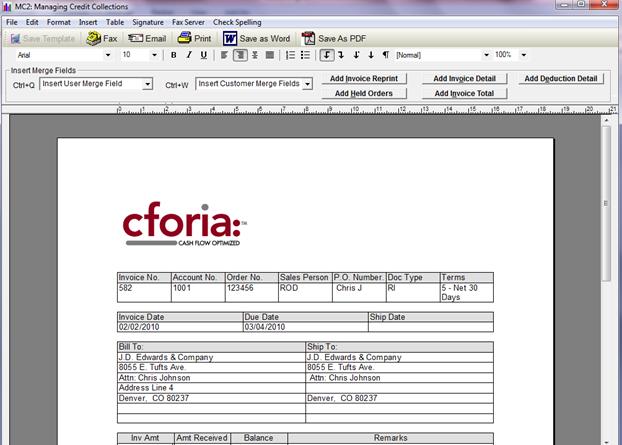
If you want to
have your letter list out certain invoices, then you can insert the special
merge field called invoice detail in your letter. To insert the invoice detail merge field,
select where in the letter you wish to display the list. Then select the  icon from the toolbar.
Note:
it is not necessary to add spaces above and below the Invoice Detail
marker, as the system will automatically do that for you.
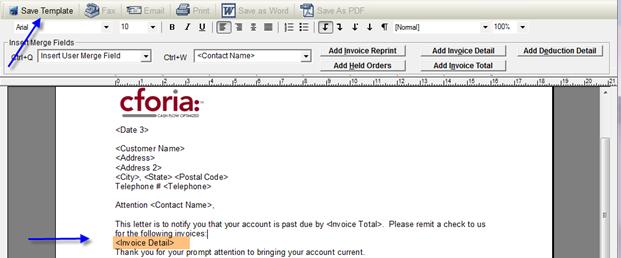
When saving any
template which uses the Invoice Detail Marker the user will be prompted to
specify what invoices that should be included.
This will require an invoice aging to be selected, and offers the user
additional filter options.
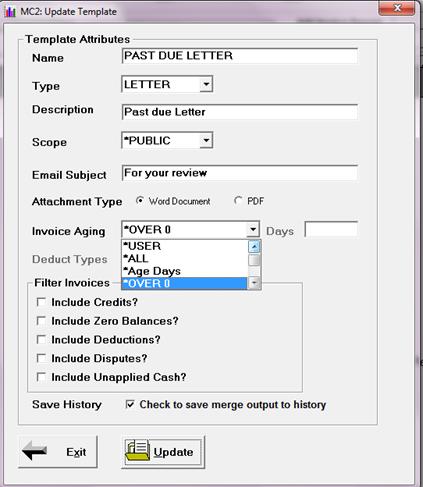
Selecting an
Invoice Aging option is a requirement when the invoice detail marker has been
selected. The available options that the
user has includes the following:
*USER This
option when selected will prompt the user with a selection list of all valid
transactions and will allow them to select or deselect transactions to be
included on the letter.
*ALL This
option will include all valid transactions across all aging buckets.
* Age Days This
option will include all valid transactions older than the specified age days
beyond terms. When this option is
selected, the user will need to complete a second field that asks for the days
beyond terms that should be used.

*OVER X Depending
on the configuration master set up for the aging buckets in MC2, available
options will display for Accumulated Aging.
Accumulated aging buckets are valid transactions from the selected aging
bucket and older. This will include
*OVER 0 and then each available aging bucket.
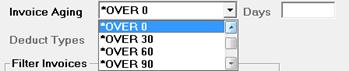
Aging Buckets Depending on the configuration master set up
for the aging buckets in MC2, available options will display individual aging
buckets. When these are selected only
the valid transactions for that aging bucket will be included.
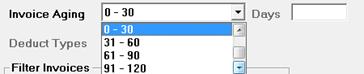
The filter
options selection becomes available any time that an invoice detail marker is
selected on letter template. The default
setting is unchecked on all filter options, and it is not a requirement to
select one or more options. However,
depending on what transactions are desired on the letter the user should always
review and update the filters when saving or modifying a letter template to
ensure the correct criteria has been established.
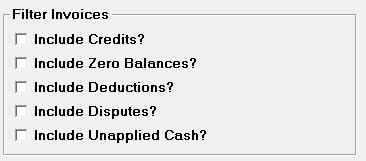
The filters are fairly
self explanatory. Checking a box next to
one of the options will make the related transactions valid for that
letter. To create a statement of account
with all transactions whose balance is not equal to zero the filter set up
would look similar to this:
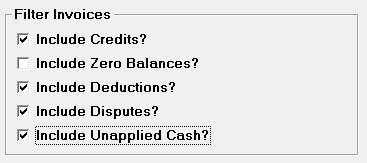
Once the template
has been saved, it is ready to be merged against any account.
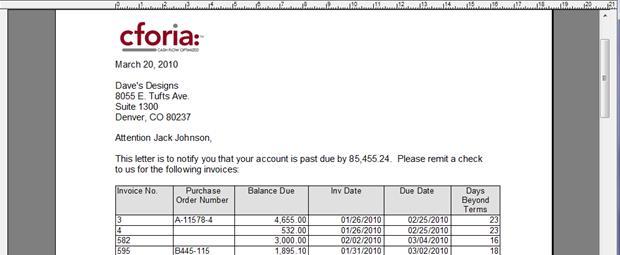
The columns that
appear in the standard invoice detail marker include: Invoice Number, Purchase Order Number,
Balance Due, Invoice Date, Due Date and Days Beyond Terms.
The “Add Invoice
Total” letter marker has been added in Release 6.0 for use in conjunction with
the Invoice Detail marker.

This marker
generates a merge field that will always match the total balance of the
invoices that are listed in the invoice detail marker. This is especially useful when a *USER or
*Age Days aging has been selected.
When working with
deduction transactions, the relevant information that needs to be communicated
to a customer or internal stakeholder differs slightly from a regular invoice
transaction. For this reason, a
specialized detail marker has been created.
To insert the deduction detail merge field, select where in the letter
you wish to display the list. Then
select the  icon from the toolbar.
Note:
it is not necessary to add spaces above and below the Invoice Detail
marker, as the system will automatically do that for you.

When you save the
template the user will be prompted to complete both the invoice aging and
filter options as described above. In
addition, the user will be required to select which Deduction Types should be
merged on the letter.
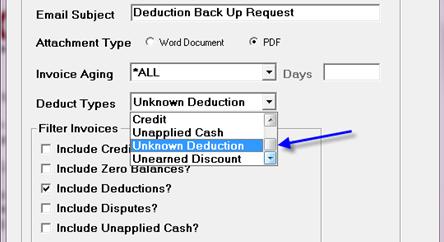
The drop down
menu next to the Deduct Types is a required field when the deduction detail
marker is selected. The options that are
available to the user will be contingent upon what deduction types have been
set up in the table code maintenance.
MC2 will automatically fill the drop down combo box in the letter engine
with all available options.
The user can
select a specific deduction type, all deduction types, or *USER to be prompted
which type to select each time the letter is merged.
Once the invoice
aging, deduction type and filters have been selected and the template saved, it
is ready to be merged against any customer account.
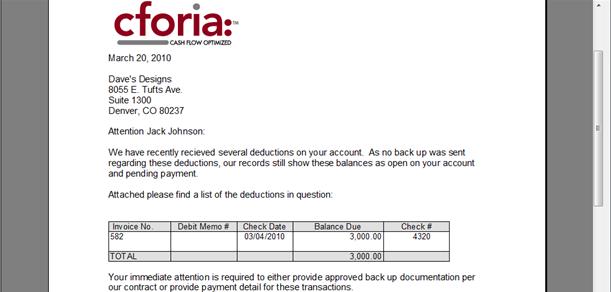
A special detail merge marker has been created
to identify all transactions which have been placed on credit hold in the
accounting system. This marker used in
conjunction with key merge fields and the invoice detail marker can be used to
communicate payment trends and requirements to a customer in a single document.
To insert the
Held Orders detail marker, select where in the letter you wish to display the
list. Then select the  icon from the toolbar.
Note:
it is not necessary to add spaces above and below the Held Orders
marker, as the system will automatically do that for you.
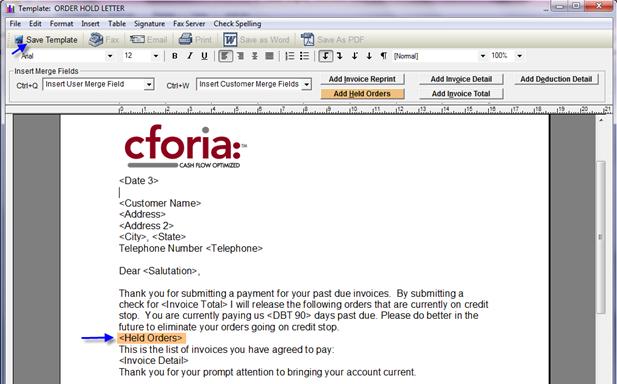
There are no
additional required filters when simply using the Held Orders marker; however
the user will be prompted for an aging marker and filter criteria if the
Invoice Detail marker is also used on the same letter.
Once saved, the
template is ready to be merged against any open customer account.
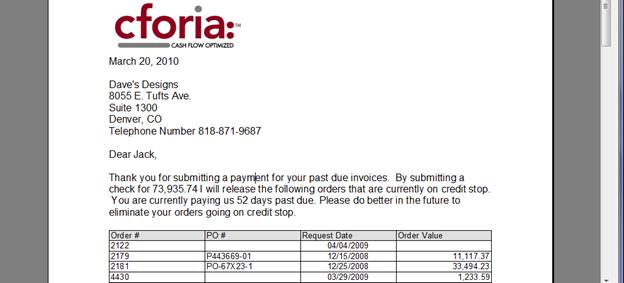
To create a new
letter template, simply select the Create New button from the bottom of the
Available Merge Documents screen.
This will open a
blank template in the Merged Document editor for the user to complete.
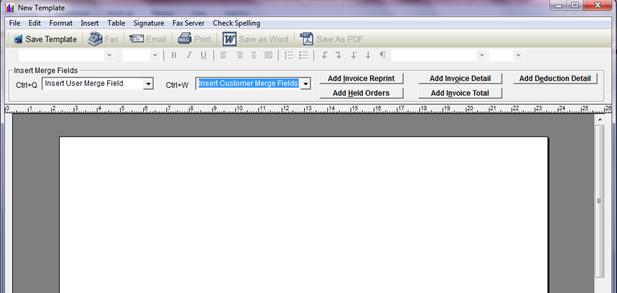
Once the form is
open simply type the text into the screen as if it were a standard word
document. At each point that a merge
field or marker is needed simply select them from the appropriate drop down
list or icon.
Tip:
If you have an existing word document that you wish to copy into the MC2
Merge Document Editor that works great.
If you clear the formats in word prior to copying into MC2, this will
work much smoother as all hidden formatting will be removed.
To save either
select the save template button on the tool bar or select File à Save from the menu bar.
The system will
prompt the user to complete the Template Attributes form:
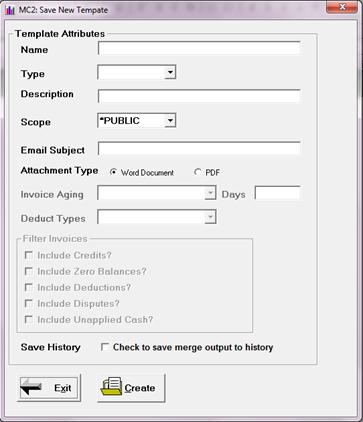
Name Name to be associated
with the created template.
Type: Assign
the document type to your template. It
is used for categorizing and sorting your templates.
Description: Type in the description of the
template.
Scope: Is
this a public or private template.
Private templates are available for the creators User ID only.
Email Subject: If a document created from this merge template is to be
e-mailed, the data entered here will be the default subject line on the email.
Note: Leaving a subject line blank can flag your
email as spam. A generic subject line is
recommended.
Attachment Type: When you e-mail a document created from this template, select
the default format of the attachment.
This can be either a word or PDF document. Keep in mind that .PDF documents cannot be
altered.
Invoice Aging: Invoice aging option that will be used if an invoice or
deduction marker has been selected in the body of the letter. (See the “Invoice Aging Options” section
above for additional details.)
Deduct Types: Deduction types to be incorporated when the Deduction
Detail marker is selected.
Save History: When this radio dial is selected on a template when it
is saved, any time the letter template is merged and sent to an output device,
the document will be stored to document history and can be viewed at a later
date by double clicking an account and selecting View à Document History.

To edit an
existing document template, simply double click on the desired template from
the Available Merge Document listing and select Edit from the drop down
menu.
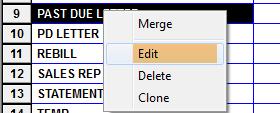
This will open up
the letter template in the edit mode and allow the user to make any necessary
changes.

When all changes
have been made select the Save Template option to save changes and update the
template attributes screen as needed.
Merging letter
templates can be done from almost any screen In MC2! From any of the main management views, simply
click on the account in which the letter needs to be merged and select Actionà Generate Letter to access the list of available merge documents.

Alternately from
any of the detail transaction screens the letter engine can be accessed from
the browse menus available in MC2.
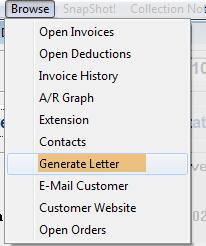
From the
Available Merge Documents list, simply double click on the desired template and
select merge from the object action menu.
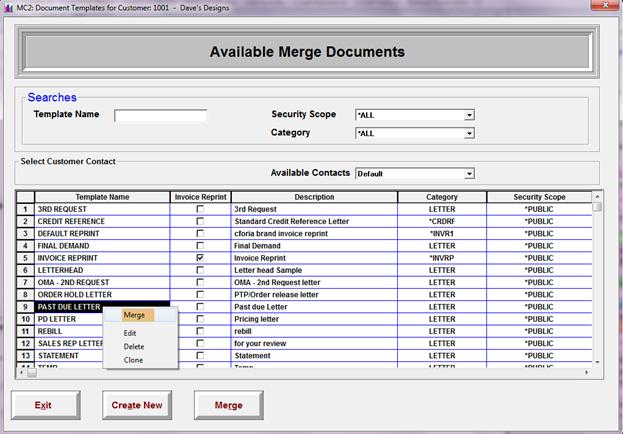
This will merge
the document for the customer that the letter was launched from. All of the merge fields that were added in
the original document template will automatically update for the customer this
was launched from.
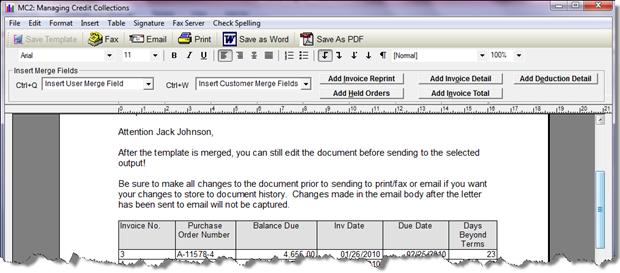
After all changes
have been made to the document, the user can then send the letter to the
selected output from either selecting the option from the menu bar or from the
Fileà Sent To output options from the main
letter engine menu bar.

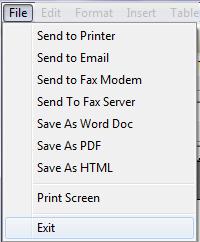
Send to Printer: Sends output to your local
printer
Send to E-mail: Sends the letter via e-mail through your
companies e-mail server.
Send to Fax Modem: This option is used if when faxing directly through
the fax modem on your PC. See the faxing
considerations section at the beginning of this manual.
Send to Fax Server: This option will send the fax through your local fax
or system fax depending on system tailoring.
See the faxing considerations section at the beginning of this manual.
Save as Word Doc: This option will prompt you where you wish to save
the word document.
Save as PDF: This option will prompt you where you
wish to save the .PDF document.
Save as HTML This option will prompt you where you wish
to save the .HTML document
To view documents
that have been stored to document history, simply double click on a customer
from any main management view in MC2 and select Viewà Document History.
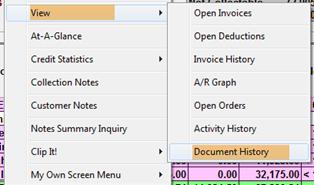
This will display
all of the documents sent to that customer which were marked in the template
set up to Save to Document History.
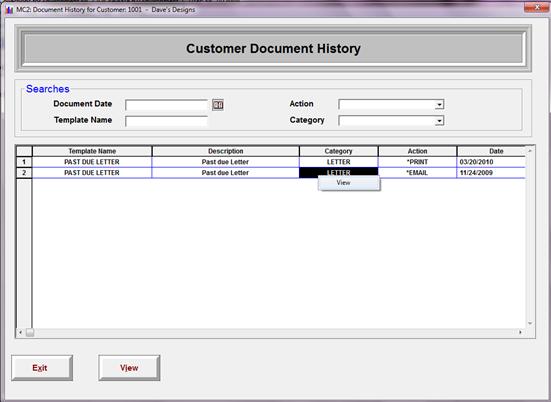
Note:
If you are planning to store documents to Document History, each user
should have the second tab of their user ID’s updated to keep the appropriate
history records. This can be done by the
MC2 Admin.
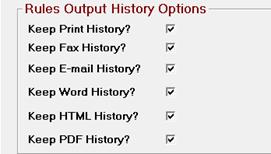
From the document
history screen click on the document and select View. This will open up a copy of the exact letter
that was merged and sent to an output selection. From the action bar at the top of the screen
it is possible to reprint or resend the letter as needed.

Which documents
are stored in document history is an individual business decision. The key is the correct template set up for
the individual organization. It is
possible to set items such as invoice reprints and statement copies to not
store to history, while marking critical items like Final Demand letters as
ones that will always store to history.
The MC2 letter
engine can be effectively used for both internal and external
communication. Attached are some examples
of commonly used letters generated via the MC2 Letter Engine:
Agency Placement Letter Used as a summary of open
items on account at time of placement with 3rd party collections.
Change of Lockbox Notification Used as a notification tool when changing
or updating lockbox information for a customer or division
Credit Reference Letter Used to respond to credit
reference requests for existing customers.
Can be tailored to include the data that you are willing to
provide: i.e.) credit limit, DBT, First
Sale, Last Sale, etc.
Deduction Back Up Request Used to target UD transactions in
which customer have not provided sufficient back up support.
Deduction Denial Letter Notification to the
customer that a deduction has been denied and requires repayment.
Demand Letter Used for Final Demand
notification to an account.
Dunning Letters Can be series of escalation
involving several letters: 1st Request, 2nd Request, 3rd
Request, etc.
Depending on ERP and implementation, these can be tailored to include or
exclude the following:
o Deductions
o Disputes,
o Credits
o Unapplied Cash
Depending on aging configuration in your implementation these can also
be tailored to include aging at accumulated levels:
o All transactions
o Over 0 Days
o Over 30 Days
o Over “X “Days (user defined)
o *USER (Allows collectors to pick and
choose transactions)
Internal Forms Can pull customer open
balances/deductions into internal forms for routing approvals.
o Ex – Could pull all rebate deductions onto
one letter and forward to internal contact for questions regarding those
transactions.
o Print and attach to supporting
documentation where approvals are required.
Notice of Credit Approval/Change Notification to customer of change in
credit status with your organization.
This could also be used to notify account of a change in payment terms.
Order Hold Letter Notification of orders that are on
hold pending receipt of payment or promise to pay for open transactions.
Payment Plan Communication Shell letter that can be used for
payment arrangements. Still requires
user to drop details into this manually, but standardizes this communication
and eliminates need to key much of the data manually
Pricing Letter (Or other Ded. type) Request for information regarding pricing
(or other deduction) issues on an account.
Can be used with MC2 Deduction Detail marker which allows all
transactions coded to that type to be easily merged in the letter engine.
Proactive Collection Letter Used to target large dollar
invoices prior to due date. Thank
customer for their recent business, reinforce terms and let them know who to
contact if there were any questions regarding their shipments.
Rebill Notification Notification to a customer or internal
contact of items that are being rebilled to that account due to denial of
deduction/claim etc.
Receipt of Payment Used to generate a receipt of payment
letter to a customer. (Note if used for credit card charge
accounts do not enter the full credit card information on this form letter.)
Request for Contact Info Send to customers
requesting updated contact information
Sale Rep Notification Used to notify sales
of current status of a past due customer balance.
Statement of Account (Standard) Statement of open items - generally
includes all items clean and dirty that are open on the account.
Statement of Account (*USER) Statement of open items - allows
collectors to pick and choose what transactions to include or exclude on the
letter.
Thank You Letter Used to thank customer for a recent
order and request feedback
Welcome Letter Used to welcome new customers. This can be tailored to provide items such as
the following:
o Remit to information
o Deduction/claim policies
o Collector contact information
o Terms information
The rules engine
is designed to automate collection activities.
The output of the engine will be either activities or customer
correspondence via email, fax, or printing of documentation. The rules engine merges activities and
document templates with collection rules to automate customer interactions and
minimize the manual customer touches collectors have to make.
The advanced
Rules Engine provided in MC2 6.0 provides feature functionality that was not
available in prior versions of the MC2 application. Even if you have been using Rules in the
prior versions of MC2 you will need to read through the documentation of the
new features in order to gain the full benefits of these enhancements.
Often the hardest
part of setting up a rule is simply getting started. With the many of the complex business models
our clients have, we realize that it is highly unlikely that one rule that will
resolve all the open receivable issues for your organization. To that end, we have made the MC2 Rules engine
very flexible in nature so that you are able to target a rule to address a
specific need within your organization.
Remember, it is easy (and recommended) to start with one or two key rules, and
expand or edit these as your collection staff becomes familiar with the
process. It is also a great idea to
start a list of rules that you may be interested in creating for your
organization.
In order to make
the rules set up process flow smoothly it is strongly recommended that that you
consider some of the following questions prior to starting the set up
process.
- Is this a onetime event, or a rule
that you will run on a periodic basis?
- Example: Lock Box change notice vs.
Statement of Account
- What are the target customers that
you are trying to target with the rule?
- Are these customers currently
grouped together in your data base by any of the following methods?
- Collector Agent
- Credit/Deduct Analyst
- Strategy Code
- Credit Risk
- Consolidation Code
- If the customers are not currently
identified in one of the logical groupings above, what other method are
you using to identify these accounts?
- Is this a standard grouping of your
customers that would benefit you to define further via a table code in
MC2?
- Are you looking to target specific
line item transactions (invoice or deduction) or are you interested in
targeting an aging bucket or total balance for a customer or entity?
- What is the root cause issue that the
rule is targeted to address?
- Example: At a deduction level - pricing issues,
sales tax, PO issues
- Example: At an invoice level – skipped invoice
issues
- Example: At a customer level – Over 60 day
dunning letters for high $
- If you are planning to have a letter
as the rules output (or suggested output for the Rules Automation) has
this letter already been created?
- If not, you will want to create this
letter via the MC2 Letter Engine.
With the
implementation of the new 6.0 Rules engine, the general concepts remains the
same, however the set up and workflow will changes slightly.
The following is
a suggested workflow to guide you through the new features:
1) Set up any letters that will be used for
rules output.
2) Create Rule (Activity) Templates
3) Set Up the Rules Group in the Rules Group
Management Console
4) Attach/Create the Sub Rules
5) Run the rule
6) Either post the rule or leave the rule in
pending status so that is available to the collectors to work through the Rules
Automation workflow.
For the purpose
of this document we will assume that the desired letter output has been created,
and start with the creation of the Activity Template.
The Rules
Template Activity is what MC2 uses to link a specific output (letter or
reminder) to a rule that the collection manager has created. The Rules Template Activities can be
accessed from any of the main MC2 management tool bars under the “Rules”
heading.
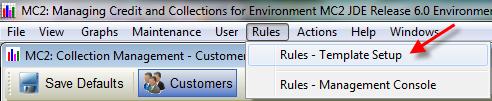
NOTE:
In order to access the Rules-Template Setup or the Rules Management
Console the user profile must have the “Processes Rules?” radio box checked. If these options are grayed out when
attempting to work with rules it will be necessary to contact the MC2
Administrator for access rights.
When the Add
Template button is selected, the Rules Template Activity Maintenance screen
opens and is ready for the user to fill in based on the desired output for a
specific rule. Each field is described
in the section following, and should be completed based on the desired rules
output.
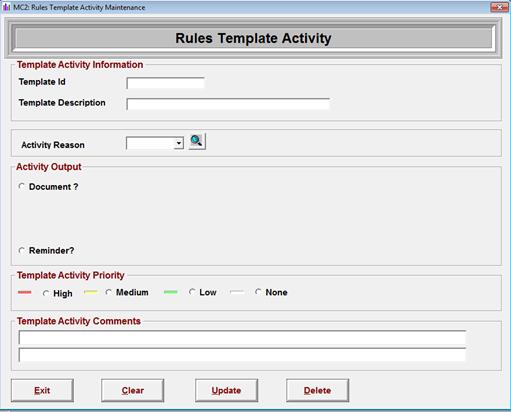
Template
Activity Information
Template ID 10 digit short identification for the
rules output. Note that once created the
template ID cannot be changed. It is
advisable to use a naming convention that is easily identifiable.
Template Descriptions 40
digit long description that describes the selected activity rule template. This description can be updated and edited
after template creation
Activity Reason The activity reason code is used to define the
type of activity associated with the rule.
These Activity and Notes reason codes can be maintained by those that have
table code access in their security are created in the Table Maintenance under
the category of Reason Codes, and are user definable.
The REASON table codes can be accessed by selecting the menu
path: Maintenance à Table Codes à Reason Codes à Table Code Detail.
Alternatively, the Reason Code can be looked up by selecting the
magnifying glass. To create a new
activity reason code, select the  button at the bottom of the pop up window.
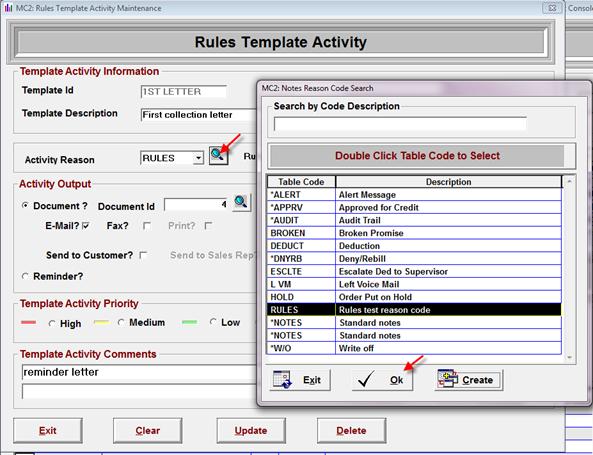
Activity Output
The Activity Output section of the Rules Template
Activity Maintenance screen allows a
user to define the type of output that
will result from the rule – either a document or a
reminder.
One or the other must be selected for each template. Depending on which
selection is made, the user will have
different prompts available to them.
Document Output Defining an activity outcome as a document
is done by selecting
the “Document?” radio button.
When a rule is linked to template in which a document output has been
selected, a letter will be generated if the rule is posted, or suggested if a
rule is left in pending status and worked by the collectors through the Rules
Automation screens.
Once this option
is selected the user is prompted to fill in additional information:
Document ID This is where the template is linked to a specific
letters that has been created using the MC2 letter engine. These documents can be invoice reprints,
statements or dunning letters and are available for selection by pressing the
magnifying glass next to the Document ID.
Once the letter is selected, MC2 will populate the document ID number in
this field.
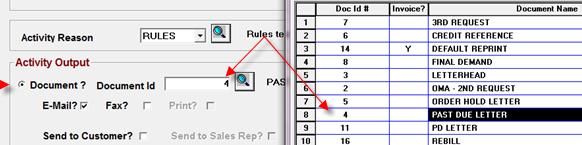
Delivery Method
is the next item that must be completed when a document output has been
selected. This is identified first by
selecting either the “E-mail?”, “Fax?”, or “Print?” radio boxes.

When used in conjunction with the “Send to Customer?” radio boxes:
·
Selecting
E-mail to define the rule will send an email to the primary contact email
address.
·
Select
Fax to define the rule will send a fax to the primary contact fax number.
·
Select
Print to define the rule output will be sent to the default printer that is
specified on the E-Mail/Fax Server tab of the configuration master.

NOTE: If
either E-mail or Fax have been selected, it is necessary to for the primary
contacts to be entered into MC2 with the appropriate fields updated. (Contacts
on an account can be validated by selecting “Maintenance à
Customer Contacts” from any MC2 drop down menu or by selecting “Contacts” from
the browse button in Snap Shot or At-A- Glance.) If
a rule is created and set to automatically email or fax a customer and no email
address and/or fax number information is set up for a specific account, the
activity will error for that customer.
Selecting the “Send to Sales Rep” radio box has been
added as a placeholder, but is not yet active.
In Future versions, this feature will allow an email copy to be sent to
the associated Sales Representative when generating a letter via the rules
engine.
Reminder Output – If the desired output of the rule is to create an activity
reminder for the collector that is not document related, select the “Reminder?”
radio box. The system will then prompt
for the optional selection of the number of days from the date the rule is ran
that the reminder will be dated.
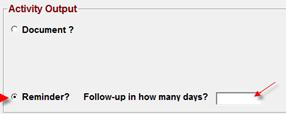
Priority - For
reminder activity output, this will allow the collector to work with the
activities in priority order. (Colors for the Activity priorities are
controlled via the More Preferences tab in the configuration master.)
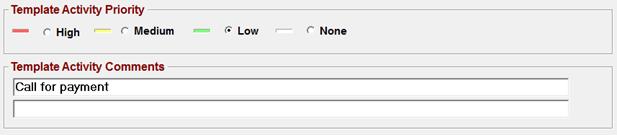
NOTE: If too many reminder activities are set with
the same priorities, it will nullify the benefits of assigning priorities. As a general rule, activities are set with
the standard priority, and only exceptions are marked with a higher priority. For example if 9 out of 10 activities are
flagged as a “High” priority, the result would be that the majority of accounts
would have “High” priority colors assigned.
In effect, this would change the meaning of a “High” priority to a
standard priority making it difficult to quickly identify the most important
actions and prioritize workload.
Template Activity Comments The
Template Activity Comments section is used to describe the purpose of the
template. The input is only displayed
for users looking up the template and displaying the templates on the Activity
Template Rules screen. The comment is
not displayed in the rules output.
Once the template
has been completed, select the UPDATE button at the bottom of the screen to
accept it into the system.
The Template ID
now appears on the Activity Template Rules screens, and is available to be
attached to new or existing rule.
NOTE: A new column has been added to quickly
identify whether the template output is a document or a reminder:
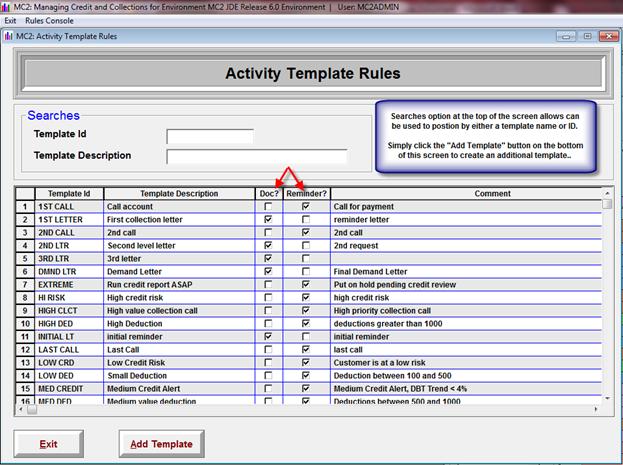
Once the Activity
Template is complete, we are ready to set up the Rules Group in the Rules Group
Management Console.
The Rules Group –
Management Console is used to create, maintain and manage the collection rules
in MC2. This screen can be accessed from
the menu bar on any of the Main Management screens in MC2. Simply select “Rules” à “Rules Management Console” as shown below:
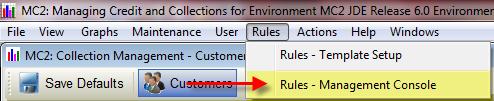
This screen
operates as missing control for all rules related actions within MC2. From this screen the user is able to initiate
any of the following actions:
·
Add a
new Rules Group
·
Activate
or Deactivate a Rules group
·
Maintain
or update an existing rules group
·
Manage
the Sub Rules associated with a specific rule
·
Run a
rules group
·
Launch
the Review Rules Group
The Rules Group –
Management Console is made up of 3 main parts, the Search section, the Filter
section and the List section
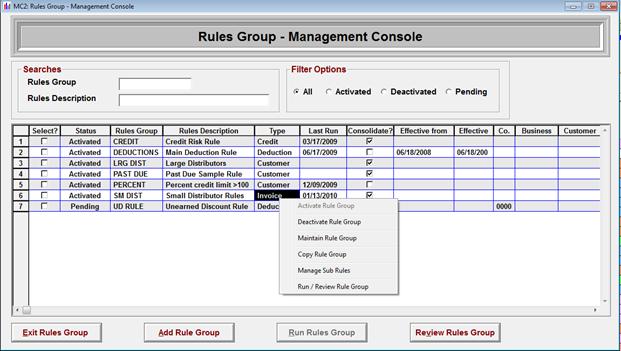
The Search and
Filter sections are designed to refine the List of rules displayed in the
listing section. When there are multiple
rules set up in the system, using the Search and Filter sections on this screen
assist with narrowing down the selected views and aid in navigation.
Searches
Use the
“Searches” section of the “Rules Group – Management Console” to quickly
navigate to the desired rules group.
Enter the first few characters of the Rules ID or the Rules Description
and the matching rule will be displayed in the list.
Rules ID
The Rules ID is
the short description of the Collection Rule.
It can be up to 10 characters in length.
Rules
Description
The Rules
Description is the long description of the Collection Rule. The description can be up to 40 characters in
length.
Filter Options
Use the filter
section of the screen to change the list of rules displayed within the list
section of the Rules Group – Management Console. The filter works on the status field of the
collection rules records. The possible
statuses are: “All”, “Activated”,
“Deactivated” and “Pending”.
All
Selecting “All”
will display all collection rules regardless of status. All collection rules
statuses will be displayed.
Activated
Selecting
“Activated” will display only collection rules that have the status of
activated. A rule is activated by
approving a “Pending” rule in the Rules Group – Maintenance Screen. All rules must be activated in order to be
run.
Deactivated
Selecting
“Deactivated” will display only collection rules that have the status of
deactivated. A rule is deactivated by
selecting “Deactivate Rules Group” from the object action menu of the Rules
Group – Management Console screen.
Pending
Selecting
“Pending” will display only collection rules that have the status of
pending. A rule is pending following the
creation of the rule, but prior to the rule being approved in the Collection
Rule – Management Console screen.
Listing of Collection Rules
The main body of
the Rules Group – Management Console contains the listing of all rules groups
that have been created. The data
displayed in the listing of collection rules is designed to provide the user
maximum information about the rules that have been created. A quick review of the key data columns
provided below:
Select? The
selection box can be used to check one or more rules that the user wishes to
run. When the selection box has been
activated, the “Run Rules Group” option at the bottom of the screen becomes
activated. When no rules groups are
selected, this option will be grayed out and not available for selection.
Status Indicates whether the
rule is active or has been deactivated
Rules Group 10 digit short description identifier for the rule.
Rules Description 40 digit long description that describes the rule in more
detail.
Type Specifies
whether the rule will be created at the Entity, Customer, Invoice or Deduction
level.
Last Run Date that the rules group
was last run.
Consolidate? If the “Consolidate?” check box is marked, it means
that the rule will read through the lines returned by the Sub Rules and only
display the most severe in the rules output.
In essence, this feature allows for a single activity output per
customer per rule.
Effective From When populated this field indicates the first date that
the rules group was effective from.*
Effective To When populated this field indicates the last date
that the rules group will be effective.*
*Note: If the effective dates are left blank, the
rules group is one that will always be available for use.
Double clicking
on a rules group from the listing of Collection Rules will provide an object
action pop-up menu which will prompt the user for options available for that
rules group.
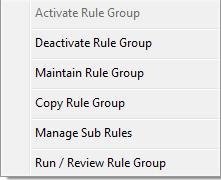
Activate/Deactivate
Rule Group
If the user
clicks on an active rule, the first option they are provided is the ability to
deactivate that rules group.
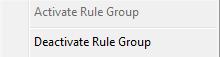
Deactivating a
rules group will retain the rule in the system, but make in ineligible to run
at this time. The Status of the rule
will display as Deactivated as shown below:

Select the
“Activate Rule” option from the Object Action Menu to reactivate rules that
have a status of “Deactivated”. This
will allow the rule to be executed.
Note:
The system will notify that the rules group has been reactivated by
displaying the rules group in green until the user exits the management
console.

Maintain Rule
Group
Select the
“Maintain Rule Group” option to maintain (review, edit or update) an existing
rules group that has already been created.
Selecting this option will open the Rules Group Maintenance screen.
Copy Rule
Group
Select the “Copy
Rule Group” option to launch the Rules Group Maintenance screen and copy all
data from the selected rule to the new rule with the exception of the Rule ID
and Rule Description. This option is an
effective function that allows the quick creation of similar rules.
Manage Sub
Rules
Selecting the
“Manage Sub Rules” option will open the Rules Sub Group Management console
where the user can review, edit or add to existing sub rules that are attached
to the rules group.
Run/Review
Rules Group
Select the “Run/Review
Rules Group” option to launch the Rules Engine and execute the selected rule.
To create a new
rules group, simply select the Add Rule Group button from the bottom of the
screen:

This will open up
a blank Rules Group Maintenance screen that is ready to be completed. Each field is described in the section
following, and should be completed based on the desired rules output.
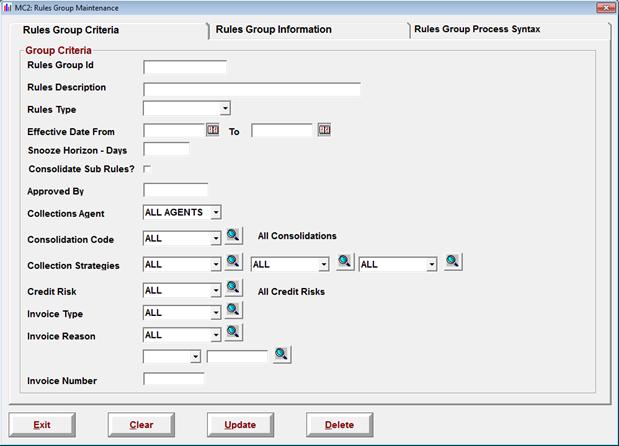
Rules Group ID 10 digit short description identifier for the rule.
Rules Description 40 digit long description that describes the rule in more
detail.
Rules Type Specifies
whether the rule will be created at the Entity, Customer, Invoice or Deduction
level. This is a critical field
as the options that are available as far as editing the rules syntax and
attaching sub rules are driven by this field.
§ Entity level rules will use the MC2ENEPF
file for syntax. At the sub rule level
the options available include: Amount
Ranges or Accumulator Ranges based at the entity level.
§ Customer level rules will use the MC2CUEPF
file for syntax. At the sub rule level
the options available include: Amount
Ranges or Accumulator Ranges based at the customer level.
§ Invoice level rules will use the MC2CDFPF
file for syntax. At the sub rule level
the options available include: DBT Ranges and invoice amount ranges. There is also an option to choose a blank
invoice type, or an invoice reason in the Rules Group Criteria.
§ Deduction level rules will use the
MC2CDFPF file for syntax. At the sub
rule level the options available to you include: DBT Ranges and transaction
amount ranges. There is also an option
to choose an invoice type, or an invoice reason in the Rules Group Criteria.
Effective Date From The first valid date that the rule listed can be run effectively.
Prior to this date the rule is invalid
Effective Date To The last valid date that the rule listed can be run
effectively. After this date the rule is invalid
Note: if the rule that being created is not
contingent on any date parameter and will always be valid, these fields can be
left blank.
Snooze Horizon The snooze horizon feature allows the user to “snooze” the
number of days between which a transaction can be selected by the rule.
For Example:
Let’s say you have a snooze horizon of 14 days on a rule that is run
every week. If customer 123456 is
selected when the rule is ran and posted today, that customer even if it meets
the rules criteria will be skipped in the rules output when the rule is ran the
following week. It will again be
eligible for selection the following week.
Consolidate Sub
Rule This radio box is a new feature to
MC2 6.0 and higher. If the consolidate
Sub Rule radio box is checked, the system will read through the lines
returned by the Sub Rule and only display the most severe.
In essence, this feature allows for a single activity output per
customer per rule.
Approved By All rules must be approved by someone in the system
in order for them to be active and available to be run. When an approver enters their initials into
the field and then selects the “Update” button, the rule status is changed from
“Pending” to “Activated.”
NOTE:
This is a free form field – it is recommended to be consistent in how
this is used.
Collections Agent Selecting a Collection Agent from the combo box of available
collections agents, will cause the rule to be executed against only those
customers, entities and invoices that are assigned to the selected collections
agent. Select “All Agents” for the rule
to be executed against all possible customers, entities and invoices.
Consolidation Code The consolidation code assignment is not
used in all MC2 implementations. The
most common use of this field is to group customers together that may be part
of a separate company or division that require separate letter head or verbiage
on all documentation. Selecting the
consolidation code from the drop down combo box will limit the rule to
customers with this assignation.
Collection Strategies The strategy code in MC2 is designed to
categorize customers with a
common collection policy. Selecting a collection strategy from the
combo box will cause the rule to be executed against only those customers,
entities and invoices that are assigned to the selected collection
strategy.
Credit Risk The credit risk code is used to identify customers
based on their potential exposure to the business. Selecting the Credit Risk from the combo box
will cause the rule to be executed against only those customers, entities and
invoices that are assigned to the selected credit risk category.
Invoice Type This option will only display if the rules type
selected is a transactional level à either “INVOICE” or “DEDUCTION”. The invoice type default on full open
invoices is BLANK, for deductions the type code can be assigned from the list
in the INVTYP table code maintenance in MC2.
Selecting an invoice type will limit the rules output to the type(s)
selected.
Invoice Reason This option will only display if the rules type selected
is a transactional level à either “INVOICE” or “DEDUCTION”. The invoice reason code is commonly used to
identify the reason for dispute on an open item in the AR ledger. The invoice reason codes are maintained in
the INVRSN table in MC2 table code maintenance.
Selecting an invoice reason code will limit the rules output to the
reason(s) selected.
Customer Option
only appears on Customer level rules.
Can narrow rules criteria to a specific customer/business unit
combination.
Please see below for
a sample of the Rules Group Maintenance form completed for a customer level
rule targeting a specific agent and strategy code:
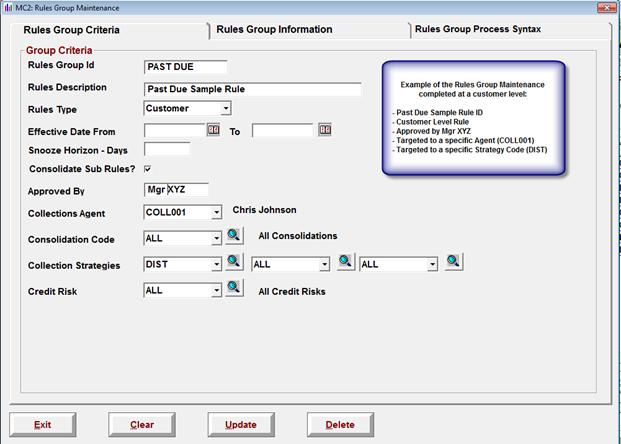
The second tab of
the Rules Group Maintenance screen provides a place to enter 4 lines of comments
relating to the rule. These notations
are informational only, and do not appear on the rules output.
Additionally,
this screen will track the last date and time the rules group was ran in the
section at the bottom. In our example,
this area is displaying as blank since the rule has not yet been ran.
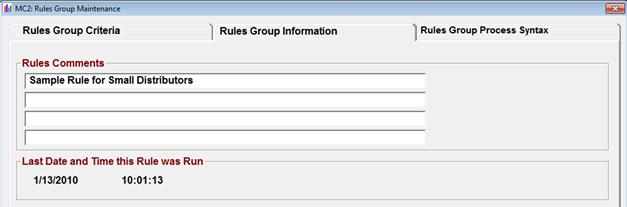
The third tab of
the Rules Group Maintenance screen is the Rules Group Process Syntax screen.
This is one of
the most significant and exciting changes that has been added to the 6.0 rules
engine is the addition of the Rules Group Process Syntax.
This feature
provides the flexibility to allow the user to view, override and add to the
standard rules group criteria that is entered on the first tab of the rules
group maintenance. This will allow the
user to drill down deeper in the database and target a very specific subset of
the customers or transactions with the MC2 rules engine.
The options that
are available to edit via the Rules Group Process Syntax will vary depending on
the “Rules Type” that is selected.
In the example
shown in the Rules Group Maintenance section, the rule PAST DUE was created at
the customer level: With the selection
as shown below, this rule will be focused on all customers linked to Agent
“COLL001” and linked to strategy code “DIST”.
When we look at
the Rules Process Syntax tab, we see a logical statement that the system has
created which states this same information.
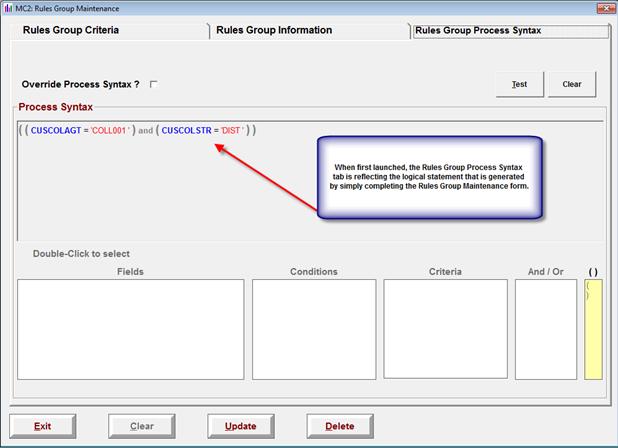
For many rules,
it will not be necessary to add additional parameters. If this is the case, and the rule now meets
the desired criteria, select the “UPDATE” button on the bottom of the screen to
accept the rule into the system.
It is sometimes
necessary to refine a rule to include or exclude additional parameters that are
not addressed by simply using the drop down criteria on the Rules Group
Maintenance form.
In order to edit
the rule the user must click in the “Override Process Syntax?” radio dial.

NOTE: Once the “Override Process Syntax” has been
selected on a rule, any changes made to the Rules Group Criteria tab will not
affect the syntax.
The Rules Group
Process Syntax screen is designed to help guide the user through the available
options for modifying an existing rule.
Once the syntax override option has been chosen, the 5 columns at the
bottom of the screen will activate one at a time:
Fields The
fields column will load with valid field choices that are dependent on the
Rules Type (Entity, Customer, Invoice or Deduction) that was selected on the
Rules Group Criteria screen.
Conditions The
query condition allows the user to narrow down or control the amount of data
returned in the rule by applying a condition such as “Greater Than (>)” or
“Equal to (=)” a specific criteria.
Criteria Allows
the user to enter specific value for the field selected. (Future versions of the product will load the
available options based on the Field that is selected. For example if the collection strategy field
(CUSCOLSTR) is selected, the system will load the available collection
strategies from the strategies that have been entered in the table maintenance.
And/Or Indicates
whether the conditional statements are additive (AND) or are exclusive (OR) of
one another.
·
Using
an “AND” statement between two rules criteria means that both criteria must be
bet in order for the rule to select that record.
·
Using
an “OR” statement between two rules criteria means that only one of the two criteria
must be bet in order for the rule to select that record.
( ) The
open and closed parenthesis are used to encapsulate or separate one rules
statement from another.
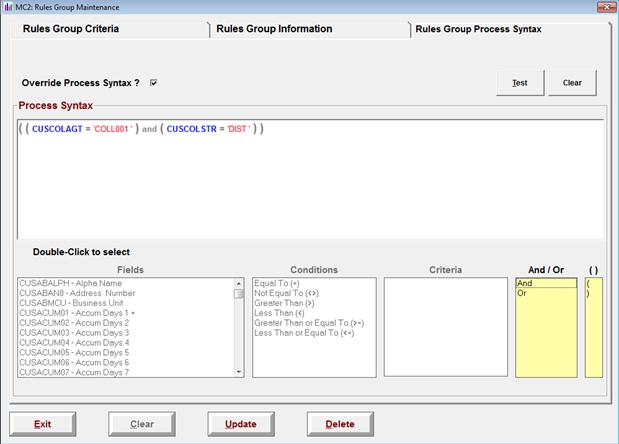
The system will
prompt the user through the query syntax, by displaying available selections in
yellow across the bottom of the screen.
In the PAST DUE
example rule, if it is decided that we want to exclude all customers with a
“LOW” credit risk, we first remove the final parenthesis, and then select “And”
from the And/Or column:
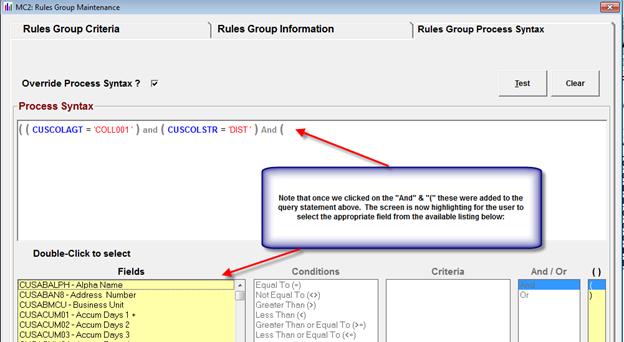
We then scroll
down the list of fields available until reaching CUSCRDRSK – Customer Credit
Risk. Double click on the field to add
this to the query statement. The system
now positions to the condition column.
Since we want to
exclude all customers with a credit risk of “LOW” the option that will be
selected in the condition column is “Not Equal To (<>)”.
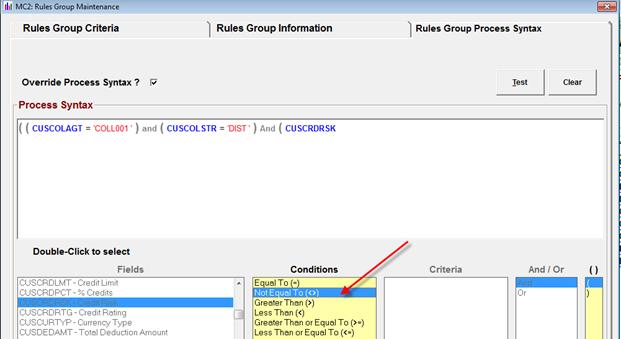
The system now
prompts for Criteria to be entered. In
the current 6.0 rules release, the user will need to key in the Criteria into
the field and select enter.
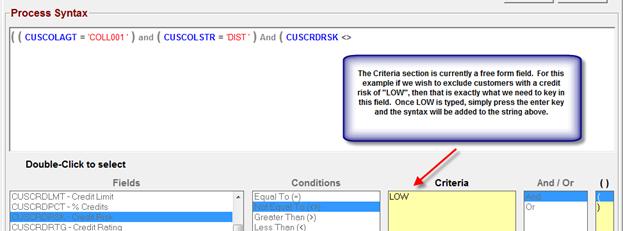
It is important
to always be certain to bring the rules statement to closure. If a closing parenthesis is missing, or if
the logical statement is incorrect, the system will provide a notification when
the “TEST” button located at the top right hand side of the screen is selected.
In the sample
that below, there are 3 separate conditional statements that are separated with
“And”. If the query statement is not
closed with a final parenthesis – an error will generate:
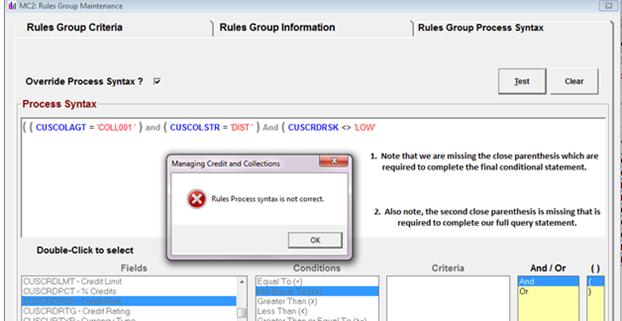
When “OK” is
selected on the error message, the process syntax is highlights in yellow, and
the user has the opportunity to correct the logic and retest.
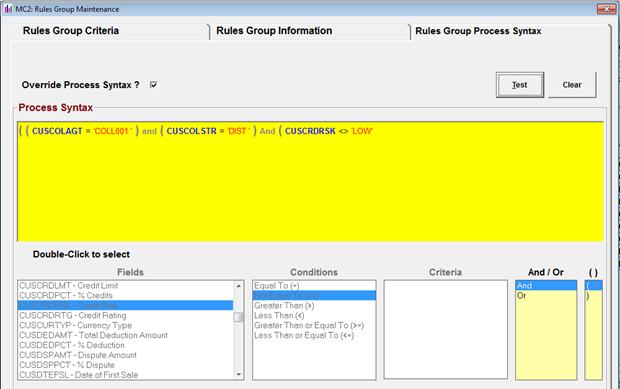
If only one
closing parenthesis was added and the rule retested, an error would have been
returned again.
Once the rule has been updated for the
appropriate logic changes, press the “Test” button again, and the system will
provide a message that the logic is now correct.
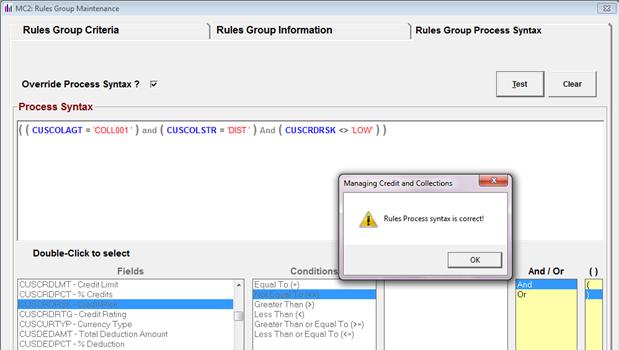
At this point the
user can click the “Update” button at the bottom of the screen to accept the
rule. The system will first validate the
rule logic and provides another message that the syntax is correct, and then
will notify that the Rules Group Update was successful.
(The reason for
this second message is that the system is designed to make certain that the
logic on all rules be accurate prior to allowing the user to accept that rule
into the system. If the user had not
tested the rule to determine whether the logic was correct, the system would have
warned them that the logic needed some work.)

Q. Do I always need to use the
Rules Group Process Syntax tab when I create a rule?
A. No. If you are able to narrow down the rules
output to the desired output by merely using the drop down combo boxes on the
Rules Group Criteria tab in conjunction with the Sub-rules features, there is
no reason to override the rules group logic.
Q. What are some ways that the
Rules Syntax Override feature can enhance some of my existing rules?
A. The possibilities this feature opens up are
really amazing. Here are just a few of
the examples that you may want to consider:
·
Run a
rule for a range of collectors
o Example: (CUSCOLAGT = “301”) or (CUSCOLAGT
= “302”) or (CUSCOLAGT = “303”) or (CUSCOLAGT = “304”)
·
Exclude
a strategy code when running a rule
o Example: (CUSCOLSTR < > “VIP”)
Q. Where does the
list of fields that displays in “Fields” column of the Rules Group Process
Syntax come from?
A. The “Fields” column is populated from the
fields found in specific MC2 files based on the Rules Type that is selected on
the Rules Group Criteria tab:
Customer Type Rule MC2CUEPF
– Customer Extension Physical File
Entity Type Rule MC2ENEPF
– Entity Extension Physical File
Deduction Rule MC2CDFPF
– Customer Deduction Summary File
Invoice Rule (FUTURE – Rules
Syntax is not currently available for use on the invoice level rules.)
Q. What if I am having a problem
determining what is causing my Rules Group Process Syntax to error?
A. If after reviewing the
statement you are unable to determine the issue, you may want to take a print
screen and send over for some assistance.
·
By
selecting “Control” and “P” on your keyboard, you are able to take a screen
capture of this page. That screen
capture can be sent to [email protected] for review.
·
Please
include a notation of what it is that you are trying to do with the rule in
question so that we are better able to assist you.
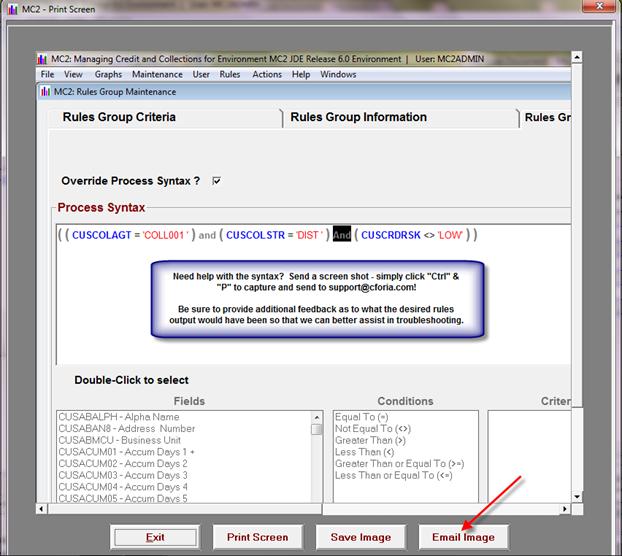
Sub Rules are a
new feature that has been added in MC2 version 6.0 and higher. It is the use of the Sub Rules that MC2 is
able to create tiered output from a single rule. This new tiered structure allows a single
rule to address customers with different levels of severity based on the level
of delinquency in the collection process.
Information that was previously stored on the Advanced Rules Tab has now
been incorporated into the Sub Rules screen.
NOTE: Upon implementing MC2 6.0, any rules that are
already set up in the client system will be translated into this new
format. Each rule will have one Sub Rule
attached that contains the information that exists on the Advanced Rules Tab in
MC2 version 5.9 and lower.
The Sub Rule(s)
define the output that the rule will generate, and every rule will have at
least one Sub Rule in order to generate any output. The Sub Rule options that are available to
attach to a rule are contingent on the type of rule that was selected in the
Rules Group Maintenance screen. (Entity, Customer, Invoice or Deduction)
Once the main
Rules Group Criteria has been entered and a rule has been created, it is
available to be selected on from the Rules Group Management Console list
display. Simply double click on the
desired rule and select “Manage Sub Rules” from the drop down menu.
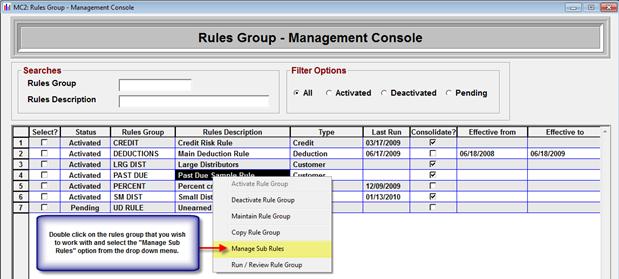
This will open up
the “MC2: Rules Sub Group – Management” screen.
To add a new Sub Rule, select the Add Sub Rule button from the bottom of
the screen:
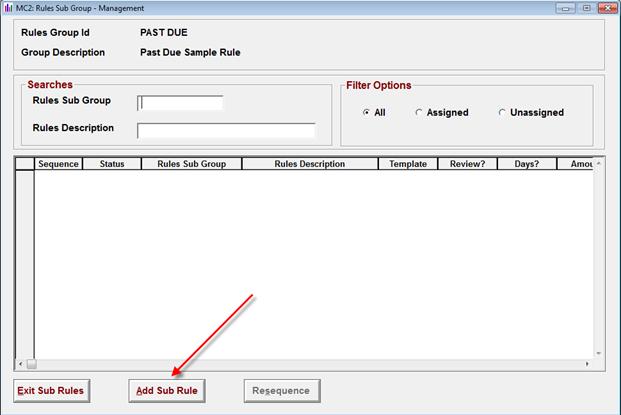
For this example,
the Add Sub Rule feature was launched by double clicking on a customer level
rule, so the system automatically returned the appropriate template to be
completed. Each field is described in
the section following, and should be completed based on the desired rules
output.
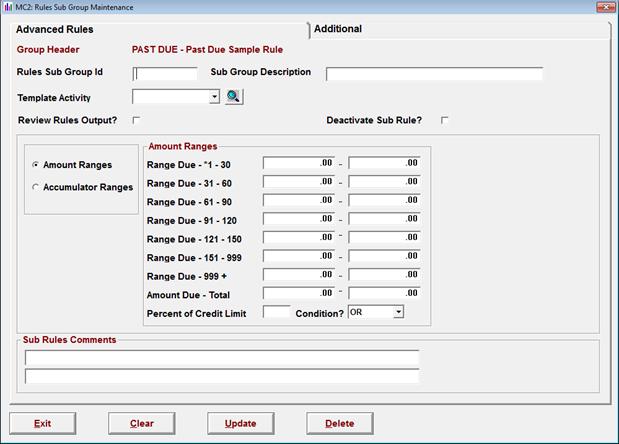
Field Definitions:
Rules Sub Group ID 10 digit short description identifier for the rule.
Rules Description 40 digit long description that describes the rule in more
detail.
Template Activity This field provides the link between the Rules Group, and the
Rules Template Activity that was previously created. It is via this field that the system knows
what output to generate for the entity, customer, invoice or deduction that was
selected via the generation of the rule.
Review Rules Output If the Review Rules Output radio box is selected, the rules output
will require the collector to review and mark as ready to post. Selecting this option will force the rule to
be worked via the Rules Automation screens.
Deactivate Sub Rule Selecting
the Deactivate Sub Rule radio box will inactivate it so that it is not
available when the rules group is generated.
Range selection: When creating a customer or entity level rule, the user must
decide whether they wish to target specific aging buckets, or if they are
interested in an Accumulator range.
Amount Range Indicates a specific aging bucket defined in the MC2
configuration master aging
Accumulator Range Indicates that the rule will pick up all items that are as old or
older than the aging accumulator range selected.
For example: On the customer level Past Due Sample Rule
created earlier, the screen below is set to select any positive balance between
$1 and $1000, and will prompt the generation of a past due letter:
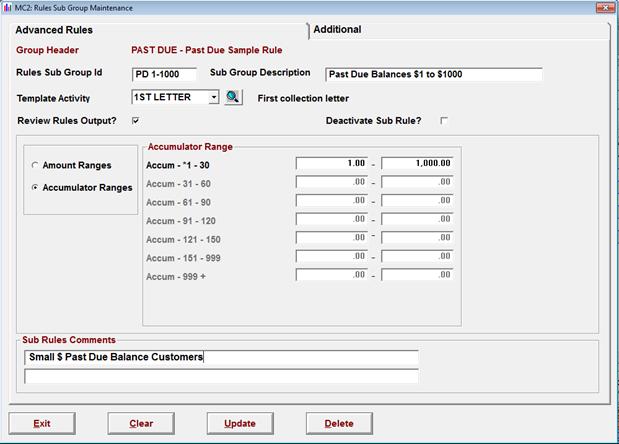
The “Additional” tab merely identifies the
last date and time the Sub Rule was ran.
To Accept the Sub
Rule into the system select the update button at the bottom of the screen.
The system will
prompt that the update was successful and ask if you wish to exit the screen.
The Sub Rule is now listed on the Rules
Sub Group – Management screen.
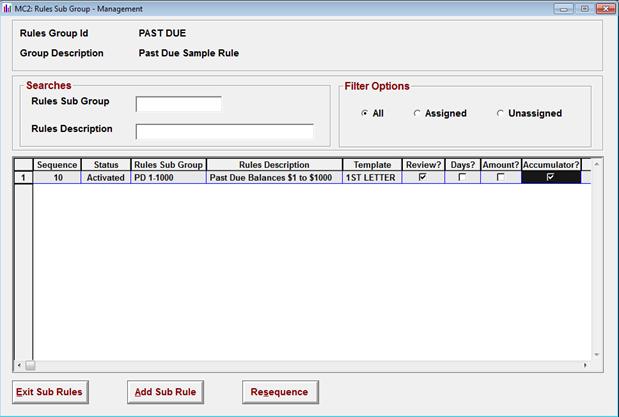
If this is the
only Sub Rule desired, the user could “Exit Sub Rules” and this rule would be
ready to run.
However, if it
was determined that customers meeting the same rules group criteria whose past
due balances > $1000 required a phone call, then a second sub-rule could be
attached to this rules group.
Click Add Sub
Rule on the bottom of the screen and complete the second Sub Rule Group
Maintenance form:

When the second
Sub Rule has been updated, both will now appear in the Rules Sub Group
–Management screen
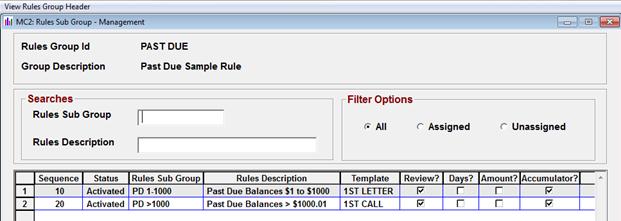
The sequence that
is associated with the Sub Rule is the priority level. When working with consolidated rules, this is
a key concept as only one hit per customer will be returned based on the
qualifying rules sub group with the highest severity.
The priority of a
rule can be adjusted by clicking in the sequence column and keying a new
value. When the “Resequence” button at
the bottom of the screen is clicked, the Sub Rules will be renumbered in
increments of 10.
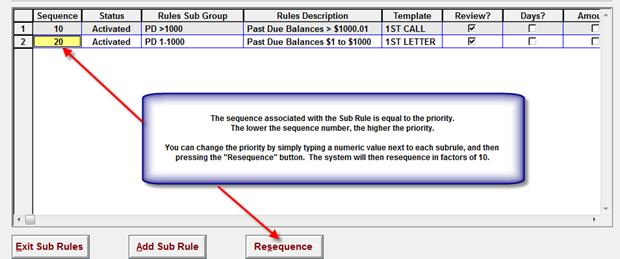
The concept of
attaching sub rules to an invoice or deduction level rule is exactly the same
as that shown above in the customer level rule example. However, if a rule is targeted to specific
transactions within the database (Invoice or Deduction) rather than aging
buckets (Customer or Entity), the options that are available in the Sub Rules
criteria are very different.
Since both
invoice and deduction rules are targeting specific transactions within the
database, the parameters that are available are designed to limit the data
returned by age or by value ranges.
The Rules Sub
Group Maintenance for Invoice or Deduction rules appears as shown below:
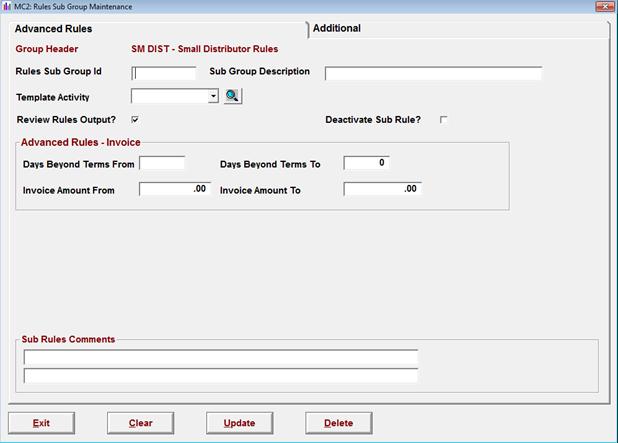
Field Definitions:
Rules Sub Group ID 10 digit short description identifier for the rule.
Rules Description 40 digit long description that describes the rule in more
detail.
Template Activity This field provides the link between the Rules Group, and the
Rules Template Activity that was previously created. It is via this field that the system knows
what output to generate for the entity, customer, invoice or deduction that was
selected via the generation of the rule.
Review Rules Output If the Review Rules Output radio box is selected, the rules output
will require the collector to review and mark as ready to post. Selecting this option will force the rule to
be worked via the Rules Automation screens.
Deactivate Sub Rule Selecting
the Deactivate Sub Rule radio box will inactivate it so that it is not
available when the rules group is generated.
Days Beyond Terms From and To
Enter the low and high value to select invoices that are within this
number of days beyond invoice terms.
Invoices that are past due beyond terms greater than the “from” and less
than the “to” values will cause the rule to be executed.
Invoice Amount From and To
Enter the low and high value to select invoices that are within this
invoice value. (Note: This is the total invoices value including product,
shipping, taxes, special charges and other invoice related charges.) Invoices that have a total invoice value
greater than the “from” amount and less than the “to” amount will cause the
rule to execute.

Once a rule group
has been created and at least one sub rule attached, it is ready to be
generated via the MC2 Rules Engine. A
rules group can be ran by either of the following methods:
Double click on
the selected rules group and choose “Run/Review Rules Group” from the drop down
menu.
Or
Select one or
more rules by clicking in the Select? radio dial next to the desired rules
groups and select the “Run Rule Rules Group” button on the bottom of the
screen.

Once the user has
chosen to run a rules group, the MC2 Rules Engine window will open as shown
below:
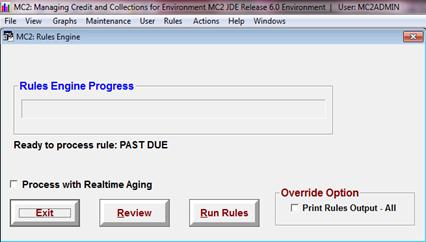
Once this window
has launched, it will remain open until the rule has completed or the user has
chosen to exit. The three primary
options available from this screen include:
Exit Exit the Rules
Engine screen without processing the
rule.
Review Exit
the Rules Engine screen, and return the user to the Review Rules Group screen
Run Rules Selecting this option will
start the generation of this rule.
Once the user has
selected to run the rules group, the system will begin analyzing the query
statement and begin processing the rules criteria against the customers
selected. As the system is working, the
Rules Engine Progress bar will display (as shown below), and the system will
spin through the customers to look for matches.
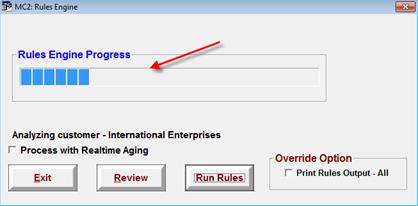
While the rule is
running, this session of MC2 will be fully dedicated to the rules
generation. If another screen is clicked
in MC2, the user may note it appears that the rule has stopped moving in the
progress bar – do not worry, the rule is continuing to run. Once the rule has completed generating – MC2
will open to the Rules Engine – Rules Review screen.
Note: Depending both on the speed of your AS400 and
on the criteria specified in the rules group, and sub rule maintenance, some
rules may take longer to run. You may
wish to open a second session of MC2 so that you can continue to work in the
system while your rules are generating.
Process
with Realtime Aging (This
option is not available in all ERP’s).
If the Process
with Realtime Aging option is selected, the rule will re-age the accounts
behind the scenes in order to capture any changes for cash application or invoicing
that may have occurred since the nightly process was ran.

Please keep in
mind when selecting to “Process with Realtime Aging” the rule may run a little
longer as it is doing the re-aging calculations behind the scenes. As this a behind the scenes aging, this will
not change the aging buckets on the collection management view
If the Print
Rules Output – If box is checked during the generation of a rule, then
regardless of the output selection in the Rules Template set up or the primary
contact preferences on each account, if this rule is posted, the system will
look to print all output from the rule to the default printer specified in the
configuration master.
This feature is
perfectly designed for mass mailing situations for customers who otherwise may
receive communication via fax or email.
Once the rule is complete, the Rules Engine Rules Review screen will
open and it will display a list of the customers or transactions identified
during processing.
The Rules Engine – Rules Review screen consists of three main parts:
1. Filter Options
2. Rules Batch Listing
3. Listing of Rules Activities
Each of these areas are reviewed below.
Filter Options
The filter
section of the Rules Engine (Review) screen displays the status of rules that
have been run using the rules engine.
The filter changes the list of pending rules in the list. Selecting a rule by clicking on a filter
sequence line in the “Filter” listing will change the list of created
activities in the “pending” activities list section of the screen.

All Rules This filter changes the
list of rules to display all rules that have been run.
Pending Rules This filter changes the list of rules to display only
rules that have been run but are not yet posted. (Rules being worked via Rules Automation will
appear as open here.)
Posted Rules This filter changes the list of rules to display only
rules that have been run and have also had the generated activities mass posted
to the list of open activities or letters sent.
This section of
the screen lists all rules batches available based on the filter criteria. The default filter to this screen will be to
display the pending rules batches available within the system.

When the user
double clicks on a pending rules batch an MC2 pop-up menu will display with
action options that are available.
Select Rules Batch Using this option selects the rules batch so that the details
of the batch will appear below in the List of Rules Generated Activities.
Delete Rules Batch Allows the user to permanently delete a rules batch from the
system. When this option is selected,
the user will be prompted to make sure they truly wish to delete the rules
batch.
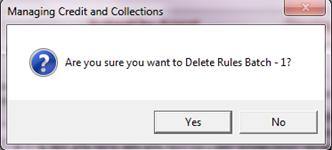
Note: This option can be used to delete a full
rules group, or to delete a rules group that has been partially worked via the
rules automation screen.
Print Rules Batch
Audit Report This option allows the user to preview or print an audit
report of the activities which have been generated by that rules batch.
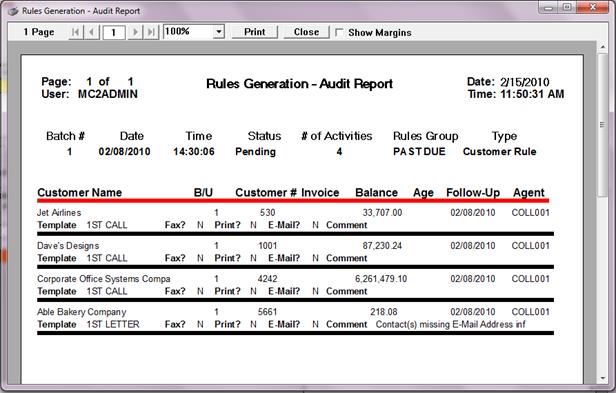
Clip All Rows This option clips the rules batch activity list out to
the clip board so that it may be pasted into excel. Once the message returns letting the user
know that the clip process is complete the data is ready to paste into excel.
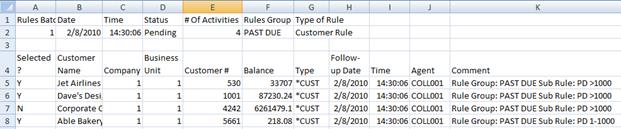
Rules Batch A system generated sequence number to identify the
rule that has been run.
Date The date that the
rule was run.
Time The time that the
rule was run.
Status The status of the rule
that was run. The possible values are:
·
Pending
– the rule has been run but activities have not been posted.
·
Posted
– the rule has been run and the generated activities have been posted.
# of Activities The number of activities generated by the rules engine
that represent that the rule found matching records.
Rules Group The short description of the Collection Rules
Group. It can be up to 10 characters in
length.
Type of Rule Specifies whether the rule will be created at the
Entity, Customer, Invoice or Deduction level.
Rules Description The long description of the Collection Rules Group. The description can be up to 40 characters in
length.
Once a rule has
been selected in the Rules Batch Listing, the activities are generated for any
matching records as defined for that Rules Group are displayed in the lower
window of the screen. This is the List
of Rules Generated Activities. Before
the list of activities can be posted it must be reviewed to ensure accuracy of
the information.

The list of rules
generated activities may be affected by several additional filters:
The “Error
Filter” may be checked to “Display Errors Only”.
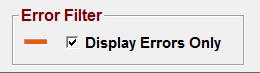
The result will
be that only records that fail to have valid email addresses and/or valid fax
numbers in the contact extension files will be listed. This provides a quick method of identifying
which records need to be corrected before those transactions can post.
Double clicking
on an activity and selecting Review Customer Contacts option from the drop down
menu the collector can open the Customer Contact List where they can update a
customer contact.
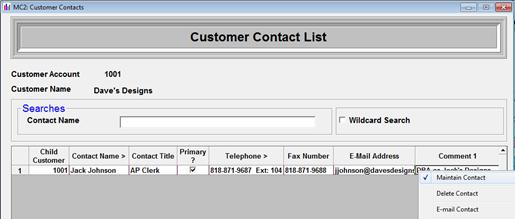
In order for the
rules to run and post smoothly it is recommended that contact records be
maintained in MC2, paying close attention to marking the primary contact and
selecting the preferred delivery method for any letter generated activities.
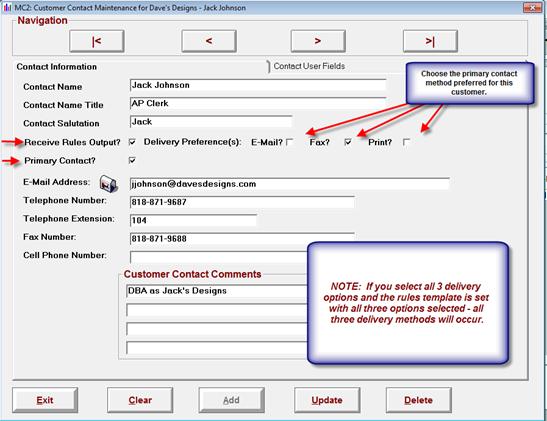
The “Display Auto
Post Only” filter is designed to show only those transactions which do not
require the collector to review and process them via the Rules Automation
workflow.
The text tip box
that is associated with these transactions will read that it is “Ready to be
posted and processed through the Automation Engine.
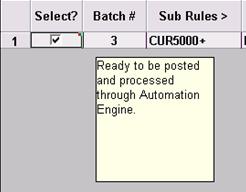
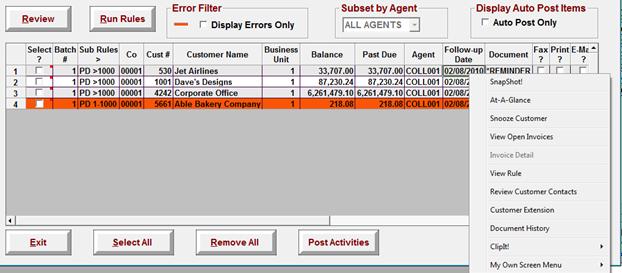
Fields Displayed in the List of Rules Generated Activities include:
Select? Rules
must be selected to successfully post.
Unselected rules will not post. Rules that have successfully been verified for
contact information and template criteria will be automatically be
checked.
Rules that have failed validation will be un-check and will be
highlighted in red. All selected
activities will be posted when the “Post Activities” button is selected from
the Rules Engine Review screen.
Note: If
any sub rules have been marked with a check mark in the “Review Rules Output?”
radio box, activities for that rule will display as unchecked on this screen
and will have a text tip notation reading that the Pending Activity is locked
and may only be closed through the Rules Automation process.
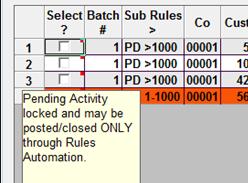
Batch # Batch
# number identifies which rules group generated the activity. This helps with auditing the list of
activities.
Sub Rules> Identifies the sub rule that generated the
activity hit for this line.
Co The
company number for which the rules group has generated an activity
Cust # The
customer number for which the rules group has generated and activity
Customer Name Name of the customer for which the rules group has
generated the activity
Business Unit Business Unit associated to the customer for which the
rules group has generated the activity.
Balance Total
AR balance of the customer for which the rules group has generated the
activity.
Past Due Past
due balance for the customer for which the rules activity was generated.
Follow-Up Date Date that the activity was generated
in the rules engine.
Agent Agent
associated with the generated activity
Document Name
of the document that is linked as the suggested output for the rules generated
activity.
NOTE: While the check boxes related to the Fax?,
Print? and E-mail columns allow the user to check these, they will not impact
the rules output or contact maintenance.
Fax? A
check mark in this box indicates that the delivery preference for this account
has been marked as fax, with the receive rules output checked on the primary
contact record.

Print? A
check mark in this box indicates that the delivery preference for this account
has been marked as print, with the receive rules output checked on the primary
contact record.

E-mail? A
check mark in this box indicates that the delivery preference for this account
has been marked as e-mail, with the receive rules output checked on the primary
contact record.

Comment This
field will either show the template activity comment on a reminder, o r in the
case of a transaction which has an error, this field will provide additional
information about why the transaction is in error.
Strategy Strategy
code that is associated with the customer for which the rule was generated.
Risk Credit
Risk that is associated with the customer for which the rule was generated.
Consolidation Consolidation code that is associated with the customer
for which the rule was generated.
Note:
Consolidation code is not used in all implementations, and may appear
blank in this column.
Promise Date Indicator of whether there is a promise already present
on the customer for which the activity was generated.
Note:
If a date is filled in this column it means that a promise activity is
present; however it may or may not be for the amount/transaction that the rule
has generated an activity for.
Recommended that the collector review this before taking additional
action.
Next Follow Up Indicator of whether there is a follow up activity already
present on the customer for which the activity was generated
Note The
last collection note that was entered for this customer is displayed for quick
review.
Note Date Date
of the last collection note associated with the customer for which the rules
activity has been generated.
Once a rules
group has been generated, the final steps in the process are to review and post
the transactions to the MC2 Auto Engine.
This can be done either via posting the transactions from the Rules
Engine screen, or by working the transactions via the Rules Automation
workflow. While these options may appear
similar, the option to manage workflow via these separate channels provide the
user flexibility that can maximize collector resources.
Posting a Rules
Group via the MC2 Rules Engine is a fantastic tool to manage the sending of
statement of accounts, low level dunning letters, of other mass generated
letters that require very little collector intervention for data review.
To be eligible to
mass post from the Rules Engine screen the output setting for the subrule for
that transaction must have the Review Rules Output? Radio dial unchecked. This will unlock the items that qualify for
the sub rule to be posted without having to be worked through rules automation
screens.

Prior to posting
a rule, the user will need to validate which of the eligible transactions they
wish to Auto Post to the MC2 Auto Engine, and which may need to be skipped or
managed separately.
On complex rules,
it is possible to filter down the screen to view only the eligible auto post
items by clicking on the Auto Post Only filter:
Check marks will
display in the “Select?” column for each transaction that the system has
identified as ready to send to the Auto Engine.
The user can select or deselect transactions
by clicking directly into the boxes.
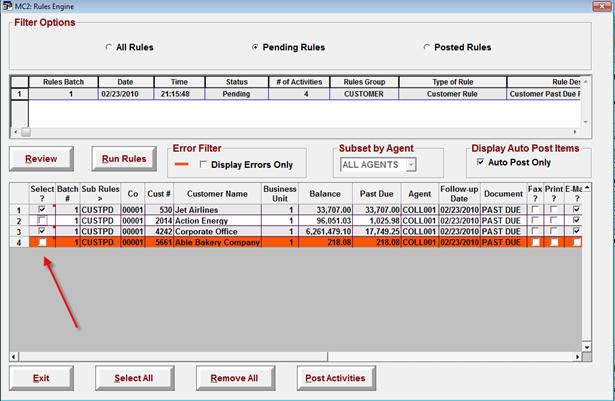
If an item has
been unchecked in the rules engine “Select?” box, it is no longer eligible to
be posted via the Automation Engine and can only be closed or posted via rules
automation.
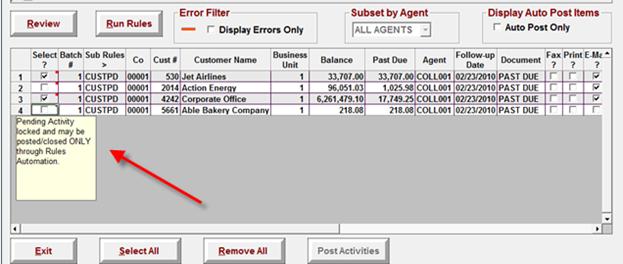
One the rules
group listing has been reviewed and the batch is ready to post, the user simply
clicks on the “Post Activities” button at the bottom of the screen to send the
transactions off to the MC2 Auto Engine.
Once the rules
batch is posted, it will no longer appear when the display is set to Pending
Rules. Instead the batch will appear
under the Posted Rules filter.
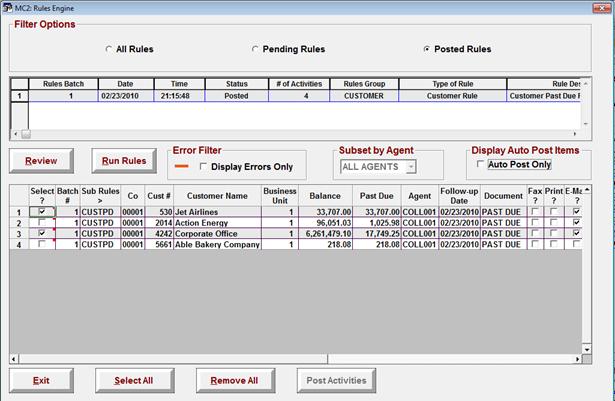
The posted
transactions are immediately visible in the Auto Generated Document Status
screen under a PENDING status, and will soon move to scheduled and then
complete statuses as the Auto Engine wakes up and moves the transactions
through the process.
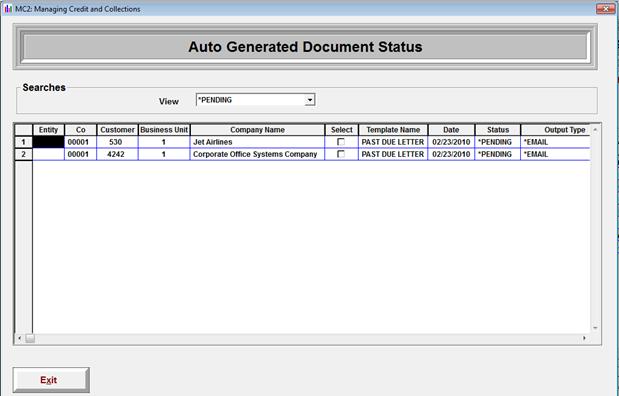
For those times
when posting a rules group in mass does not meet the immediate requirements,
leaving the rule in pending status and allowing the collectors to work the
transactions via the Rules Automation work flow may just be the answer. This feature is perfect for more complex
rules that require more intensive review by the collectors prior to taking
action.
Rules Automation
allows the user queue up pending activities via the Rules Engine, and manage
these transactions quickly on a one off review level. In order to use this feature, a rule is
generated, but not posted from the Main Rules Engine. Through the use of increased navigation in
snap shot, the collector can move take action on pending activities in one
account and move to the next in just a few short clicks -greatly increasing the
number of customer touches a collector can manage.
- Rules Automation Button off of the
Collection Agent Tickler Activity Screen redirects the Collector to an
Automation Review screen.
- Key features of the Collection Agent
Automation Review screen include:
- Subset rules output by agent.
- Tracks the number of pending and
completed activities by rules group
- Navigation forward and back between
accounts via handy arrows prompts provided in the snap shot view.
- One-off letter creation through the
Generation of Instant letters.
- Automatic posting of letter activity
to collection note history.
- Ability to Clip-It by agent.
The “Collection
Agent Tickler Activities” screen is the location of all posted follow up
activities that have follow up dates that are current or in the past. In the upper right hand corner, there is a
new button that has been added which will allow the collector to navigate to
the open items that are pending from the rules automation.
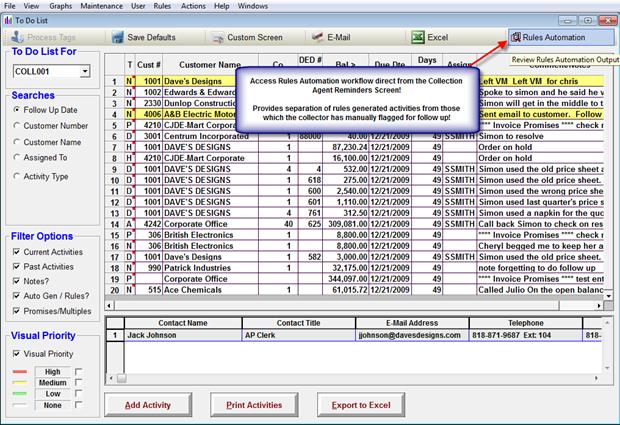
Once the  button has been pressed, the user is directed
to the “Collection Agent Automation Review” screen.
button has been pressed, the user is directed
to the “Collection Agent Automation Review” screen.
The Collection
Agent Automation screen is a streamlined vehicle for managing all system
identified follow up actions. These
items are flagged for review based on a set of predefined business rules that
are set up via the MC2 Rules Engine.
From this screen
the collectors are able to work through and address all system generated
actions for their portfolio, and close these pending activities either by
posting a letter or manually tagging the activity as complete.
Note: If
the user ID is set to default to a specific agent number, this screen will
follow the default and bring them straight to their own action items. (Note below the screen is subset to agent
“COLL001”. If the security profile
allows access to all agents, it is then possible to use the drop down menu to
view the actions for the next agent.
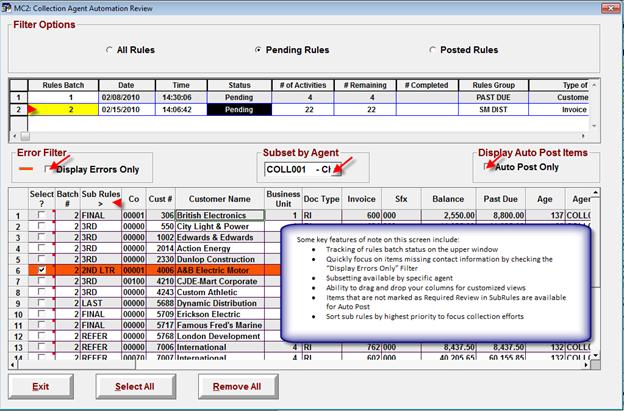
Upon entering
into the Collection Agent Automation Review screen the collector highlights a
rules group in the top window.
In the bottom
window, the identified items related to that rules group will display. These could be either suggested follow up
activities or letters based on the rules that have been ran.
The collector can
choose to work directly from the lower window, or they are able to drill into
more detail by double clicking on the first account and drilling into the Snap
Shot view. Working via the Snap Shot
view is recommended as the user can navigate quickly through accounts via
navigation arrows that are unique to the rules automation screens.
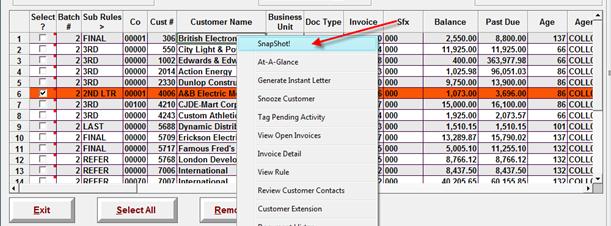
After clicking
into the snap shot view, the collectors see a screen that is very similar to
the normal Snap Shot view – with a few key differences.
·
In
the Upper left hand quadrant there is a yellow bar that separates any manually
or posted rules activities (above the line) from pending rule transactions
(below the line).
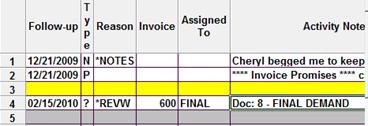
·
Above
the line are normal posted activities.
These are transactions that have either been posted to the account via
the rules or the collector has manually flagged for follow up via a PTP,
Multi-Reminder or as an activity follow up from a letter or note.
·
Below
the yellow line are the items flagged in the rules automation engine as pending
activities to be worked via the Rules Automation workflow.
NOTE:
the pending reminders are all flagged with a “?” type and since they
have not yet been posted via the rules process they are no calculated into the
activities in the Collector metric.
The collector
will double click on the pending activity in order to take action against
it. The options available to the collector
on pending rules are slightly different than actions that are available for a
regular manually posted reminder, and are listed below:
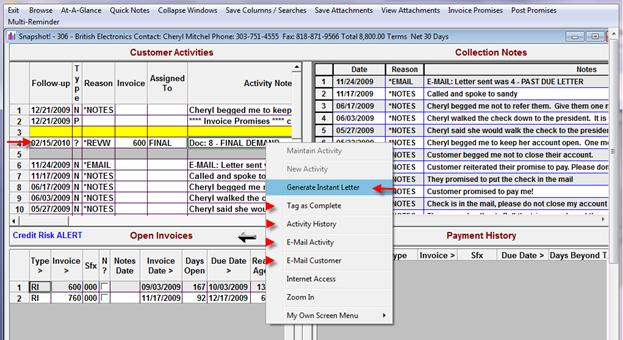
Double click
directly upon the pending activity in the snap shot view to select the generate
instant letter option. This feature that
has been added to allow the collector to generate a one-off letter to the
customer with minimal key strokes. This feature leverages the existing letter
engine in MC2 in combination with a streamlined process to populate letters to
the customer based on the rule criteria.
Once the user
selects this option, the letter template engine will initialize. Instead of having to select a letter from the
available merge documents the system will auto-merge the letter that is
associated with rules template for a specific sub rule.
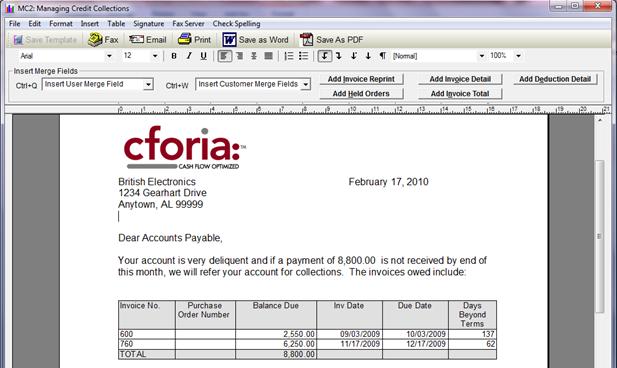
Once the template
is merged, the collector then has the option to select an output for the letter
that has been generated.
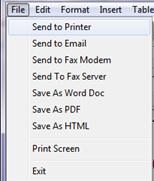
When the instant
letter is emailed, printed or faxed and the user exits the screen, they are
prompted to add a letter activity for follow up.
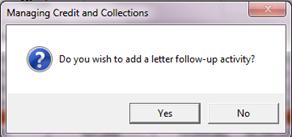
If the option to
add a letter activity is chosen, the activity maintenance screen will display
and prompt the user to create a custom reminder.
NOTE:
The collector has the option to change the ownership of the follow up to
the person entering the activity rather than the agent assigned to the customer
if needed.
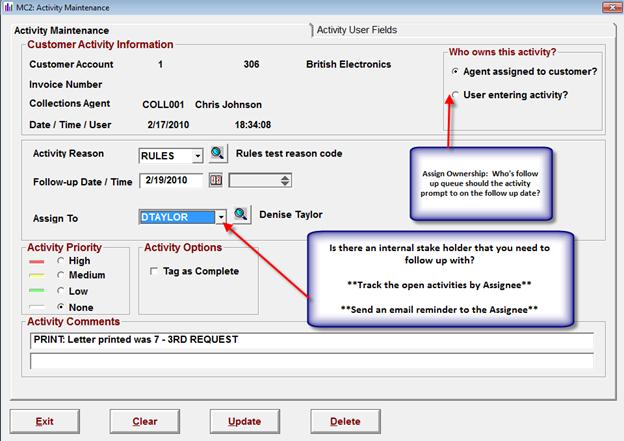
When the activity
is complete, if it has been assigned to a stakeholder the user will be asked
whether they wish to email the activity or not just like the normal activity
workflow.
This is a great
feature as it allows for a quick email to an internal stakeholder to help
adjudicate a deduction or dispute. It provides key information in a straightforward
format.
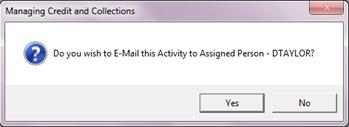
While key activity information is systematically captured in the email
created, if needed, the user has the ability to add, delete or change the
information just as would be done in a standard email.
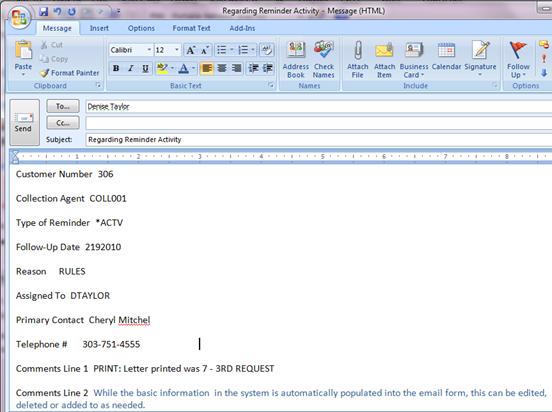
Once the user
completes the sending of any follow up or the activity is complete, select
“Yes” to exit the activity maintenance function.
The activity that
was created in this process will now appear in the upper left hand quadrant of
the snap shot view.
NOTE:
This follow up activity will appear as a regular activity, above the yellow
line in snap shot. From this point forward the follow up action will be managed
through the activity reminder screens.
At the same time
as the instant letter is emailed, printed or faxed, a notation is written to
the collection notes quadrant of the snapshot screen. This new feature provides a more complete one
stop record of the collection communication and actions without the need for
manual notations.
·
Displays
whether the action was *PRINT, *FAX, OR *EMAIL
·
Provides
the name of the letter that was generated
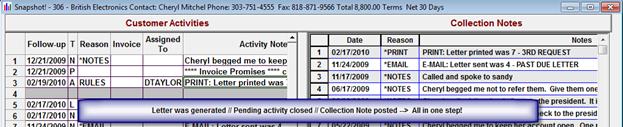
If the collector
opts not to generate the instant letter, or if they are being reminded to make
a telephone call, the collector may decided to tag the pending item as complete
and write a manual collection note on the account. When this option is selected, the pending
rule activity will disappear from the Customer Activities window and will be
written to the activity history file.
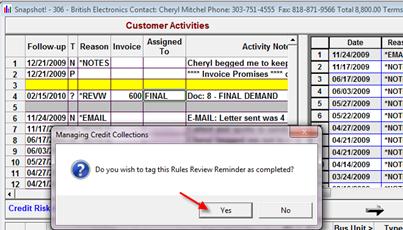
If the collector
opts to view the MC2: Activity History, they will be directed to a summary
screen similar to the one below that will provide detail of all activities that
have been posted to this account.
NOTE:
It is possible to use the Clip It! Function from this screen to copy the
activity history information over to an excel spreadsheet if needed.
Simply double
click on the bottom row, select “Clip It!” by subsetted rows and copy to an
excel spreadsheet.
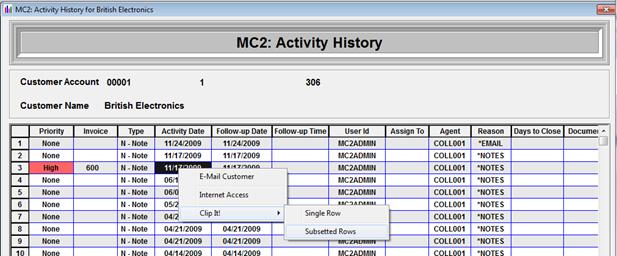
This option
allows for the capture of important information about the invoice or
transaction and forwards it to another party for review. The notation in the subject line will
automatically populate stating that this email is Regarding Tickler Activity.
NOTE: Once the user has chosen to email the
activity, they must either complete the email transaction or cancel this
email before they are able to continue on to another transaction in MC2 or
toggle over to another open email. The
system will not allow them to continue until they have completed this step.
·
If
launching MC2 from the desktop, and not a Citrix or Terminal server, the email
will be sent via their standard email and in most cases will be stored in the
users sent item folder.
·
If
launching MC2 from Citrix or Terminal server, the user will want to copy
themselves on any activities that are sent, as these will not reside in their
sent item file in their standard email application.
While key
information is populated on the body of the email for convenience, the user can
add, delete and edit any information or tailor to their personal needs by
typing directly on the email as normal.
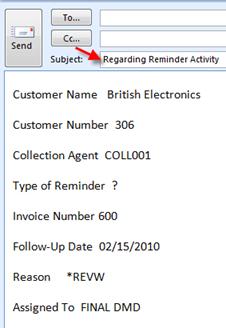
NOTE: Once the user has chosen to email the
activity, they must either complete the email transaction or cancel this
email before they are able to continue on to another transaction in MC2 or
toggle over to another open email. The
system will not allow them to continue until they have completed this step.
When the user
selects to email the activity to the customer, the system opens a blank email
file and populates the primary customer email address from the extension file
in MC2 and adds a default message in the subject line “Regarding your account”.
If no email
address has been updated in MC2, then the email will open with a blank address
line.
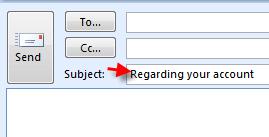
Once the
collector has completed all actions relating to the selected account, they are
ready to move to the next activity that is in their work queue. A key change to the Rules Automation workflow
is that the user does not need to exit the snap shot view in order to move to
the next account. Instead, they can
merely click on the navigation arrows in the center of the screen to move forward
or backward in the listing of accounts.

NOTE: If the collector attempts to scroll beyond
the first or last item in a rules group batch, they will return to the Rules
Automation Screen.
As actions have
been taken in the rules automation screen and the activities closed, the line
items that are displayed in the rules automation screen will be removed. This feature allows the collector to focus
fully on only those items that have not had action taken against them.
In the example below, Agent Coll001 only
has 20 open items left for Rules Group 2 as actions have already been taken
against the other2 items.
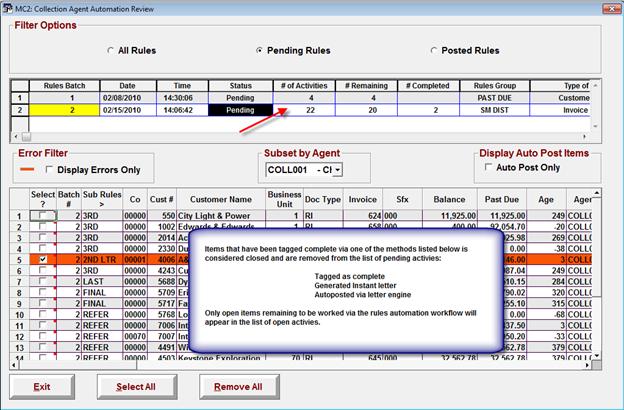
Once all actions
are complete in a rules group, then they can highlight the next rules group and
repeat this procedure.
Managing open
rules groups is best done from the Rules Management Console.
Batches should be
worked, posted or deleted on a regular cycle in order to keep the items
identified as currently actionable and minimize collection noise.
If it is
necessary to delete rules batches that did not have all items worked, do not
panic. The next time that run the rule,
if there are transactions that are still valid hits, the rules engine will pull
them in again.
Clip It Feature
added
In order to get a quick spreadsheet of all open action items in a
rules batch for a specific collector, it is now possible to use the Clip It!
feature in the lower window, or the copy to excel feature.
Scroll to the bottom of the window and double click on the last line
in the grid to get the pop-up menu.

Select Clip It! and choose Subsetted Rows. Open Excel, position the cursor to the first
cell and select Paste.
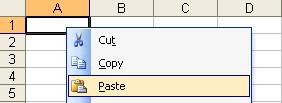
The information displayed on the rules automation review screen is now
in an easy to use excel format.

To use this feature scroll to the bottom of the activity list in the
lower window, and highlight the corner box on the grid. (Marked
as the red X below)
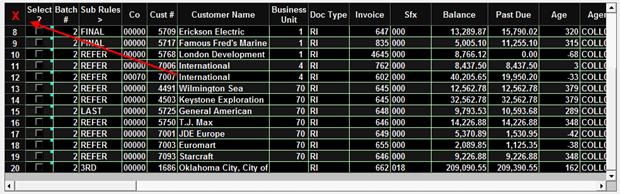
Simply Press “Control” + “C” on the keyboard to copy the information
and then paste into excel.
NOTE: The copy and paste to
excel works quickly on larger data selections as compared to the Clip It
features.
Sometimes there
may be an account identified that needs to be excluded from all rules activity
for a specified period of time. To
accommodate this need, an override snooze feature has been added at an
individual account level. Activating
this feature will snooze an Individual account so that it will be excluded from
all Rules Activity for a defined period of time.
NOTE:
This overrides a snooze placed at a Rules Group level.
To snooze an
account from selection while in the rules automation screen, simply double
click on the customer and select “Snooze Customer”

Once a snooze has
been placed on an account, this date will be visible both on the customer
extension maintenance form and on the Collection Management View if that column
has been selected as visible.
From any of the
main Management View, select Maintenanceà Documents and Faxes to access the
document status options.
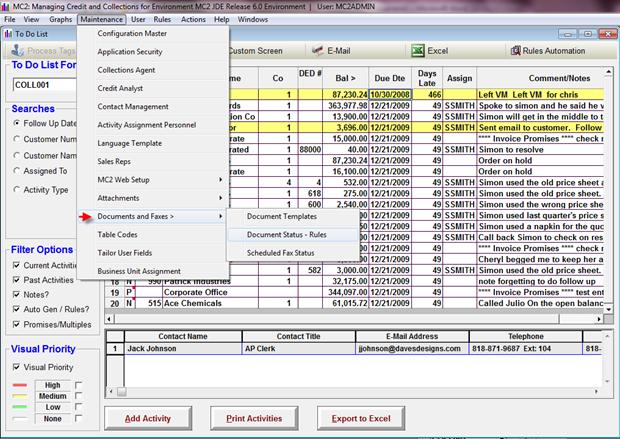
This displays the
master document template list that is available for use in MC2. From this screen it is possible to add,
delete or edit existing documents.

This features
displays the status for all rules engine generated documents which have not
been completed successfully. Only
documents generated by the rules engine will be displayed and managed through
this feature.
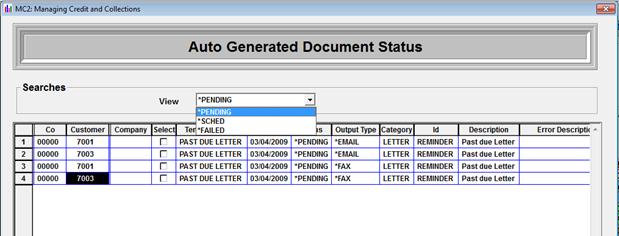
Available status
codes on this screen include:
*FAILED Documents
that were unable to be sent.
*PENDING Documents
that have been created on AS/400 but not sent.
*SCHED Faxes
that have been sent to the MC2 Fax Server but not confirmed as sent.

Actions that can
be performed from this screen by accessing the MC2 pop-up menu include:
Reschedule This
option will reschedule a previously failed document and change the status to
Pending until the automation server resends the information.
Cancel This
cancels the pending document.
SnapShot! Launches
the snap shot view for that customer
At-A-Glance Launches
the At-A-Glance view for that customer
View Open Invoices Launches
the View Open Invoices screen for that customer
Review Contact Opens the contact maintenance screen for that customer so
that the information can be viewed and/or updates as necessary.
Review Customer Opens the customer extension maintenance record for that
account to provide quick access to key information.
If the filter is
set to the Failed status – the action bar at the bottom of the screen will
activate with some additional options.

Using the Select
All or and De-Select All buttons in conjunction with the check boxes next to each line with allow the
user to identify transactions that either need to be re-scheduled via the MC2
Auto Engine or Cancelled.
Re-Scheduling a
transaction will move it from the *FAILED status to the *PENDING status for
reprocessing.
This feature
displays all faxes that were individually sent by MC2 users via the MC2 Fax
functionality. Only those faxes sent
through the MC2 FaxServer will be displayed on this list.
NOTE: If a user has a fax/modem card in their
computer and they are tailored to fax individually, their fax status will not
be displayed here. Only those faxes sent
through the MC2 FaxServer will be displayed on this list.
Available status
codes on this screen include:
*FAILED Faxes
that were unable to be sent.
*PENDING Faxes
that have been created on AS/400 but not sent.
*SCHED Faxes
that have been sent to the MC2 Fax Server but not confirmed as sent.

From the MC2
pop-up menu the user has several options that they can perform:
View/Edit Fax
Contact Information Opens the contact maintenance screen for
that customer so that the information can be viewed and/or updates as
necessary.
Re-Schedule Resets the document to Pending status and prompts the
system to re-schedule.
Cancel This
cancels the pending document.
Clip It Places
the data displayed onto a clipboard so that it is ready to paste into excel.
Transactions that
can be initiated from this screen:
Select This selects that document to be resent.
Select All This
selects all faxes to be resent.
De-Select All This
de-selects all faxes that are to be resent.
Re-Schedule This posts the transactions from the *FAILED status
to the *PENDING status.
Cancel Selected This
cancels the pending fax.
This screen
provides quick view to the credit and payment history for a customer. This table is initially blank after the
initial installation of MC2. One data
line is written to this table every time the Average Days to Pay (ADP) program
is run, capturing the customer performance as of that moment in time. The data in this display will be displayed
in descending data order. Credit History
and Trend information is captured at the customer and entity levels in MC2.
Note:
While some customers have opted to run this program more frequently, it
is recommended that the ADP program be scheduled to run on a monthly basis
during off hours. (i.e. The last
calendar day or last Sunday of each month.)
The Credit
History and Trends screen can be accessed from Collection, Credit or Deduction
Management views by double clicking on an account and selecting Credit
Statisticsà Credit History and Trends.

When the Credit
History and Screen opens, the user will see a list of data lines for each time
the ADP program has been ran.
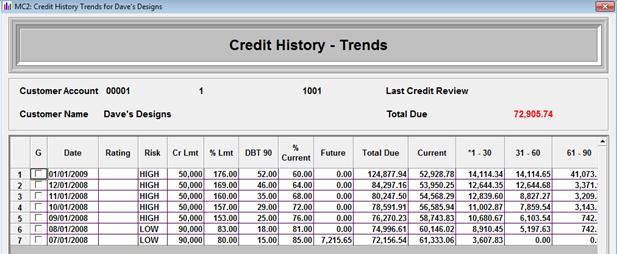
These can be
reviewed by scrolling across the screen, or compared to each other graphically
by selecting multiple data points in the “Graph?” column and pressing the Graph
Trends button:
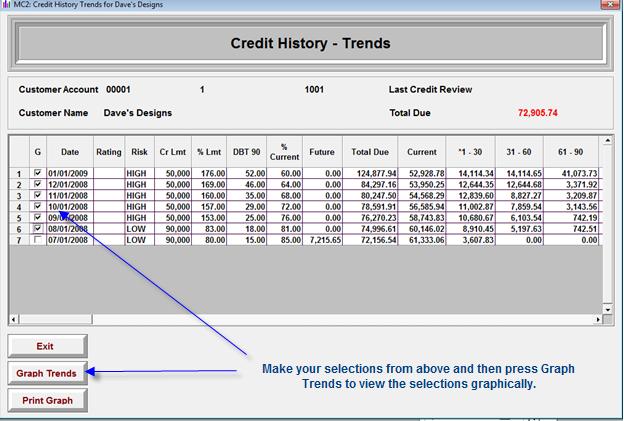
Once the Graph
Trends button has been selected, the Credit History –Trends graph will display
with options for the user to select from.
Note:
When any graphing feature is active in MC2, you will see an icon in the
task bar at the bottom of the screen for the Graphics Server.
Exit Exit
the Credit History and Trends screen completely and returns them to the main
management view.
Show Trends When in the Graphical view, this option displays and
will return the user to the data selection screen within the Credit History –
Trends screens so that they user can make new date selections.
Graph Trends When in the trends screen with the data selection view,
this option will graph the data sets selected.
Print Graph Sends the graph to the user’s
default printer.
The user can
choose to view the data as either a Bar Chart or a Line Chart by selecting
these radio dials.
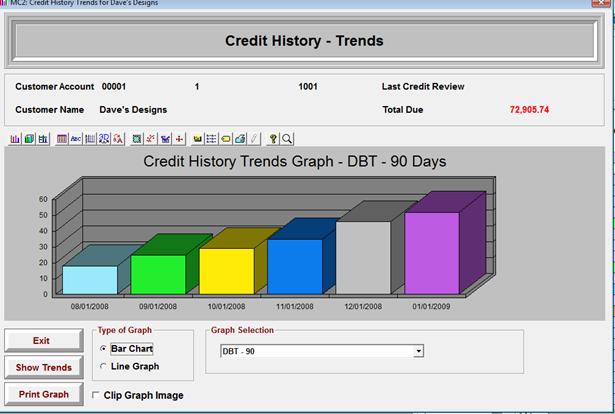
Line Graph for
the same data:
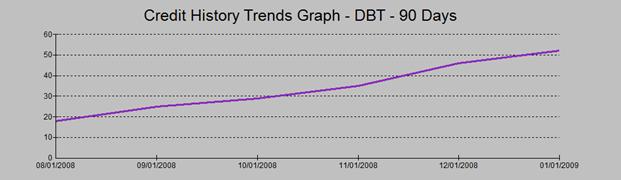
Graph Selection
From the Graph
Selection drop down listing, the user can choose select fields that are
captured during the ADP update and graph that information. Simply click the drop down arrow within this
selection to view the full list of available options:

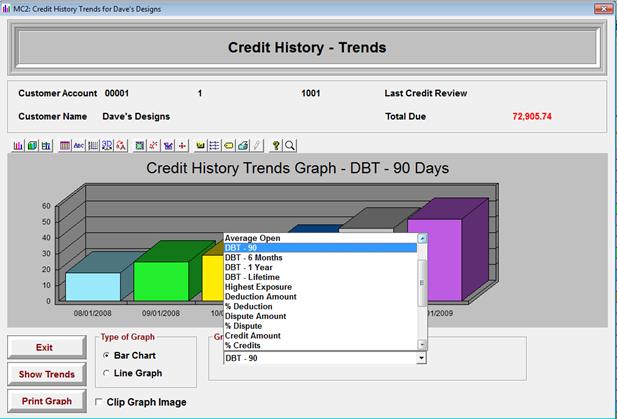
High Credit The maximum open balance
that the customer has had. (*NOTE this
is based on high balance since the implementation of MC2.)
Credit Limit Credit
limit assigned to the customer
Open Value This
is calculated as the total of open orders plus future, current, and aging
bucket receivables.
% of Limit This
is a calculated value displayed in the MC2 credit management grid. The formula
is total due (open AR plus open orders) divided by the credit limit.
Average Open This is calculated as the
average days the invoices are open (total number days open/total number of
invoices).
DBT Values All
standard DBT values are available (90 Days, 6 months, 1 year &
Lifetime). See Metrics and Calculation
sections for detail of these figures.
Highest
Exposure The
maximum AR plus open order value that customer has had. (*NOTE based on implementation date for MC2)
Deduction Amount Sum total of the items coded with a
deduction (INVTYP) code within this collection agent. Excludes collectable deduction types.
% Deductions Calculated fieldà Deduction Amount /Total Balance
Dispute Amount Sum total of the items coded with a
Dispute (INVRSN) code within this collection agent
% Dispute Calculated
field à Disputes Amount /Total Balance
% Current Calculated
field à Current Aging /Total Balance
Net Days to Pay This field is
specific to BPCS installs and is captures the Customer Average Pay Days (CAPD)
from the BPCS customer master file. (RCM)
Forecast Values All standard forecasting values
are available. See Metrics and
Calculation sections for detail of these figures.
Selecting this
option clips the graph image as it displays on the screen so that it is
available to paste into another application.

MC2 provides
several different graphical representations of aging information. Key information can be displayed by:
·
Company/agent
·
Sales
Representative
·
Customer
·
Deduction
From the main
menu bar on any of the primary views in MC2, the user can access both the A/R
Graph by Company/Agent and the A/R Graph by Sales Representative by simply
selecting the appropriate option under “Graphs”.
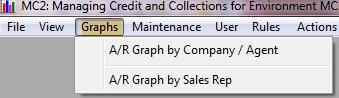
Alternatively
these can be selected from the icons located on most main management menu bars
as shown below:

This option
displays the aging information by company or collections agent. These graphs can be printed if desired. Additionally, the user can select between
percentages and type of graph
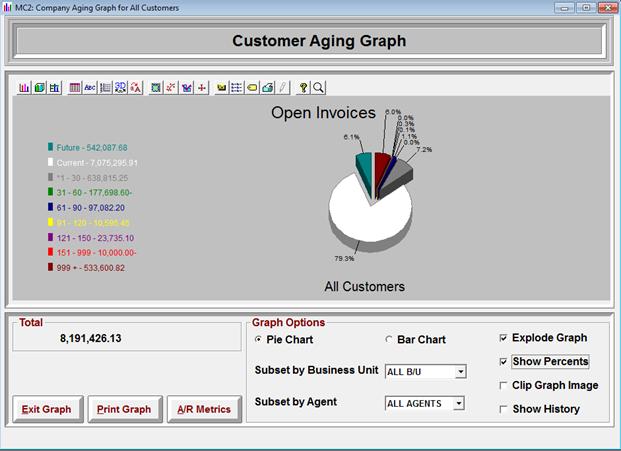
Exit Graph Allows user to
exit back to the main management view.
Print Graph Selecting this option will send the clip
graph image to the user default printer.
Note the user will be prompted as to whether their default printer is
color printer.
From the Company
AR Graph in MC2 it is possible to generate a display/report that provides high
level customer level metrics. This
information is calculated live time at the time that the AR Metrics are
submitted to run. When the Executive
Dashboard is installed, this screen will also provide a cash forecasting
mechanism based on how your customers have historically been paying you on your
clean receivables.
For full details of all
columns/field calculations included in the A/R Metrics, please see the Metrics
and Calculations section of this manual.
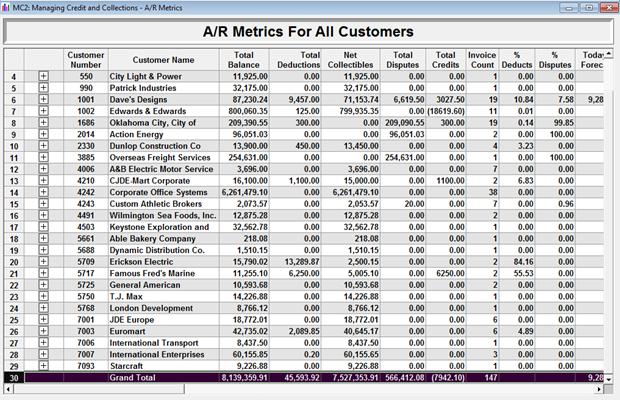
Subset by Co/BU Displays the aging for each
Company or Business Unit
Subset by Agent Displays the aging for
each Collections Agent or All Agents
Pie Chart Displays pie
chart of customer aging data
Bar Chart Converts chart
to bar chart
Explode Graph Available option when a pie chart is selected
- Explodes the pieces of the pie chart for better visibility. (see above)
Rotate Chart Available option when a bar chart is
selected – Rotates the graph slowly a full 360 degrees when selected. Uncheck
the radio dial at any time to freeze the graph at a specific angle.
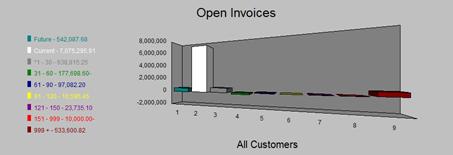
Show Percents Converts from currency
to percentage view
Clip Graph Image Selecting this check box copies the graph to the
clip board so that it may be pasted to a document or presentation
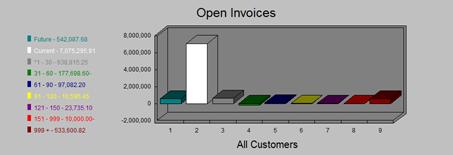
This option is
only available at the company level (ALL AGENTS).
Using key
performance metrics, you are now able to gain a historical graphing perspective
at a company level. Data is captured
each time the ADP program is ran and stored for historical trending. Once the Show History radio dial is
selected, the available dates will be displayed at the bottom of the
graph. Select the desired dates and the
metrics option in order to see the graphical representation.
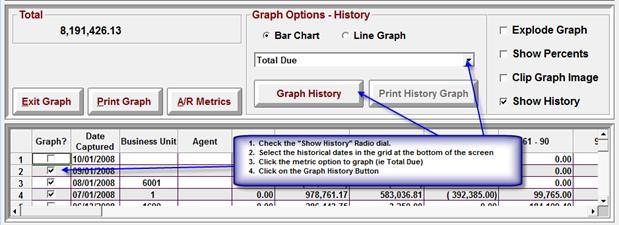
You can toggle
between line charts and bar charts when reviewing historical information.
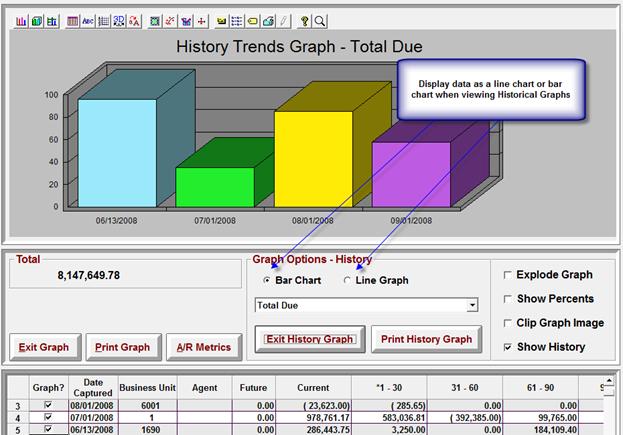
This option
displays the aging for all customers for a specific sales representative. Sales Rep Graph is now available at summary
and detail level. Selecting a different
representative refreshes the graph to display that sales representative
information. These graphs can be printed
if desired. Additionally, the user can
select between percentages and type of graph
Sales
Rep Graph is now available at summary and detail level.
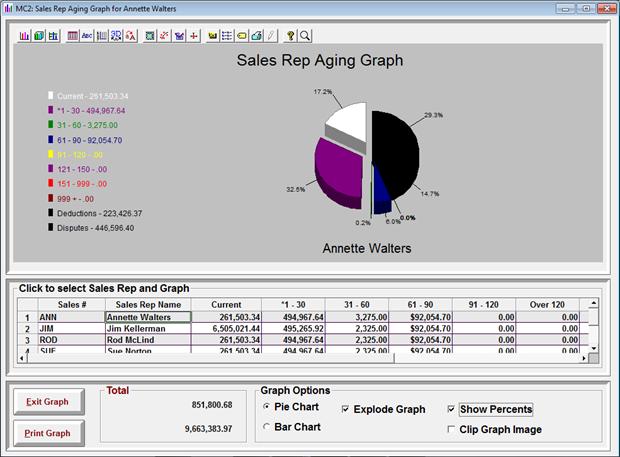
Pie Chart Displays pie
chart of sales rep aging data
Bar Chart Converts chart
to bar chart
Explode Graph Available option when a pie chart is selected
- Explodes the pieces of the pie chart for better visibility. (See above)
Rotate Chart Available option when a bar chart is
selected – Rotates the graph slowly a full 360 degrees when selected. Uncheck
the radio dial at any time to freeze the graph at a specific angle.
Show Percents Converts from currency
to percentage view
Clip Graph Image Electing this check box
copies the graph to the clip board
Simply double
click on a sales rep and select “Sales Rep Aging” from the drop down menu as
shown below:
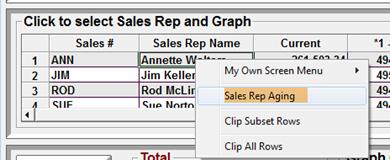
The Sales Rep
Aging Summary will open and display a full list of customers that are linked to
that sales representative. To view the
transactions that make up a specific customer balance simply double click on
that account and select the View Open Invoices option from the pop-up menu.
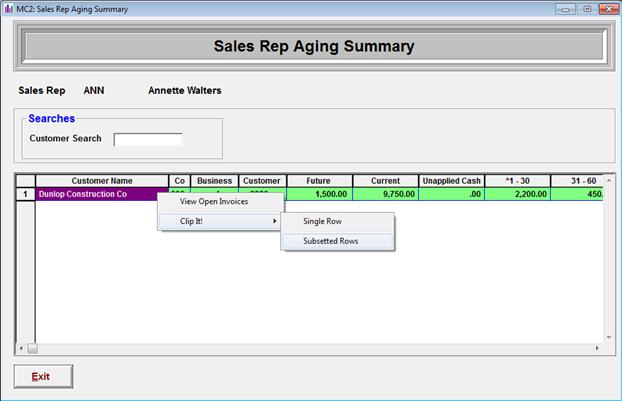
To create a Sales
Rep detail aging report, select Clip It! à Subsetted rows and past into Excel.
The customer
graph options are almost identical to those available at the company
level. However, the method of accessing
the graph is different. To access a
customer level graph from any of the main management view, double click on the
customer and select View à AR Graph from the MC2 Pop-Up menu.
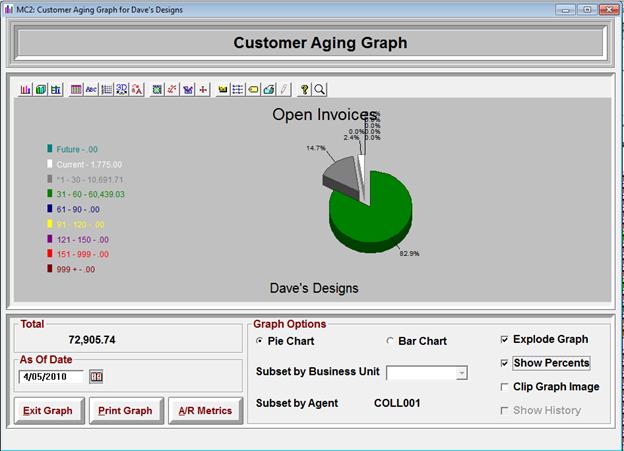
The Show History
option is disabled at the customer level.
For more detailed views at the customer level, please reference the
Credit History and Trends.
The Aging graph
is available at customer or entity level; however the A/R Metrics are only
supported at the customer level.
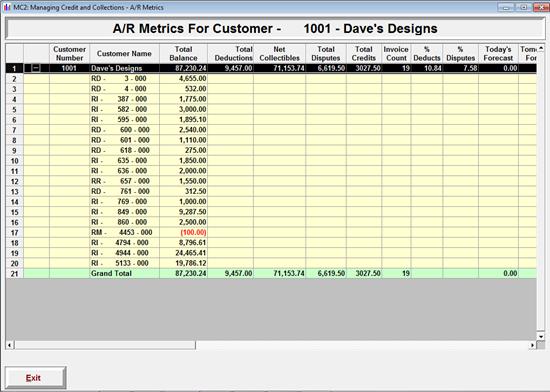
The deduction
aging graph can be accessed only if MD2 has been unlocked in the configuration
master. To access this graph open the
deduction management view and select the Deduction Graph icon on the menu bar
at the top of the screen.

Click on any
deduction code line to see a graphical representation of the aging for that
deduction type. For example the graph
below shows the PD – Price Discrepancy aging:
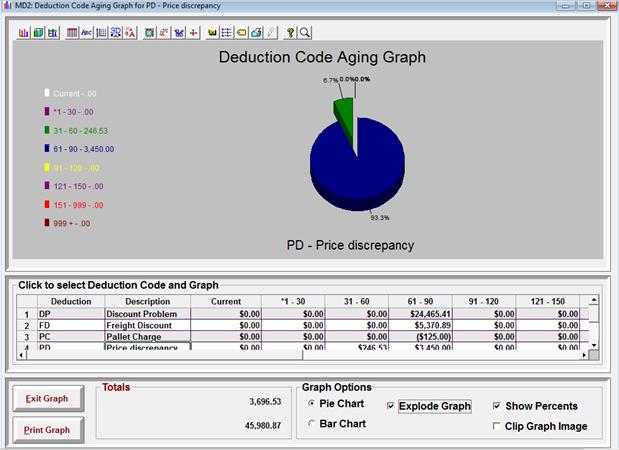
Click on the
Total Deductions line to see the aging for all deduction types consolidated.
Pie Chart Displays pie
chart of deduction code aging
Bar Chart Converts chart
to bar chart
Explode Graph Available option when a pie chart is selected
- Explodes the pieces of the pie chart for better visibility. (See above)
Rotate Chart Available option when a bar chart is
selected – Rotates the graph slowly a full 360 degrees when selected. Uncheck
the radio dial at any time to freeze the graph at a specific angle.
Show Percents Converts from currency
to percentage view
Clip Graph Image Electing this check box
copies the graph to the clip board
Release 6.0 of MC2 provides a wealth of easily accessible information and
metrics to help both collectors and credit management analyze and manage their
portfolios. This document provides an
overview of the metrics that are currently available within the product, and
how this information is calculated.
Please note that some of these metrics are only fully active and
available for view if the Executive Dashboard module has been activated on your
system, and your maintenance tables updated appropriately.
New Metrics
fields added to Collections Agent List by Agent to help you track collection
progress. This information is accessible
to those with administrative authority from any of the main management screens
in MC2 by selecting “Maintenance” à “Collection Agent”.
The screen that
will display is drag and drop customizable so that you can organize your data
based on personalized business needs.
These fields are
updated nightly when the update program is run, and are captured in history every calendar month end when the
MC2ADP program is ran. By simply
clicking the “+” next to Agent ID, it is possible to see historical information
and to graph that data over time.
An example of this can be seen below where several data points were
selected for agent COLL001 to review:
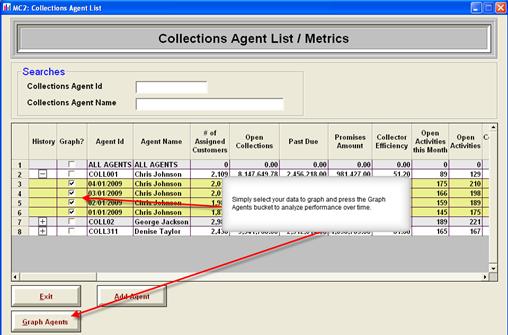
Once the data date selections were made, the information is ready to pull
in to the graphs for analysis. (Note –
Available fields may vary by ERP)
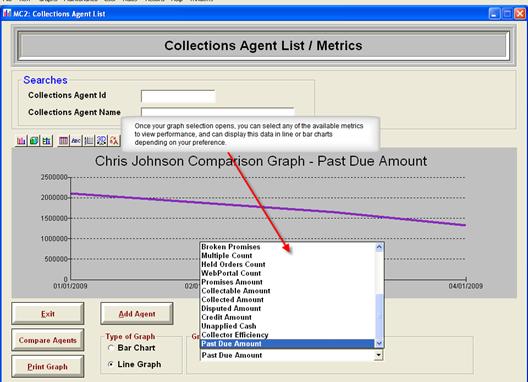
Agent ID as
defined in Collection Agent Maintenance
Agent Name
Agent Name as defined in Collection Agent Maintenance
Email address as defined in the Collection Agent Maintenance
Count of the customers assigned to that Agent ID – based on customers
with non-zero balances
Total due balance for assigned customers including both clean and dirty
receivables.
Sum total of past
due balance on account. Includes full balance of clean receivables past
due.
Sum total of the items coded with a deduction (INVTYP) code within this
collection agent. Excludes collectable
deduction types.
Sum total of the items coded with a Dispute (INVRSN) code within this
collection agent
Sum total of all transactions with a remaining credit balance.
Sum total of the unapplied cash (RU transaction type) within this
collection agent. {May vary in
availability based on ERP}
Collectable
Amount is accumulated Net Receivables MINUS the future bucket
Accumulation of
the customer extension level received amount. (CUSRCVAMT) This is a total of
amounts received against open transactions in the database – essentially the
amount received against partially paid invoices.
Total amount
received for the month for open transactions on accounts assigned to the
collector ID.
Note: The
month to date field used is invoice date by default unless G/L date if
specified in implementation.
Count of the # of open activities for that collector during the month. This will be a cumulative count of all
activities with an activity creation for the calendar month.
This is a cumulative count which is updated as part of the nightly
program, and the value is resets each calendar month end.
Summary count of all activities (A, N, D, E, R, L, P, M, H, W) for agent
as of the nightly update.
Summary count of all activities open for assigned agent. This count includes the following activity
types: A=Activities, N=Notes, D=Deductions.
Summary count of all Email activities (E) open for assigned agent.
Summary count of all Rules activities (R) open for assigned agent.
Summary count of all Letter activities (L) open for assigned agent.
Summary count of all Promise activities (P) open for assigned agent.
Summary count of all Multiple Follow up activities (M) open for assigned
agent.
Summary count of
all Order Hold activities (H) open for assigned agent.
Summary count of all Web Portal activities (W) open for the assigned
agent. (Requires MC2 Web Portal)
Sum total of open promise values for customers assigned to this agent as
of the nightly update program - only takes into consideration (P) type
promises.
Count of "P" type activities in which the follow up date has
past.
Calculated field for collection efficiency bases on industry standard
metric as shown below:
Beginning Receivables +
(Credit Sales/N*) - Ending Total Receivables
Beginning Receivables + (Credit Sales/N*) - Ending Current Receivables X 100
The denominator
is = (AgtBegAmt + AgtNetAmt – Accumulated Current Balance (ie CUSRAAGEC) per
Agent)
The numerator is
= (AgtBegAmt + AgtNetAmt – AgtEndAmt)
AgtBegAmt is the
total balance at the beginning of the month where Day = 01 (this is measured
using nightly update program due to the fact that the ADP program may not be
scheduled on first day of month)
AgtNetAmt is the
accumulation of customer’s net receivables in total per agent/multiple
customers
AgtEndAmt is the
total balance at the end of the month when ADP program is run – total of net
receivables per agent/multiple customers.
From the Company
AR Graph in MC2 it is possible to generate a display/report that provides high
level customer level metrics. This
information is calculated live time at the time that the AR Metrics are
submitted to run. When the Executive
Dashboard is installed, this screen will also provide a cash forecasting
mechanism based on how your customers have historically been paying you on your
clean receivables.
The AR Metrics is
available to run/download at the entire company level or at an individual
customer level only at this time. At the
same time that the display is generating, the information is being written out
to the Clip Board for easy availability to copy into excel for reporting
purposes.
You can
access/run the AR Metrics via the Aging graphs in MC2. For example, to get the company level A/R
Metrics, simply launch the Company AR Graph and select the “A/R Metrics” button
as shown below:
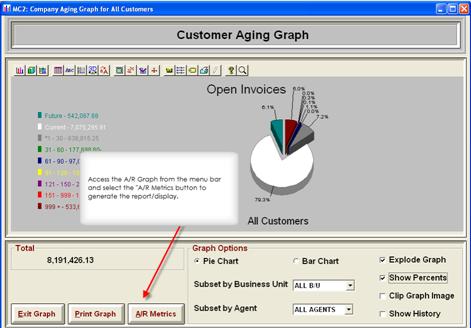
NOTE: As this data will be reflected for all
customers in the database, this may take several minutes to run, and will need
to complete prior to the MC2 session being available to do other activities.
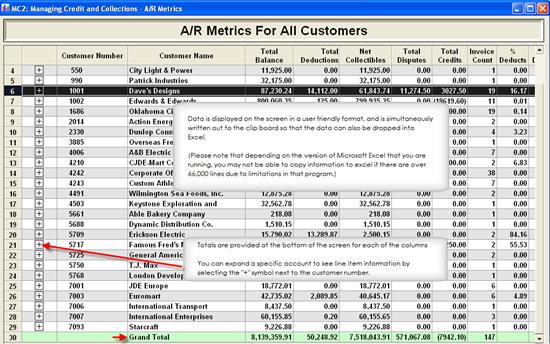
Customer Number Customer number associated with account
in ERP
Customer Name Customer alpha name pulled direct from
ERP
Total Balance Sum total
due from customer - includes clean and dirty receivables
Total Deductions Total of all
transactions with a deduction (INVTYP) code assigned to them. Excludes any collectable deduction types
Net Collectables The net
collectables total includes all transactions with a blank invoice type
(INVTYP), plus any items that are coded with a collectable invoice deduction
type
Total Disputes Total of all
transactions with a dispute code (INVRSN) assigned to them.
Total Unapplied Cash Total of the
"RU" transactions open on the account {Availability may vary by ERP}
Total Credits Total
credit balance transactions open in the system.
Invoice Count Count of all transactions that are open on the
account - includes invoices, deductions, credit memos, etc.
% Deducts Calculated
field -> Deduction Amount /Total Balance
% Disputes Calculated
field -> Disputes Amount /Total Balance
% Credit Calculated
field -> Credit Amount/ Total Balance
% Unapplied Calculated field ->
Unapplied Cash / Total Balance
Today's Forecast* Cash
flow forecast. Using historical payment
trends (DBT 90) MC2 forecasts the expected cash receipts due from customers
today. This is factored by applying the
DBT 90 average to the due date of all clean receivables open in the database,
and filtering this further for any transaction promise dates.
Tomorrow's Forecast* Cash
flow forecast. Using historical payment
trends (DBT 90) MC2 forecasts the expected cash receipts due from customers
tomorrow. This is factored by applying
the DBT 90 average to the due date of all clean receivables open in the
database, and filtering this further for any transaction promise dates.
Forecast Next 7 Days* Cash
flow forecast. Using historical payment
trends (DBT 90) MC2 forecasts the expected cash receipts due from customers in
the next 7 days. This is factored by
applying the DBT 90 average to the due date of all clean receivables open in
the database, and filtering this further for any transaction promise dates.
NOTE:
the data that is forecasted today and tomorrow is also by definition
included in the next 7 days total.
Next 30 Days* Cash flow
forecast. Using historical payment
trends (DBT 90) MC2 forecasts the expected cash receipts due from customers in
the next 30 days. This is factored by
applying the DBT 90 average to the due date of all clean receivables open in
the database, and filtering this further for any transaction promise dates.
NOTE:
the data that is forecasted in prior forecasting buckets will also by
definition included in the next 30 days total.
Forecast > 30 Days* Cash
flow forecast. Using historical payment
trends (DBT 90) MC2 forecasts the expected cash receipts due from customers in
greater than 31 days. This is factored
by applying the DBT 90 average to the due date of all clean receivables open in
the database, and filtering this further for any transaction promise dates.
* Please see more detailed information on cash forecasting components
and DBT calculations listed in the
following sections.
Also note that with the exception of the
Invoice Count, all of the fields that are available in the AR Metrics are also
available on the Collection Management screen:
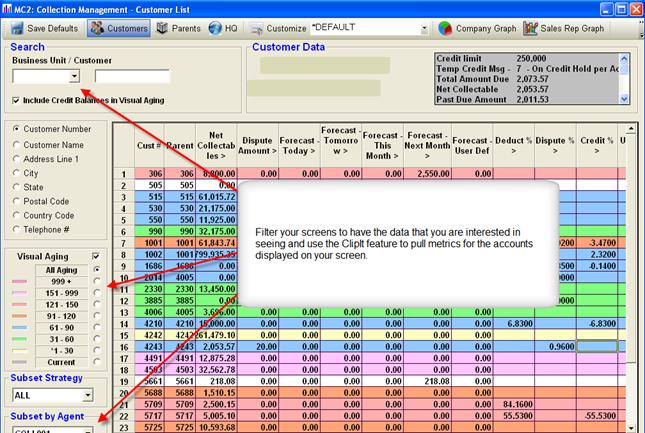
This allows you to customize the data that
you see by additional filters such as:
·
Agent
·
Strategy
·
Business
Unit
·
Visual
Aging category
You can copy the data on the collection
management screen to excel quickly by selecting “Clip It!” à “All Rows” from the drop down menu.
For large selections this may take some time.
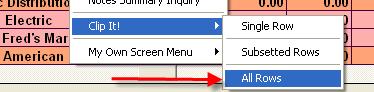
Cash forecasting in MC2 is a predictive measurement which allows quick
view of expected cash receipts for upcoming time periods. To most accurately calculate when money will
be received from a customer, it is key to look at how that particular account
has been historically been paying their open items. Identifying payment trends on a customer by
customer basis is time intensive process when undertaken manually. MC2 provides this information via days beyond
terms trending which is calculated for all customer accounts at month end as
part of the ADP program that captures credit history and trends.
In addition to payment trend, it is also important to filter out the
noise that may exist in the A/R. This is
accomplished easily in MC2 by allowing the filtering out of dirty receivables
(deductions/disputes) to occur, and by considering any hard promises that have
been received via collection actions.
In its simplest form:
Cash
forecasting in MC2 is calculated by applying the average DBT 90 to all open,
positive value clean receivables which have an expected receipt date greater
than or equal to the current date.
In order to fully understand this calculation it is important to define
the individual parts.
DBT 90 The DBT 90
calculation is provided in more detail in the next section. However, this is the average days past the
due date that the customer has historically been paying transactions. To calculate this, MC2 looks at the valid
transactions with a paid date in the last 90 days and averages these together.
Expected Receipt
Date This is the date that MC2
assigns to all transactions in the system, and is the date that payment is
expected to be applied to the transaction.
The expected receipt date is calculated against all transactions in the
database – both clean and dirty.
- To establish an expected receipt date, the
system first applies the DBT 90 average for the customer and applies that
against the due date for all open transactions. (Please see DBT 90 Definition in section below)
- If there is
a promise to pay activity that has been attached to an invoice, the
promise date that is associated with that activity will override to the
expected receipt date in the nightly update.
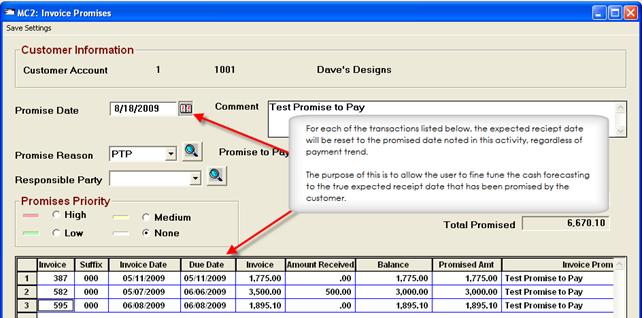
Note: It is possible for a
transaction to have an expected receipt date that is in the past, if the money
was not collected. Transactions with
expected receipt dates in the past are not picked up in the cash
forecasting. I would require a promise
to pay transaction to be posted to these transactions to make them eligible to
be included in the cash forecasting again.
Clean
Receivables For
forecasting purposes, clean receivables are the collectable transactions only.
(Deduction (INVTYP) code is blank or set to a collectible deduction type
code. Invoice Dispute (INVRSN) code is
blank.)
Note: The deduction type codes in MC2 are
maintained in the table maintenance, and as part of the Release 6.0
implementation it is key to review the deduction types that are in use and
determine whether the business dictates that these are considered clean or
dirty.
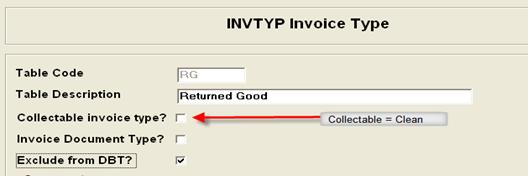
For
example: If there is a code established
for items being paid in installments, you may wish to consider invoices coded
with this code as a clean receivable.
Simply check the collectable invoice type box on that code, and all
transactions that have this code associated with them will be considered a
clean receivable.
Days Beyond Terms
At a transaction
level, this is exactly that – how many days beyond the terms of the transaction
the customer has paid.
If the
configuration master is set to aging by due date, the Days Beyond Terms (DBT)
calculation at the transaction level in MC2 is calculated based upon the number
of days past the transaction due date that payment is received. Conversely, if the configuration master is
set to age by invoice date, this calculation will be the number of days from
invoice date to date paid.
DBT at the
transaction level is calculated for all transactions in the data base
(invoices, debit memos, credit memos, deductions, charge backs, etc.) on a
nightly basis.
DBT Averages are calculated in MC2 at as part of the monthly ADP program
which generates the credit history and trends records. {Note:
It is highly recommended to run the ADP program at the end of each
calendar month.
The DBT calculation can be customized to include or exclude deductions
depending on the implementation. This
does not require Cforia programming to customize. This is now controlled by a flag on the
deduction (INVTYP) code, and can be changed for the next ADP run at any time by
an MC2ADMIN.
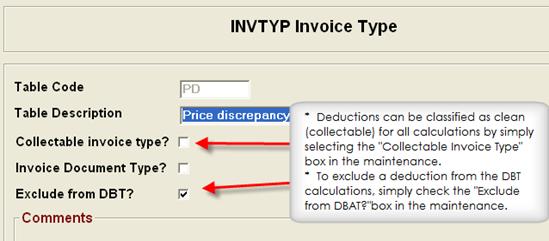
DBT averages are calculated at both the customer and entity levels,
depending on the ERP.
DBT 90 days is calculated a little differently than the other DBT
categories. This change has been
implemented as part of the Release 6.0 implementation as a direct result of the
need to manage degradation in payment trends more closely. This new calculation helps to identify
slippage in payment trends when there are customers that have stopped making
regularly scheduled payments.
The DBT 90 calculation as it is defined here is the same calculation that
is factored into the cash forecasting logic.
DBT 90
Calculation Calculated in
the ADP program at month end. This is
the average DBT for all eligible receivables paid within the last 90 days
If
there are no payments in history for the last 90 days (or if the DBT 90 is exactly zero) the system will look at the
average real age of the open transactions.
If the average real age is >0, this will be entered into the DBT90
field.
Calculated in the
ADP program at month end. This is the
average DBT for all eligible receivables paid within the last 180 days
Calculated in the
ADP program at month end. This is the
average DBT for all eligible receivables paid within the last 365 days
Calculated in the
ADP program at month end. This is the
average DBT for all eligible receivables paid in history. (NOTE:
History transactions in MC2 are stored for as long as they are available
in your ERP system.)
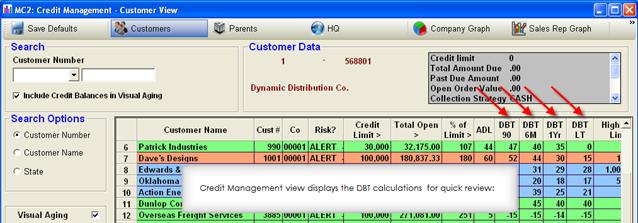
NOTE: When trying to tie out
the DBT calculations in the system, remember that this is calculated at the
time the ADP program is run. You will
want to use that date to calculate from.
For example if I wanted to calculate the
DBT 1 year for an account and my ADP program ran on 12/22, I would want to look
at payments received for the 364 days prior to 12/22. Also remember to exclude transactions that
were marked as ineligible based on document or deduct type.
Number of days
old an invoice is calculated from the due date. The age days for an invoice
created today with net 30 day terms will be –30. The age days will be equal to
zero when the invoice is due.
In open invoice views, this is the number of
days an invoice is open calculated from the invoice date.
In invoice
history this is the number of days from invoice date to payment date.
The high credit
limit that the customer has been assigned.
The maximum open
balance that the customer has had. This
information is captured at the time of the nightly update program. (*NOTE
this is based on high balance since the implementation of MC2.)
The maximum AR
plus open order value that customer has had. .
This information is captured at the time of the nightly update
program. (*NOTE based on implementation date for MC2)
Field on
collection management screen which counts the number or collection notes and
activities that have been posted this account during the course of the month.
This is a
calculated value displayed in the MC2 credit management grid. The formula is
total due (open AR plus open orders) divided by the credit limit.
Calculated column
on the Deduction Management View that provides deduction line as a % of the
total customer outstanding balance. Calculation is: sum total $ for that deduction code / the
total open customer balance.
Calculated column on the Deduction Management View that provides
deduction line as a % of total customer deductions for that account. Calculation
is: sum total $ for that deduction code
/ the total open deductions for the account.
In open invoice
views, this is the number of days old an invoice is - calculated from the due
date. The real age for an invoice created today with net 30 day terms will be
–30. The real age will be equal to zero when the invoice is due.
-A-
Accumulator Bucket Each accumulator bucket is the amount due for that
period (days late) plus all of the other later buckets. For example,
“Accumulator Bucket 3” represents the amount due for the 3rd aging
bucket plus all older aging buckets. If
the 3rd aging bucket in the configuration master is equal to “61-90
Days past due”, then “Accumulator Bucket 3” represents all balances 61 days
past due and older.
Activities View The master list of activities for all
customers, collectors, open and in history.
Accessed from main tool bar on all panels except Snap Shot!
Activity (Reminders) An
action item related to a customer, entity and/or an invoice. Once created, the activity will remain open
until manually tagged as complete. It
can be created manually or from the rules engine. It contains text, priorities, follow-up dates
and times, date and time stamp of who created it and any individual that it is
assigned to. It can be accessed from the
standard MC2 pop-up menu.
Activity History When an activity has been tagged as complete,
it is moved to the activity history file.
The activity history can be viewed from the Activity Management screen
when the Historical Activities filter button is selected.
Activity Reason Code Reason code associated with
activity. This is used to track types of
customer interactions. The master list
is managed in the table code maintenance from the main tool bar.
Activity Type A single character field that references
the type of activity that has been generated.
The most commonly used ones are listed below:
A = Activity Follow Up
(Actionà Add Activity or Invoice Activity)
N = Notes Activity Follow Up
D = Deduction Note Follow Up
E = Email Follow Up
R = Rules Generated
L = Letter Generated
P =
Promises Activity
ADP Program The ADP program (MC2ADPXXX) is ran at the
end of each calendar month and is responsible for the calculation of the DBT
totals in MC2 and the capture of key information for metrics and trending.
Age Days Number
of days old an invoice is calculated from the due date. The age days for an
invoice created today with net 30 day terms will be –30. The age days will be equal to zero when the
invoice is due.
All Agents This
is a reserved word in MC2 that represents the total group of collectors. Any panel subset by this value will display
all records
All Anylst This
is a reserved word in MC2 that represents the total group of credit/deduction
analysts. Any panel subset by this value
will display all records.
Application Security The maintenance feature which
allows a user to sign into MC2, and grants authority to different available
functions. Access to this maintenance is
restricted to those with MC2 Administrator authority.
Assigned To An internal stakeholder of the
organization that is responsible for working with the agent or analyst on
resolving open activities. The master assignee list is maintained in Activity
Assignment Personnel from the maintenance menu option on the main tool bar.
At-A-Glance A high-level customer summary that
includes aging data, credit data and user definable fields. This can be at the customer, entity or headquarters
level depending on ERP.
Auto Post Activity Refers to the ability to systematically post the
output of a sub rule. In order for this
feature to be active, the sub rule must have the “Review Rules Output?” radio
dial unchecked.
Avg Days Open An average days past invoice date for all the
open invoices for a customer.
Average Open This is calculated as the average days the
invoices are open (total number days open/total number of invoices). CUSAVEOPN in MC2CUEPF
-B-
Broken Promise Any Promise to Pay activity (P) that has past
the scheduled follow up date.
Build Date Located
under HelpàAbout Cforia Software under any main
management view in MC2, the build date
identifies the last time the MC2 application has been updated on a given
PC. This will be displayed in similar
format: Release 6.0 ERP as of April 8,
2010.
Business Unit A key field pulled direct from the source
ERP which classifies customers and invoices based on the company or business
unit defined.
-C-
Collectable Amount Collector Metric located under Maintenance à Collection Agent. Collectable Amount is accumulated Net Receivables
MINUS the future bucket
Collected Amount Collector Metric located under Maintenance à Collection Agent. Accumulation of the customer extension level
received amount. (CUSRCVAMT) This is a total of amounts received against open
transactions in the database – essentially the amount received against
partially paid invoices.
Collected - MTD Collector Metric located under Maintenance à Collection Agent. Total amount received for the month for open
transactions on accounts assigned to the collector ID.
Note: The month to date field used is invoice date
by default unless G/L date if specified in implementation.
Collection Note A customer-level note relating to collections
activity. Activities can be generated
from collection notes if the collector sets the follow up date to any future
date. Priorities can be assigned to collection notes and activities. These notes are accessible via any standard
MC2 pop-up menu.
Collection Strategy A logical grouping of customers for the purposes of
collections. The master list is managed through the table code maintenance menu
from the main tool bar. The collection strategy is assigned to the customer,
entity or headquarters via the extension file maintenance.
Collections Agent The individual responsible for a customer’s,
entities or headquarters collections activities. Each customer/entity/headquarter must be
assigned to a Collections Agent. That can be accomplished through extension
file maintenance. Mass customer
assignment to collections agents can be accomplished through the assignment
engine accessed through the Collection Agent Maintenance in the main tool bar.
Collector Efficiency See Collector Metrics. This
is a calculated field for collection efficiency bases on industry standard
metric as shown below:
{Beginning Receivables + (Credit Sales/N*) - Ending Total Receivables}
/ {Beginning Receivables + (Credit Sales/N*) - Ending Current Receivables X
100}
Collector Metrics When the Dashboard is unlocked the Collector
Metrics can be viewed by selecting Maintenanceà Collection Agent from any of the main
management views. This view captures,
tracks and graphs collector performance over time.
Combo Box A drop down menu
within MC2.
Commit Window The number of days out that MC2 uses to
calculate total amount due. All orders that are outside of that value are
excluded from the calculation. This is
very helpful when dealing with long lead-time orders. It is updated through customer extension
file maintenance.
Company AR Graph Displays aging by company or collections agent. It
is accessed from the Company AR Graph option on the tool bar.
Configuration Master This file sets the Global
Configuration settings including the aging for MC2, aging for MD2, color
preferences, faxing and email configuration settings for MC2 and can be
accessed only by those with MC2 Administrator.
Consolidate Sub Rule This radio box is a new feature to
MC2 6.0 and higher. If the consolidate
Sub Rule radio box is checked, the system will read through the lines returned
by the Sub Rule and only display the most severe action.
Consolidation Code The consolidation code assignment is not used in all
MC2 implementations. The most common use
of this field is to group customers together that may be part of a separate
company or division that require separate letter head or verbiage on all
documentation.
Contact One
or more contacts associated with a customer, entity or headquarters. It can be accessed from the standard MC2
pop-up menu.
Credit/Deduct Analyst Person, who is not a collector, and
is responsible for customer’s credit or deductions. There is a global tailoring option in the
Company Master File Maintenance from the Maintenance option on the main tool
bar. If the Subset Credit Grid by Credit
Analyst is selected, the credit grid will be subset by Credit Analyst instead
of Collections Agent. This is to be
enabled only for companies who have different people responsible for
credit/deductions and collections.
Credit History and Trends A history of the credit and payment
history for a customer. This table is blank after the installation. One record is written to this table every
time the Average Days to Pay program is run.
It is accessed from the Customer and Credit Grids by selecting a
customer and then selecting that option.
Credit Limit The credit limit
defined in the ERP accounting system.
Credit Rating A table code file that defines a
companies, entities or headquarters credit rating. It is managed through the table code
maintenance from the maintenance option on the main tool bar. It is assigned to
customers/entities/headquarters through extension file maintenance.
Often times this field is defined through an inquiry to a reporting agency like
D & B. That option can be accessed
from the standard MC2 pop-up menu.
Credit Risk The risk associated with conducting
business with a customer, entity or headquarters. This user definable field differs from the
Credit Rating in that it defines your trading relationship and not what is
reported to external agencies. It is
assigned to customers, entities and headquarters through extension file
maintenance. That option is accessed
from the standard MC2 pop-up menu.
Credit View A main panel of MC2 which displays
customers, entities or headquarters credit data. It is subset by Credit Risk and Collections
Agent (or Credit Analyst depending on Company tailoring). It is accessed from the View option on the
main tool bar.
Customer AR Graph A graphical view of customers aging data. Clicking on the graph will drill down into
the invoices that make up that aging bucket.
It can be accessed from the standard MC2 pop-up menu.
Current Exposure This calculation is the total AR plus the open
orders on the account as of the nightly program update.
Customer Extension File This is the customer master file for
MC2. All customer codes, collections
agents, credit analysts and default contacts are assigned through this
file. It can be accessed from the
standard MC2 pop-up menu.
Customer Note High level customer notations often used for
storing credit related customer information. They can be accessed from the
standard MC2 pop-up menu or from within the Snap Shot view by double clicking
in the collections notes quadrant and selecting to toggle to customer notes.
Customer Statement An MC2 customer statement report. It is initiated
through the standard pop-up menu.
Customer View This grid displays
customer, entity and headquarters aging information. It is the main aging inquiry screen. It is accessed via the view option on the man tool bar.
-D-
Date Stamp The date of a
transaction within MC2.
Days Open The
number of days an invoice is open calculated from the invoice date.
Days to Pay In invoice history this is the number of
days from invoice date to payment date.
DBT Days
beyond terms. MC2 calculates this based
upon the number of days past the invoice date if we are aging by invoice date,
or by due date if we are aging by due date.
DBT 90 Calculation Calculated in the ADP
program at month end. This is the
average DBT for all eligible receivables paid within the last 90 days
If there are no payments in history for the last 90 days (or if the DBT 90 is exactly zero) the
system will look at the average real age of the open transactions. If the average real age is >0, this will
be entered into the DBT90 field.
DBT 6 Months Calculated in the ADP program at month
end. This is the average DBT for all
eligible receivables paid within the last 180 days
DBT 1 Year Calculated
in the ADP program at month end. This is
the average DBT for all eligible receivables paid within the last 365 days
DBT Lifetime Calculated in the ADP program at month
end. This is the average DBT for all
eligible receivables paid in history.
(NOTE: History transactions in
MC2 are stored for as long as they are available in your ERP system.)
Default Contact The primary contact for this customer, entity
or headquarters. It can be updated in either contact maintenance or extension
file maintenance.
Deduct Amount Column on collection management which provides
a sum total of all transactions that are coded with a deduction type (INVTYP)
code.
Deduction/Dispute Note Available with MD2 installed, this
option allows the user to create a transaction level note with or without a
follow up activity.
Dispute Amount Column on collection management which provides
a sum total of all transactions that are coded with a dispute (INVRSN) reason
code.
Document Templates The standard set of templates that are used to create
customer letters. They are generic
templates that contain the merge fields, letter markers, and formatting of
finished letters. When the document
template is merged against a specific customer record, the customer and invoice
information are merged with the template to create a finished letter. The menu option can be accessed from the
maintenance option on the main tool bar or by selecting Actionà Generate Letter from any main management view.
Document Type A category of document templates. To access them, select maintenance from the
main tool bar and then table codes.
-E-
E-Mail Server A server which sends e-mail. MC2 uses your server to send e-mails. That
configuration is the company master maintenance.
Entity Extension File This is the entity master file
for MC2. All entity codes, collections
agents, credit analysts and default contacts are assigned through this
file. It can be accessed from the standard
MC2 pop-up menu when the entity view is selected.
Entity A
grouping of customers. The relationship of these groups is taken directly from
the customer master file in your ERP system.
Expected Receipt Date The expected receipt date is
calculated against all transactions in the database – both clean and
dirty.
To establish an expected receipt date, the system first applies the
DBT 90 average for the customer and applies that against the due date for all
open transactions. (Please see DBT 90 Definition)
If there is a promise to pay activity that has been attached to an
invoice, the promise date that is associated with that activity will override
to the expected receipt date in the nightly update.
Extension File Maintenance Generic referral to the Customer Extension
File, Entity Extension File or Headquarters Extension file
ERP system The
order entry and financial software suite that MC2 is integrated with.
-F-
Filter Options When viewing activities panels, you can
include or exclude records based upon specific criteria called filter
options. These options always appear on
the left hand side of the panel.
Follow-up Date The required date to
follow-up for an activity.
Follow-up Time The time of day planned
for follow-up on an activity.
Forecast Cash
flow forecast. Using historical payment
trends (DBT 90) MC2 forecasts the expected cash receipts due from customers
today. This is factored by applying the
DBT 90 average to the due date of all clean receivables open in the database, and
filtering this further for any transaction promise dates.
Tomorrow's Forecast Cash flow forecast.
Using historical payment trends (DBT 90) MC2 forecasts the expected cash
receipts due from customers tomorrow.
This is factored by applying the DBT 90 average to the due date of all
clean receivables open in the database, and filtering this further for any
transaction promise dates.
Forecast Next 7 Days Cash flow forecast. Using historical payment trends (DBT 90) MC2
forecasts the expected cash receipts due from customers in the next 7 days. This is factored by applying the DBT 90
average to the due date of all clean receivables open in the database, and
filtering this further for any transaction promise dates.
NOTE: the data that is
forecasted today and tomorrow is also by definition included in the next 7 days
total.
Forecast Next 30 Days Cash flow forecast. Using historical payment trends (DBT 90) MC2
forecasts the expected cash receipts due from customers in the next 30
days. This is factored by applying the DBT
90 average to the due date of all clean receivables open in the database, and
filtering this further for any transaction promise dates.
NOTE: the data that is
forecasted in prior forecasting buckets will also by definition included in the
next 30 days total.
Forecast > 30 Days Cash flow forecast. Using historical payment trends (DBT 90) MC2
forecasts the expected cash receipts due from customers in greater than 31
days. This is factored by applying the
DBT 90 average to the due date of all clean receivables open in the database,
and filtering this further for any transaction promise dates.
-G-
-H-
Headquarter Extension File This is the headquarters master file for
MC2. All headquarters codes collections agents, credit analysts and default
contacts are assigned through this file.
It can be accessed from the standard MC2 pop-up menu.
Headquarters A grouping of entity accounts. These relationships are defined in the
customer master file of the ERP system.
High Credit Date The date that the high credit limit was assigned.
High Credit Limit The high credit limit that the customer has been
assigned.
High Credit The maximum open balance that the
customer has had. This information is
captured at the time of the nightly update program. (*NOTE this is based on high balance since
the implementation of MC2.)
High Exposure Date Date of high exposure.
High Exposure The maximum AR plus open order value that
customer has had. This information is
captured at the time of the nightly update program. (*NOTE based on implementation date for MC2)
Hold Code The
reason that an open order is on hold. It
is defined and set in the ERP system.
-I-
Invoice Reason Code The reason for late payment of an invoice. It is set in the Snap Shot, View Open
Invoices, or Invoice Management Views.
Invoice Type The deduction type. It is either manually assigned to an invoice
or automatically assigned with a custom program.
-J-
Job Management Management view which is available in JDE only,
and is only active for the Construction industry.
-K-
-L-
Local Date Format MC2 supports both European and USA dating. The format is specified in company master
maintenance.
-M-
MC2 Fax A fax printer
that can be installed on a users PC and/or the MC2
Fax Server.
MC2 Fax Server A stand-alone PC that contains one or more
modems and the MC2 Fax Server software suite.
It is used for mass-faxing customer correspondence.
MC2 Pop-Up Menu MC2 has a standard pop-up menu that is displayed by
selecting any record on a main panel.
The options are essentially identical.
Once that pop-up menu is understood than the user should be able to
navigate through the entire application and conduct almost any transaction.
MC2 Web A
web based application that interfaces to MC2.
It allows sales reps and other individuals to collaborate with the
credit and collections department.
Merge Field Fields which are available for use within
the MC2 Letter Engine at both the customer and user level. When merge fields are inserted on a customer
template, they pull specific customer information from the data base into the
letter based on the customer that was selected.
Multi-Reminder A multiple reminder allows the collector to
schedule a series of follow up calls to a customer. Suggestions on use of this feature include
Payment Schedules, Escalation Follow Up, and reminders for call or statement on
specific dates.
-N-
Net Collectables The net collectables total includes all
transactions with a blank invoice type (INVTYP), plus any items that are coded
with a collectable invoice deduction type
# of Cust Touches – MTD Field on collection management screen
which counts the number or collection notes and activities that have been
posted this account during the course of the month.
-O-
Open Collections Collection Agent
Metric. Total due balance for assigned
customers
including both clean and dirty receivables.
Open Invoices View This main invoice list panel allows the review and
analysis of late invoices by type and reason code. It is accessed from the view menu option on
the main tool bar.
Open Invoices Invoices (transactions) that have open
balances. MC2 views the open invoices
from the ERP system. The behavior of
when invoices move from open to paid history is defined in the ERP system and
not MC2.
Open Order Management This main open order panel allows the
review of open orders in the ERP system.
It is accessed from the view menu option on the main tool bar.
Open Value This
is calculated as the total of open orders plus future, current, and aging
bucket receivables. CUSOPNVAL in
MC2CUEPF
-P-
Paid History Invoices which are closed in the ERP
system.
Past Due Sum
total of past due balance on account.
Includes full balance of clean receivables past due.
PDF This
is an Adobe file format that MC2 supports.
It is very helpful when sending electronic correspondence that you do
not want the recipient to modify.
% of Credit Limit: This is a calculated value displayed in the MC2
credit management grid. The formula is
total due (open AR plus open orders) divided by the credit limit.
% of Customer Balance Calculated column on the Deduction
Management View that provides deduction line as a % of the total customer
outstanding balance. Calculation
is: sum total $ for that deduction code
/ the total open customer balance.
% of Deductions Calculated column on the Deduction Management
View that provides deduction line as a % of total customer deductions for that
account.. Calculation is: sum total $ for that deduction code / the
total open deductions for the account.
Primary Contact This is the main contact for the account. While there can be multiple contacts in MC2
for each account, there can be only one primary contact. This contact is the one that will be linked
to your MC2 Letter Engine, Rules Engine and Automation (Fax, Email, Print)
options.
Note: If customer is rules eligible check the Receive Rules Output
radio dial and specify the preferred method - print, fax and/or email for the
primary contact.
Promise Activity Promise reminders are a powerful collection
follow up tool as it allows a collector to consolidate promised invoice
payments to one reminder, and manage payment effectively
-Q-
-R-
Real Age In
open invoice views, this is the number of days old an invoice is - calculated
from the due date. The real age for an
invoice created today with net 30 day terms will be –30. The real age will be
equal to zero when the invoice is due.
Reminder An
industry term for a reminder. MC2 uses the term “activity” to indicate
reminders.
Rule A
set of criteria used to interrogate the AR system. A rule is linked with a rule template to
auto-generate activities and customer correspondence.
Rules Automation The Collection Agent Automation screen is a
streamlined vehicle for managing all system identified follow up actions in a
workflow queue. Item are flagged into
the queue based on a set of predefined business rules that are set up via the
MC2 Rules Engine.
Rules Engine A set of programs that automate
collections activities. The rules engine
interrogates the AR system based upon a set of user definable rules. The engine will create activities or send
customer letters depending on user preference.
It is accessed from the rules menu on the main tool bar.
Rules Syntax This feature provides the flexibility to
allow the user to view, override and add to the standard rules group criteria
that is entered on the first tab of the rules group maintenance via a query
like override structure. This will
allow the user to drill down deeper in the database and target a very specific
subset of the customers or transactions with the MC2 rules engine.
Rule Template A pending action within the rules engine. It
can be either an activity or customer correspondence. If it is customer correspondence then a delivery
means must be defined. You can fax,
e-mail or print the customer correspondence.
-S-
Salutation The
first name of a contact that the letter engine can use to address letters. It is assigned within contact maintenance.
Snap Shot A
digital dashboard designed to manage customer relationships via 4 distinct
quadrants. It is the main collections
panel. It is accessed through the
standard MC2 pop-up menu from any of the main views.
Snooze Date Column displayed on the Collection
Management view that shows if a customer has been snoozed via the rules
automation or customer extension records.
Until this date is past, the customer is not eligible for any rules
transactions.
Snooze Horizon The snooze horizon feature allows the user to
“snooze” the number of days between which a transaction can be selected by the
rule.
For example, let’s say you have a snooze horizon of 14 days on a rule
that is ran every week. If customer
123456 is selected when the rule is ran and posted today, that customer even if
it meets the rules criteria will be skipped in the rules output when the rule
is ran the following week. It will again
be eligible for selection the following week.
Sorts MC2
can sort data in a variety of ways. Any
column label with a “>” to the right of the text is a sortable column. If you right click on the column header, it
will be sorted.
Sub Rule Sub
Rules are a new feature that has been added in MC2 version 6.0 and higher. This new tiered structure allows a single
rule to address customers with different levels of severity based on the level
of delinquency in the collection process.
-T-
Time Stamp The time of day that a record was
updated.
Total Due The
amount that the customer owes you. It is
defined as the open AR, and includes both the clean and dirty receivables.
Total Open The
sum total of both the AR balance (clean) plus the open orders on the
account. (ENEOPNVAL or CUSOPNVAL)
-U-
Update Program The nightly update program (MC2UPDTXXX) is ran
every evening after midnight and will pull in data from the source ERP and
recalculate and refresh the aging and views within MC2.
User Definable Field MC2 provides the ability to
customize the application without modifying it.
User fields can be displayed or hidden.
They can have their titles customized to meet each companies needs.
There are 15 fields that can be used at the invoice, customer, contact, entity,
activity and headquarters levels. They
are activated and maintained from the maintenance menu option on the main tool
bar.
User ID Stamp The user ID of the person who created a
transaction.
-V-
Visual Aging MC2 classifies customers and invoices by
color based upon its aging criteria. The
user can select which customers or invoices they view by selecting the
appropriate visual aging classification in any main MC2 panel. Note: On the Collection and Credit
management views, the color for a specific customer is predicated on the oldest
debit balance aging bucket.
Visual Priority Activities are classified by priority and
not by date. Activity panels and notes
are filtered by these priorities.
-W-
Web Tailoring When one of the Cforia Web portal options
have been installed, the Web Tailoring options allow the MC2 Administrator to
customize the settings for your organization.
-X-
-Y-
-Z-